Cannot connect to remote access. Setting up remote desktop access. To administer remote connections
Technical support users of your own software product, administration and control of a corporate network - all this requires remote control client computer. And the field of software products for remote access is not empty: tools are provided both by the Windows 7 operating system itself and by numerous third-party programs. Built-in tools are good for their accessibility, third-party tools have an intuitively simple interface, “tailored” for ordinary users. Having analyzed the principles of operation, the pros and cons of each method, you will be fully armed, and the network and users will be under control.
Setting up Windows 7 Remote Desktop
Remote Desktop is available in Windows 7 Premium edition and higher. You will need it if you need to work with it on computers running Windows 7 Home Edition (the cheapest), provide support for multiple remote desktops - to connect to several computers at the same time - or change the port address used by the RDP service. To do this, you will need non-trivial settings that can be made to the system using the system registry editor or third-party programs. But it is better to spend a little of your time than a large amount of money on buying a new operating system.
Remote Desktop Port
The RDP service, whose functions ensure the functionality of the remote desktop, uses port No. 3389 as standard. The likelihood of hacker attacks on this port is very high, so to increase the level of network security, the port number can be changed. Since there are no settings for this in the Control Panel, you will have to use the system registry editor.
- From the command line, run Registry Editor with permissions system administrator.
Launching Registry Editor to change the RDP port address
- In the editor window, navigate to HKEY_LOCAL_MACHINE\System\CurrentControlSet\Control\TerminalServer\WinStations\RDP-Tcp\PortNumber. A list of registry branch variables will be displayed on the right side of the window.
The required variable is hidden deep in the depths of the system registry
- From the context menu, select “Change” and enter the new port address, first making sure that the value entry mode is decimal.
Switch the number system to decimal and enter a new port address value
- Now, to connect to a computer, you will need to enter not its network name, but an address with a port number, for example, 175.243.11.12:3421.
Changing the port address from the standard 3389 to a custom one will not allow the Remote Assistance service to work on computers running Windows XP. Take this into account if you have any on your network.
Remote Desktop in Windows 7 Home Premium with support for multiple remote desktops
To encourage users to spend more money, Microsoft has severely limited the capabilities of its Remote Desktop service depending on the OS version. For example, in “Home Advanced” and below there is no ability to connect remotely at all, and in any others the number of sessions is limited to one, that is, you will not be able to connect remotely to two or more computers at the same time. The manufacturer believes that for this you should purchase a special edition server version of the system (Terminal Edition).
Fortunately, caring enthusiasts have worked to resolve this difficult problem. The result of their efforts is the RDP Wrapper Library software package. Once installed, it injects itself as an intermediary between the Remote Desktop Service (RDP) and the service manager, after which it deceives them by emulating a presence in Windows network Server Terminal Edition and including the RDP service on computers running Windows 7 Home.
The program is available for download from the author's page and is completely free. After downloading and running the installer, all settings are made in automatic mode, including making changes to firewall rules.
RDP Wrapper Library - installation is automatic
The included RDPConf.exe utility allows you to enable or disable remote access on the fly, change the number of simultaneous access sessions and the port number for accessing the RDP service.
Using Rdpwrapper you can configure remote access settings
How to allow or deny remote access
All options for allowing or denying remote access to your computer are located in the “Computer Properties” section of the Control Panel. You can enable or disable remote control in just a few steps. Don't forget that you must be logged in with an account with administrator rights to make these changes.
- Press the Win+Pause key combination to display the system properties window.
The Win+Pause keys will help enable “System Properties”
- In the left column of additional actions, click on the “Setting up remote access” link.
- In the dialog box that opens, you can following settings controls:

- It should be noted that for remote control to be possible, the user account opening such a session must have administrator rights. To enable remote control to the average user, you should add his name to the list of permissions, which can be accessed using the “Select users” button.
If the user you want to grant remote access does not have administrator rights, you can add him in this dialog box
Video: how to allow remote access to your computer
Remote Desktop Connection
Connecting to a remote desktop is very simple. Naturally, before this you need to enable all the necessary permissions on the client machine and create a list of users on it who will be allowed remote control.
- Call up a standard command line dialog and run the mstsc.exe utility using it.
Calling a remote desktop client program
- On the “General” tab, enter the name of the computer to connect in the top column of the dialog box, and the user name in the bottom column (if you need a name different from the one under which you logged in). Don't forget that the user account must have administrator rights.
Entering the computer name on the network for remote control
- In the “Interaction” tab, select the planned connection speed based on the capabilities of your network. If you find it difficult to choose settings, leave them on automatic. The system will test the channel speed and select the optimal values.
Select the channel speed based on your network capabilities
- If everything was done correctly, and remote access is allowed on the client machine, you will see a window for entering your username and password. Enter the username and password of the client machine.
- After clicking the “Connect” button, a window with the desktop of the remote PC will appear. It can be expanded to full screen and create the complete illusion of working on a client machine.
Avoid working in video modes with high resolution: This will create a heavy load on the network, and the remote PC interface will appear jerky. The ideal option is a resolution of 1280x1024 pixels and a color depth of 16 bits.
What to do if remote desktop does not work
Problems connecting to a remote computer can be caused by many reasons. Among the most common, the following should be noted:
- on the client machine, permissions to access the remote desktop and remote assistant are not enabled in the settings;
Make sure your settings allow remote access to your PC
- the account with which you are trying to access remotely does not have administrator rights;
Make sure your account have administrator rights
- your computer and the client computer are not part of the same computer working group or domain in local network;
The slave and master computers must be members of the same workgroup
- The router on the local network used by both computers is blocking port 3389, through which remote services communicate. Windows management 7;
Inclusion firewall in the router without additional settings blocks most ports
- Outgoing requests from Remote Desktop Services are blocked by the antivirus package.
The Remote Desktop Service may be blacklisted in your antivirus package
remoteapp is disabled
A message about disabling remote access often awaits the user when trying to connect to it, and a dialog box also appears that can confuse an inexperienced user.
Licensing service error will prevent you from starting a remote desktop session
Meanwhile, everything is very simple: the rights of the user who is trying to “raise” a remote desktop session are not enough to change the system registry section responsible for licensing. The error is corrected in two stages.

Why is the remote desktop slow?
Uninterrupted operation of a remote desktop access session requires a high-speed channel, the lion's share of which is consumed by the transmission of the remote desktop image itself. Depending on the operating resolution on the client machine, the traffic can be so dense that it will overwhelm the average office 100-megabit local network. But on the network, in addition to two communicating PCs, there are also clients. To prevent network collapse, the remote access program begins to reduce the number of transmitted frames (frames) per second.
If at 60 frames per second you see a smooth, smooth picture, then at 30 the interface will be displayed with noticeable jerks. Further reducing the screen refresh rate will make the work unbearable: you will not even be able to accurately position the mouse cursor on interface elements. To prevent this from happening, you should optimize how network connections slave and master computers, as well as screen settings on the client computer.

Remote access to Windows 7 components
In addition to managing a remote desktop by emulating the keyboard and mouse of a client computer, Windows 7 remote access tools also allow you to remotely run programs and system commands from the command line interface, manage the system registry and firewall, as well as restart or shut down the slave PC . It requires less network and system resources than managing a remote desktop, and can be done unnoticed by the user working at the computer.
Remote command line
For the needs of system administrators, Microsoft has developed a special service utility. By interacting with the remote access services of the operating system, it allows you to access the command line interface of any computer on the local network, run programs on it, and even remotely install programs before launching them. The utility is called PsExec and is available for free download from the official Microsoft website as part of the PSTools package.
Download the utility from the server, run it on the computer from which control will be carried out, executable file installer and agreeing with the text license agreement, carry out the installation.
Install the PSExec utility
Now you can call the utility from the command line and use the full range of its wide capabilities.
Let's take a closer look at the command syntax and Extra options launch it: psexec [\\computer[,computer2[,…] | @file][-u user [-p password]][-n s][-l][-s|-e][-x][-i [session]][-c [-f|-v]] [-w directory][-d][-<приоритет>][-a n,n,… ] program [arguments].
Table: psexec command launch options
| Parameter | Description |
| computer | Tells PsExec to run the application on the specified computer or computers. The computer name is not specified - PsExec will launch the application in local system. If instead of the computer name the asterisk character (\\*) is specified, then the PsExec program will launch the application on all computers of the current domain. |
| @file | Tells PsExec to run the application on all computers listed in the specified text file. |
| -a | The processors on which the application can run are separated by commas, with processors numbered starting from 1. For example, to run the application on processors 2 and 4, enter “-a 2,4” |
| -c | The specified program is copied to the remote system for execution. If this parameter is not specified, then the application must be located in the system folder of the remote system. |
| -d | Indicates that there is no need to wait for the application to complete. This option should only be used when running non-interactive applications. |
| -e | The specified account profile is not loaded. |
| -f | The specified program is copied to the remote system, even if such file is in remote system has already. |
| -i | The launched program gains access to the desktop of the specified session on the remote system. If no session is specified, the process runs in a console session. |
| -l | When the process starts, the user is granted limited rights (the rights of the Administrators group are overridden and the user is granted only the rights assigned to the Users group). In OS Windows Vista the process starts with a low level of reliability. |
| -n | Allows you to set the connection delay to remote computers (in seconds). |
| -p | Allows you to specify an optional password for the username. If this parameter is omitted, you will be prompted to enter a password and the password will not be displayed on the screen. |
| -s | The remote process is launched from the system account. |
| -u | Allows you to specify an optional username to log into the remote system. |
| -v | The specified file is copied to the remote system instead of the existing one only if its version number is higher or it is newer. |
| -w | Allows you to specify the working directory (path inside the remote system) for the process. |
| -x | Displays the user interface on the Winlogon desktop (local system only). |
| -priority (priority) | Allows you to set different priorities for a process:
|
| program | The name of the program to be launched. |
| arguments | Arguments to be passed (note that file paths must be specified as local paths on the target system). |
Examples of the PSEXEC utility
The procedure for working with the PsExec utility is as follows:
- Run command line another computer using the psexec \\ command<сетевое имя компьютера>cmd.exe.
- Open any program on the remote computer. If the program is not on the slave PC, it will be copied from the administrator's machine. To do this, enter psexec \\<сетевое имя компьютера>-c test.exe, where test.exe is the program to be executed remotely.
- If the program you want to execute remotely is not in the system folder, specify its full path when running the psexec \\ command<сетевое имя компьютера>-c c:\program files\external_test.exe
Video: PSTools - a set of console system administrator utilities
Remote registry
In order to be able to remotely edit the registry, you must first activate the client computer relevant services. This is easy to do if the account has administrator rights. To do this, launch the Service Manager snap-in from the command line window and select the “Remote Registry” service from the list in the main window. Click the Start button on the top control panel.
The Remote Registry service must be running on both client PCs and the administrator's computer.
Now you can connect to the registry of a computer on your local network remotely.

The registry branch of the remote PC will appear in the registry editor window and you can edit it as easily as your local registry.
Remote firewall management
Unfortunately, there is no convenient graphical tool for remote firewall management. Therefore, all manipulations will have to be performed using the command line. First you need to connect to the remote PC using the Telnet service. If the Telnet client is not installed, you need to add it through Add/Remove Windows Components.

Now you need to establish a communication session with a remote computer via the telnet protocol.

Once the connection is established, you can remotely manage the firewall on the remote computer using the netsh command. The following commands will be available to you:
request firewall rules. To figure out Windows configuration Firewall on a remote PC can be done using the command netsh advfirewall firewall show rule name=all;
enable or disable the firewall with the commands “netsh advfirewall set allprofiles state on” and “netsh advfirewall set allprofiles state off”;
return to default settings using the netsh advfirewall reset command;
opening a port is perhaps the most common task that will need to be performed. For example, you can open port 2117 for a torrent client to work like this: netsh advfirewall firewall add rule name="Utorrent rule" dir=in action=allow protocol=TCP localport=1433;
allowing incoming and outgoing requests to an arbitrary program using netsh advfirewall firewall add rule name="Allow Miner" dir=in action=allow program="C:\Bitcoin\miner.exe";
allowing remote management using the Windows console: netsh advfirewall firewall set rule group= “remote administration” new enable=yes.
After completing the necessary settings, do not forget to close the session Telnet command quit.
Remote reboot
The standard OS shutdown command allows you to shut down or restart any computer on the local network if it has permissions configured for Remote Assistance and Remote Desktop. From a command prompt window, run the command in the format shutdown / /m \\computername /c “comment” and press Enter.
Table: shutdown command parameters
| /s | Ending the remote PC session. |
| \\Computer_name | Name or network address remote PC. |
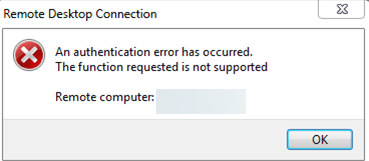
After installing the KB4103718 update on my Windows 7 computer, I cannot connect remotely to the server. Windows Server 2012 R2 via RDP remote desktop. After I specify the RDP server address in the mstsc.exe client window and click “Connect”, the error appears:
Remote Desktop Connection
An authentication error occurred.
The specified function is not supported.
Remote computer: computername
After I uninstalled the KB4103718 update and rebooted the computer, the RDP connection began to work fine. If I understand correctly, this is only a temporary workaround, next month a new cumulative update package will arrive and the error will return? Can you recommend anything?
Answer
You are absolutely right that it is pointless to solve the problem, because you thereby expose your computer to the risk of exploitation of various vulnerabilities that are covered by patches in this update.
You are not alone in your problem. This error may appear in any operating system Windows or Windows Server (not just Windows 7). For English users Windows versions 10, when trying to connect to an RDP/RDS server, a similar error looks like this:
An authentication error has occurred.
The function requested is not supported.
Remote computer: computername
The RDP error “An authentication error has occurred” may also appear when trying to launch RemoteApp applications.
Why is this happening? The fact is that your computer has the latest security updates (released after May 2018), which correct a serious vulnerability in the CredSSP (Credential Security Support Provider) protocol used for authentication on RDP servers (CVE-2018-0886) (I recommend read the article). However, on the side of the RDP / RDS server to which you connect from your computer, these updates are not installed, and the NLA (Network Level Authentication) protocol is enabled for RDP access. The NLA protocol uses CredSSP mechanisms to pre-authenticate users via TLS/SSL or Kerberos. Your computer, due to the new security settings introduced by the update you installed, simply blocks connection to a remote computer that uses a vulnerable version of CredSSP.
What can you do to fix this error and connect to your RDP server?
- Most correct way to solve the problem - installation latest updates Windows security on the computer/server you are connecting to via RDP;
- Temporary method 1 . You can disable Network Level Authentication (NLA) on the RDP server side (described below);
- Temporary method 2
. You can allow connections on the client side to RDP servers with an insecure version of CredSSP, as described in the article linked above. To do this you need to change the registry key AllowEncryptionOracle(REG ADD command
HKLM\SOFTWARE\Microsoft\Windows\CurrentVersion\Policies\System\CredSSP\Parameters /v AllowEncryptionOracle /t REG_DWORD /d 2) or change local policy settings Encryption Oracle Remediation/ Fix encryption oracle vulnerability), setting its value = Vulnerable / Leave vulnerability).This is the only way to access remote server via RDP, if you do not have the ability to log into the server locally (via the ILO console, virtual machine, cloud interface, etc.). In this mode, you will be able to connect to a remote server and install security updates, thus moving to the recommended method 1. After updating the server, do not forget to disable the policy or return the key value AllowEncryptionOracle = 0: REG ADD HKLM\SOFTWARE\Microsoft\Windows\CurrentVersion\Policies\System\CredSSP\Parameters /v AllowEncryptionOracle /t REG_DWORD /d 0
Disabling NLA for RDP on Windows
If NLA is enabled on the side of the RDP server you are connecting to, this means that CredSPP is used to pre-authenticate the RDP user. You can disable Network Level Authentication in the system properties on the tab Remote access(Remote) , unchecking the “Allow connection only from computers running Remote Desktop with Network Level Authentication (recommended)” checkbox (Windows 10 / Windows 8).

In Windows 7 this option is called differently. On the tab Remote access you need to select the option “ Allow connections from computers running any version of Remote Desktop (dangerous)/ Allow connections from computers running any version of Remote Desktop (less secure)".
You can also disable Network Level Authentication (NLA) using the Local Editor group policy - gpedit.msc(in Windows 10 Home, the gpedit.msc policy editor can be launched) or using the domain policy management console - GPMC.msc. To do this, go to the section Computer Configuration –> Administrative Templates –> ComponentsWindows–> Remote Desktop Services – Remote Desktop Session Host –> Security(Computer Configuration –> Administrative Templates –> Windows Components –> Remote Desktop Services – Remote Desktop Session Host –> Security), turn off policy (Require user authentication for remote connections by using Network Level Authentication).

Also needed in politics " Require the use of a special security level for remote connections via RDP protocol» (Require use of specific security layer for remote (RDP) connections) select Security Layer - RDP.
To apply the new RDP settings, you need to update the policies (gpupdate /force) or restart the computer. After this, you should successfully connect to the remote desktop server.
Good afternoon, dear readers and guests of the blog, today I encountered the following situation: when I tried to connect to a terminal server on Windows Server 2008 R2, I received the error " Can't connect to a remote computer. Try connecting again. If the problem persists, contact the owner of the remote computer." After entering your login and password, which indicates at least that the port is accessible, let's see how we can solve this problem and restore access.
Causes of the "Try to connect again" error
Last time we defeated the blue screen error dpc watchdog violation, we will defeat this one too, but first you need to understand the reason for all this action. This is what it looks like this problem:

As I wrote above, it appears after entering the correct login and password.
- This whole rigmarole began back in 2014, after updates KB2992611 and subsequent ones. At the time of installation of these updates, the level of security and encryption was tightened.
- Second possible reason, this is the presence of the CryptoPro or VipNet programs, I had exactly the second option
- Other third parties software on encryption.
If you look at the Windows logs, you can find the following system warnings:
- The following fatal warning occurred: 36888. Internal error status: 1250

- The X.224 RDP component detected an error in the protocol stream and disabled this client.

How to solve an error with an RDP connection
There are several methods to solve the error "Cannot connect to the remote computer. Try connecting again. If the problem persists, contact the owner of the remote computer." what you should do:
- Delete required Windows updates
- Removing or updating "Crypto PRO" and VipNet
- Installing additional updates
Removing or updating software
I start with this method, since it is the most correct both from the point of convenience and from the point of safety. If you do not need this software, then I advise you to remove it and clean the system of garbage, but if the programs are needed, then consider updating them to latest versions which no longer have such problems. In my case, this could not be done, since I needed old version VipNet.
Uninstalling update KB2992611
The next method I will recommend is installing new updates that solve this, I can recommend KB3018238 (it now comes with KB2992611) and KB3011780, as time goes on, these updates may overlap with newer ones, so keep an eye on them on the official Microsoft website. If KB2992611 is installed, then try to remove it, check connectivity and install it again.
Download KB2992611 https://www.microsoft.com/ru-ru/download/details.aspx?id=44618
Download KB3011780 https://www.microsoft.com/ru-ru/download/details.aspx?id=44966

Download and update, this is similar to the steps described in the problem where Windows 7 does not find updates, we also installed standalone versions.
Reduced encryption level requirements
Not the best correct solution, as it reduces the level of protection and encryption of traffic, but can be a lifesaver in some situations. In the terminal server settings, lower the "security/encryption level" level. To do this, go to "Start > Administrative Tools > Remote Desktop > Remote Desktop Session Host Configuration", select "Settings for server", then the "General" tab and two items:
- Security Level > RDP Security Level
- Encryption level > Low

Now everyone, reconnect and try to log in via RDP again, the error should disappear, but look for an opportunity to update.
Greetings, dear readers, and Denis Trishkin is in touch again.
Recently I came across such a question as “Remote Desktop” (RDP Windows 7). This tool allows you to work with your computer using another device. For example, a user can use home equipment to perform all the necessary functions on a PC located in the office. Agree, in some situations this option is convenient. But at the same time, everything must be debugged correctly first.
In order to enable rdp, you need to perform several steps:
If you are using an access point, router, or any other equipment through which the Internet is connected, you first need to forward the ports. Or it is possible to use DMZ - setting the necessary settings using a single computer.
It is important to have an external dynamic or static IP address.
Check that there is a password on the account through which the connection will be made. And if it doesn’t exist, install it. Otherwise, the relationship cannot be made.
Set up rdp server:
- go to " Start", and on the icon " Computer» call context menu, and then " Properties»;
— select “”;

increase
- a window will appear in which we click “ Allow remote assistance connections..."(if you plan to connect only from equipment running Win 7 and higher, it is better to check the box next to the authenticated item);

increase
— the “” button restricts or allows the user to use the computer remotely (if a ban is set, the person will only see what is happening on another computer);

— on the “” tab Select users» indicates the people who will be able to connect to the device remotely (in this case, everyone must have a password set).

Important! Windows does not provide the ability to connect multiple users at the same time. This is specifically limited by the license. A special patch from a third-party development team is provided for removal. It can be easily found on the Internet.
Establishing a connection( )
To establish a connection via rdp, you first need to know its IP address. To do this, on the desired device, go to the command line (open “” and enter “ cmd»).

In the window that appears, indicate "". A list will open in which you need to find the line with the IPv4 parameter. The numbers indicated opposite are the data we need.

After this, on the computer from which we plan to connect, launch the rdp client or “”. To do this you need to go to " Start" and then go to " Standard».

increase
A window will open where you can set the equipment address (IPv4). Then click "".

If everything is specified as expected, a menu will appear in which you need to enter your login and password to establish a connection.

Before this, there is a choice " Parameters", where various rdp settings are provided:
Update( )
It is important to understand that when constantly working with this tool, you need it to perform all its functions 100%. Otherwise, users may simply not achieve their goals.
For correct operation, all settings must be specified correctly. But in some cases this is not enough. It is also worth installing all upcoming rdp updates from Microsoft on time. This can be done not only in the appropriate center provided in the operating system itself, but also on the official developer page.