How to work in Photoshop CS6: for beginners. Plugins for Photoshop CS6. How to Use the Basic Features of Adobe Photoshop The Best Photoshop Tutorials for Beginners
Specialists in the field computer technology strive to invent many programs. In turn, PC users keep up with new products and try to study them. One of the most popular and famous inventions is Adobe Photoshop. A powerful graphics editor allows you to create a wide variety of images. But to work with such a program, you must know all the possibilities and be able to use them.
Where is Photoshop used?
Many users ask the question: “where to start learning Photoshop?” This is an excellent program that allows you to turn your fantasy into reality. For example, on Adobe Photoshop CS6 you can perform the following manipulations:

In the editor you can create comics, layouts, collages, drawing, retouching, make comics and infographics, optimize images and convert formats. Now it becomes clear why Photoshop is needed.
Basic Tools
How to learn Photoshop on your own and where to start? The answer is simple: with basic tools. The installed Photoshop is initially launched. After the program opens, you should pay attention to the upper horizontal and lateral vertical. The toolbar is located here. They need to be studied first. Just hover your mouse over the icon and a hint will pop up.
To bring a tool, for example: a brush, into an active state, it is recommended to left-click on the icon. With the selected instrument the horizontal panel will change, and many possibilities will appear specifically for the brush - pressure, transparency, color and much more. Specialists involved in professional photo editing already know the settings for a certain manipulation, for example: retouching.
 At the very bottom of the screen there is an additional set of tools, so you need to pay attention to the triangle located there. Right-clicking will open additional options.
The Photoshop CS6 menu is an integral element, without which it is impossible to perform photo manipulation. Initially you need to click on the menu and open the file. It contains a list of images that are subject to processing. After the work is done, do not forget about saving. The function is also in the menu.
All other options are for photo editing. They start after "file" and end with "help".
The first steps of photo manipulation
The program is mastered only with the help of the selected image. Everything is done simply - you need to go to the menu and click on “file”. Then a list of pictures will open and all you have to do is select the photo you like. You should start working after adding the print to the Photoshop editing window.
On the right side of the photo a small window with tabs is formed And. With each new action, for example: blending mode, it is recommended to create new layers. Don't edit just the original photo.
You won’t be able to perform the manipulation right away, because the picture is blocked by default in the program and is in background. To remove the lock and make a “layer” from a photo, it is recommended to double-click on the “background”, which is located on the right side of the window - the “layers” tab. After which, the photo will become active and you can start working.
What are layers for?
In Adobe Photoshop CS6, it is not possible to edit photos without using layers. The created duplicate layer will serve as a backup version of the image. All Photoshoppers encounter unsuccessful actions with an image, so it is very easy to make a repeating image without harming the source.
 Layers help with applying new effects. For example, an inscription is made on a wedding photo and doves are created in a translucent form. To perform a similar manipulation is done new layer, which is located on top of the main image. Then two options will follow: you can draw the doves using a brush or select them from a photo file and paste them onto a new layer.
Layers can be given a translucent or transparent tone. Just move the slider and set the transparency to 50%. Thus, the same pigeons will not be flashy. After inserting a translucent picture, you should add more detail, for example, make chiaroscuro and draw feathers with a brush.
The difference between Photoshop CS6 and all versions of Adobe Photoshop
You can give the drawing the desired effect and color only through the horizontal tools and the tab with layers, which you should right-click on, after which “properties” will appear. All Adobe programs Photoshop is practically no different from each other and for a beginner, in fact, it makes no difference which one to use.
Eg, Photoshop 5 or CS6 are almost identical. For this reason, any version is suitable for a person who is not knowledgeable about a photo editor. For example, the filter gallery and color mode are the same, this is standard features. New generations of programs may have additions, but they will be minor.
Is Photoshop difficult to learn?
Often, many beginners are interested in: is it difficult to master the program? There is no exact answer to this question. It all depends on intelligence. Adobe Photoshop is a tool, like any other equipment, for example : « washing machine» requires mastering. Therefore, the mechanism must be studied to understand all the possibilities. After some time, a beginner will become an expert if he begins to understand the essence of Photoshop. But there is one rule - you need to train from light to hard. For example, you need a photo:

First, you should experiment with such simple functions, and then learn to outline an image, create chiaroscuro, make collages and create truly unique drawings. With help graphics tablet you can draw prints from scratch. To fully master the program, you will need to spend a lot of time and be really diligent.
Important! The 64-bit version of Photoshop is more powerful, especially random access memory. You should know that Photoshop CS6 and CC are installed exclusively on x64 Mac O.S.
Example of photo processing
It is important to understand how to work with photographs in Photoshop, so you need to study an example of image processing. It is not always possible to find a certain ideal picture in which you can implement the intended manipulation. For example, you want to take a night landscape, but many of the photos have already been edited or are too dark. There is always a way out. At Photoshop help you can easily turn a day landscape into a night one.
Step-by-step transformation process daytime snapshot in the night version:

Stars
To give the sky more effect, you should make stars.
Process:
- A new one is created on top of all layers. It is filled with black and the paint fill tool is applied. Then the “noise” function is added, which is located in the “filter” menu. Black and white noise is increased (Amount).
- In the filter gallery, select “linocut sketch”. To get the desired effect, you need to play with the settings.
- To position the stars correctly, use the move tool.
- On the layer with stars you need to adjust the blending mode (Blending Options).
- Next, a mask is added for the same layer. The gradient color is black and white. The bottom is made invisible and, by adjusting, the opacity is increased to a certain extent.
Illumination of objects
Photoshop CS6


For the best photo effect, it is advisable to make the windows backlit.
Process:
- Using the straight lasso tool, select windows. To make multiple selections without clearing previous selections, it is recommended to hold down the Shift key.
- Next, duplicate the selected objects and place the copy on top of the layers.
- Then select blending modes (Blending Options). Check the box for Color Overlay. The object should take on a light orange tint.
- To improve the effect, it is recommended to scroll through the color overlay items in the menu and select Hue.
- Opposite (Outer Glow) check the box - this is an external glow.
- You can play with the blending points again and choose the appropriate shade.
Secondary Light Sources
It is necessary to reflect the incident light from the windows onto the ground and walls.
Process:
- You need to select the “brush” and set the opacity to 20%. A new layer is created.
- Next, select the window color using the eyedropper tool.
- Using a brush, shades are outlined on the ground and walls. The light should be diffused.
- The saturation is adjusted using the layer opacity.
In order to correctly distribute light and shade, it is recommended to familiarize yourself with their reflexes. You need to understand how light glides across this or that object. Metal is smooth, but wood is rough. This greatly influences the creation of high-quality realistic images.
- Cancel: Go back one step, in other words, cancel the last action.
- Run again: Move one step forward, undo the undone step.
- To help you work with undoing/redoing actions, there is a “Log” tab in the right corner of the window; by clicking on the lines with actions in this tab, you can move or return several actions forward and back, up to the initial state of the image.
- Cut Copy Clear Paste: These actions are understandable to any computer user. If there is a selected area in the image, then actions are applied specifically to it.

- Image Size: Allows you to change the dimensions of the edited image in pixels in width and height. Moreover, the size can be changed either with or without maintaining the original proportions, this depends on the checkbox next to the “Maintain proportions” parameter.
- Canvas Size: The canvas is the area on which you can draw or edit an image. With this function you can zoom in and out. When you zoom out, part of the image will be cut off.
- Items Rotate 180 degrees, Rotate 90 degrees clockwise And Rotate 90 degrees counterclockwise understandable without comment.
- Flip Vertical And Flip horizontally: Mirror the image.
- Crop: Cropping the image, the cropping field is set using the mouse.

First, let's figure out what layers are in Photoshop?
The concept of “layer” in Photoshop has exactly the same physical meaning as in life - it is a layer or layer that is integral part something whole.
In Photoshop, as in others graphic editors, this is an extremely useful and irreplaceable thing; to some extent, layers are the main working tools in online photoshop. They allow you to work with each of the image elements separately, without affecting the rest of the image. They can be thought of as a stack of transparencies or tracings; you can draw on each of them, and if there is no image on the film, you can see through it the layers that lie underneath.

To make it easier to work with layers, there is a “Layers” tab on the right side of the program’s working window; it is shown in the figure on the right. The active layer in this tab is highlighted in blue. The visibility of a layer is regulated by the presence of a checkbox on the right; to turn off visibility, you need to uncheck the checkbox. Layers can be dragged up and down using the mouse. The purpose of the buttons at the bottom of the panel, from left to right: change opacity, enable a layer mask, add layer styles (outer shadow, inner shadow, bevel, outer glow, inner glow), new layer, delete active layer.
For now, let's move on to the "Layers" menu items.
- New layer: Creates a new layer.
- Duplicate layer: Duplicates the active layer and places it above the active layer.
- Delete layer: Deletes a layer.
- Open image as layer: Opens an image from your computer and displays it as a layer, placing it above the active one on this moment layer.
- Open image URL as layer And Open from library as layer performs the same actions as the previous paragraph, only the image is taken from a third-party site or online library.
- Merge Layers: Merges the active layer with the layer below it.
- Merge Visible Layers Merges the currently visible layers of the document; they are marked with a checkmark in the layers tab.
- Move Layer Up, Move Layer Down Moves the layer's position in the layers tab.
- Layer Styles Allows you to add decorations for the layer, such as:
- Cast a shadow
- Inner shadow
- External glow
- Inner glow
- Rasterize layer Converts vector objects, such as text, into a regular image made of dots.
- Add Layer Mask, Remove Layer Mask, Apply Layer Mask Working with masks is similar to layer masks in Photochop.
With other points Rotate layer..., Reflect... everything seems clear.
● Correction

This tool gives us the opportunity to change the brightness and contrast of the image, its color saturation, tonality, and also change each color level of the 3 primary colors separately.
Another one useful feature, which is called Automatic levels will allow you to make automatic image correction.
Below in the menu there are a number of options with pre-configured and changeable parameters. For example, they allow you to turn a photo into a negative or apply a sepia filter to the image to make the photo look like an old photograph in light or dark brown tones.
An interesting option called Cross process. It gives digital photography the look of an 80's photo, i.e. taken with a film camera.
● Filter

This menu has a rich set of various filters for processing and applying them to an image or photo. Moreover, the very names of all these filters will eloquently tell us what will happen to the image if we apply them.
● View

- Zoom in, zoom out Increase/decrease the image display scale.
- Actual pixels Display the drawing in real size.
- Show all Display the image scaled to fit the window.
- Navigator Show/hide the navigator tab located in the upper right corner of the window.
- Layers, Journal Show/hide tabs And Magazine located on the right side of the window.
- Tool Options Show/hide the tool options tab located at the top of the window, below the main menu.
- Full screen mode Very useful option. Allows you to position the editor's working window across the entire monitor window.
- Change the location of the palette The option is still under development.
There is a toolbar on the left side of the editor window.
It is on it that all the most basic and frequently used tools for working in online Photoshop are located.
The functions of the tools are similar to those in regular Photoshop.
Photoshop is a graphics editor developed by Adobe that is used as professional editors, so regular users. The program can be used not only to create images from scratch, but also to edit ready-made images. Adobe Photoshop skills are useful and can even be profitable. Of course you can take special courses Photoshop, or master the editor yourself using this and many other tutorials.
Steps
Create a file
- In the window that appears, you will see many settings. With their help, you can customize the canvas as you wish. Don't worry, all these settings can be changed after you start working on the image. Just remember that once you get started, these settings may affect appearance Images.
-
Select size. The first set of options is for selecting the size of your canvas, or work surface. You can use a preset size (for example, 8.5x11" is suitable for printing on plain paper), a custom size (choose width and height), or select the "clipboard" setting (in which case the size copied to the clipboard will be used). which is very convenient for copying and pasting existing images).
Select resolution. Choose the image resolution depending on what you will do with it afterwards. Resolution determines the number of pixels per centimeter of an image. The higher this number is, the more detailed the image you will get.
- Increasing the resolution will also affect the file size. In fact, there will be other consequences. Your computer may not be powerful enough to process large files, and then it will start to freeze and slow down. Also large files will take longer to download and load, so you should upload them to the network only when absolutely necessary.
- Standard web file resolution is 72 pixels/inch. Standard photo resolution is 300 pixels/inch. You can set the print resolution to any resolution, but remember that if it is less than 300 pixels/inch, the image will appear pixelated. Using images larger than 72 pixels/inch on the Internet can significantly increase their loading time.
-
Select a color mode. Depending on what you are going to do with the image, select the desired color mode. This setting determines how colors are calculated and displayed. The mode can be changed after you start working on the image, without negative consequences for the image.
- RGB is the standard color mode. This mode is great for images that will be viewed on a computer because in this mode computers calculate and display the images.
- CMYK is another common mode. This mode is best suited for printing images, since CMYK is the standard color space for printers to define colors. It is best to save the file in RGB space and change it to CMYK before printing, since the PC will still display RGB colors.
- Grayscale is another parameter, the essence of which follows from the name. This mode is used for printing black and white images only.
- Regardless color mode, the higher the number of bits, the more colors will be displayed. Increasing the number of bits will also increase the size source file, so do not increase this parameter unnecessarily.
-
Select a background. Mostly, this parameter will affect the color of the canvas - white or transparent. On a white background, the changes made to the image are clearly visible, but on a transparent one it is easier to achieve the desired effects.
- An excellent option would be to edit the image on layers above the background, then you can easily change White background to transparent, and back.
- Start with transparent background, which you will then paint over with white. Create new images on separate layers above the background. You can erase the white background color where necessary.
-
Merge layers. After, or while working, you'll probably want to merge the layers. This action will connect all parts of the image into one. Remember that this action is irreversible. Right-click on a layer and select "merge with previous" or "merge layers" depending on which layers you want to merge. You can also select the “merge visible” option, and the editor will merge all visible layers.
Create a file. To create an image, you will need to open the file as soon as the program opens. To do this, click “File-New”, or press the key combination “Ctrl + N”.
Tools panel
-
Let's understand the selection tools. Selection tools work different ways and allow you to select individual parts of the image, or the entire image. Immediately after selection, you can copy/paste or simply edit the selected area. You can see a highlighted area indicated by "ants running" around it. To remove the selection, press the key combination “Ctrl/command + D”. Remember that the selection is only valid on the selected layer, although you can also click Copy Merged Data from the Edit menu if you want to copy the selection from all layers without merging them.
- Selecting an area: A set of shapes will open, from which you can select any by clicking right button mouse on the icon. It works in much the same way as selecting files on a computer - hold down and move the cursor. Extend the selection of your square into a circle or oval by holding down the Shift key while selecting.
- Lasso: Similar to the selection tool, but allows you to make freehand selections. The regular lasso is the fastest and easiest option, but less accurate. The straight line lasso is similar to a regular lasso, but the selection will be built from the anchor points that you select. The third option is a magnetic lasso, which will “attach” to the edges of an object, creating a more precise selection. All three tools must be used with a selection closed. To do this, end your selection by clicking on the starting point (you'll see a small circle appear next to your cursor). If you make an erroneous selection, you can press the Backspace button to delete the intermediate point.
- Magic wand: This tool will select pixels that are similar in color. You can control the tolerance for selecting similar colors by changing the Tolerance setting. This way you can select different areas, or entire objects.
- Quick Selection: Quick Selection is perhaps the simplest, most common, and useful selection for selecting different parts of an image. This is the Magic Wand and Magnetic Lasso combined into one tool. Click and drag the tool over the area you want to select.
-
Let's deal with brushes. Brushes are used to add pixels to an image. You can use them to edit photos, or create a drawing from scratch. Brushes have a huge number of settings from the brushes menu, as well as many different ready-made brushes and their shapes.
- You can download more brushes for money, or for free, from various sources on the Internet.
- Adjust the size, hardness and opacity of the brush as desired. A larger brush will cover more area of the image, a harder brush will give sharper lines, and lowering the opacity will allow you to layer different colors on top of each other, leaving more room for creativity.
-
We deal with blur, sharpening and “finger”. All these tools are located under one button, with the image of a drop. Select the one you need by clicking on the drop icon from the list. These tools only affect the pixels they are applied to and can be used to achieve a variety of effects.
- Blur: A tool that smoothes and merges pixels - everything you touch will appear blurry. How strong this blur will be depends on the “intensity” parameter at the top.
- Sharpen: The opposite of blur, the tool highlights and sharpens individual pixels. Use gradually as the tool makes changes quite quickly.
- Finger: A tool that allows you to smudge the color of your choice in the direction you move the cursor.
-
Let's understand the light, dimmer and sponge. These tools, respectively, darken or lighten parts of the image, and the sponge adds or removes the saturation of colors. To select them, click on the icon with a circle and a line. With this tool you can add brightness to highlights and darken shadows in certain areas of the image.
- Since these tools work on individual parts of an image, it's best to copy the image to a new layer and pin the original layer. Edit the copy to avoid accidentally damaging the original image.
- Using the settings at the top of the window, you can change the type of shades that the Dodge and Burn tools change, just like the sponges. Try to use highlights to highlight and shadows to darken, so as not to affect the midtones (unless you need to change the midtones, of course).
- Also don't forget that you can change the brush size and intensity in the settings at the top of the screen.
-
Let's understand the stamp tool. This tool, whose icon looks like its name, is used to select an element of an image and copy it anywhere. It is usually used to remove blemishes on the face, or protruding hair, etc. Simply select this tool, hold down “Alt” and left-click on the area you want to copy from, then select the area you want to copy to.
- Don't forget that when you copy, the cursor will move proportionally over the area you are copying from.
-
Let's understand gradients. This tool will allow you to apply a gradient, or fill, to an image. It can be applied both on an existing layer and on a separate one. The style of the gradient can be changed in the settings at the top, and the colors that make it up can be adjusted from the color menu (placeholder and active colors).
- To apply a gradient, draw a line (select starting and ending points). The type of gradient will depend on how you draw this line and how long it will be. For example, the shorter the line, the smaller the transition areas between colors will be. Experiment with gradients to understand how they work.
Choice of colors
-
Open the color palette window. In order to change the active color, you need to double-click on the color icon at the bottom of the toolbar. A window will appear with various settings, the most obvious of which are choosing a shade from the palette and a vertical bar with a color choice (both of which are fairly self-explanatory).
- If you see a pop-up warning when you select a color, the color you selected may not display correctly when printed, although it will appear fine on screen.
- If you see a small pop-up window in the same location, the color you selected may not display correctly online. Check the "Web Colors Only" checkbox as required.
Today we will consider the question: “How to use Photoshop?” After all, it is this graphic editor that allows you to solve the most complex problems associated with images. It should be said right away that precise instructions will not be provided here, but only recommendations that allow you to study on your own. So, next you will learn how to use Photoshop.
Preparation
First, let's look at the program itself. The latest version of this editor is Adobe Photoshop CS6. But you don't have to download Last update. The program interface and most of the tools have remained virtually unchanged since the release of the first version. Of course, the first update goes a long way back from CS6. But on initial stage Any version of this program is suitable for learning. By the way, the interface this editor contains 27 different languages. There is also a Russian translation.

Basic Tools
To answer the question: “How to use Photoshop CS6,” you must first consider the main tools of the program. Since without them you will not be able to carry out even the simplest operations. In total, 4 groups of instruments can be distinguished. Below we will briefly look at each of them.
- Selection tools. A huge number of operations carried out in Photoshop occur precisely with the help of this group of tools. Selection can be done in different ways. For example, in any way using the lasso tool ( hotkey L) A small area can be separated. For more precise selections, it is recommended to use the “pen” (P). The choice of tools should be made depending on the situation.
- Drawing tools. Surely, you have already come across similar tools in other graphic editors. To draw a picture in any way, you can use a “pencil” or “brush”. Here it is possible to adjust the size and precision of the tools. If you made a little mistake or just want to erase a fragment you don’t need, you can use the eraser. To restore a lost background image, use the “archive brush”.
- Tools for correction. This group includes various means for blurring, sharpening, decreasing brightness, etc. These tools allow you to perform a wide variety of operations and effects.
- Additional tools. This category can include tools for filling, spot restoration, color selection, typing, etc.

additional information
To understand how to learn to use Photoshop, you first need to familiarize yourself with all the tools. As you've probably already noticed, there are plenty of tools for image editing. But don’t think that it will take you a lot of time to familiarize yourself with all the tools. This process is always fun and fast.
Conclusion
The question “How to use Photoshop?” very often asked on specialized forums. And sometimes it remains without due attention, since it is impossible to explain to every beginner the basic things associated with this editor every time. It is recommended that you first try experimenting with the tools, filters, and other tools yourself. And after that, approach this issue more seriously. And after some time, you yourself will be able to advise others on how to use Photoshop.
Good day, dear readers. Do you seriously want to learn how to work in Photoshop and hope that you will succeed? Hundreds of people every day, inspired by video miracles in three-minute videos, open this program and forget about it a week later.
“At school they teach and teach, but here, in adult life, they pile on!” - a quote from a Soviet cartoon appears in my head. After a week, everything is forgotten, the person begins to think that he already knows how to do everything and how much further, you still won’t be able to apply it anywhere.
As a rule, all this knowledge remains unfulfilled by useless talents No. 7463. Why do you think that you will succeed? Well, at least you still haven't stopped reading this article and that's good. This means you are partly a realist, this is wonderful, which means we have something to talk about. Then, let's find out how to work with Photoshop, or rather, from which side it is better to approach it, so as not to give up everything halfway.
How not to stop there
Motivation is the most important thing in life, especially for beginners in learning anything. You can start writing a book and quit after a month, leave cross-stitching after a week, as a rule, people forget about the work of creating websites after about six months. Why is this happening? Initially, the wrong approach to the matter.
You must constantly work on your own motivation. How to do it? First of all, let's find out what you want from Photoshop?
Play and edit a couple of your own photos?
Don't even bother with training. Find tutorials on YouTube for dummies or dig into Photoshop yourself, at random. These are the kind of interesting designs you can get when working with just a few buttons.

Which ones exactly? "Image" in the top toolbar. Special attention pay attention to corrections. There are a lot of gizmos here that can surprise your friends and diversify your leisure time.
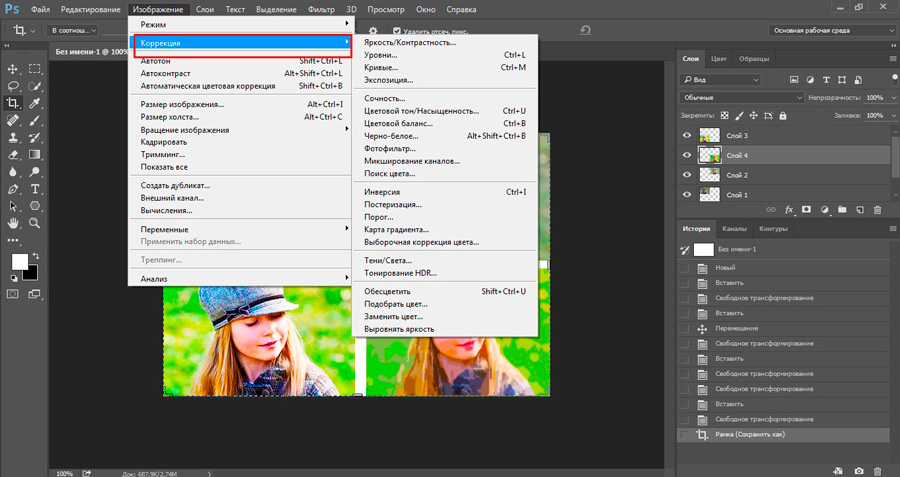
Some of the most interesting tools here, in my opinion, are “Curves” and “Richness”.

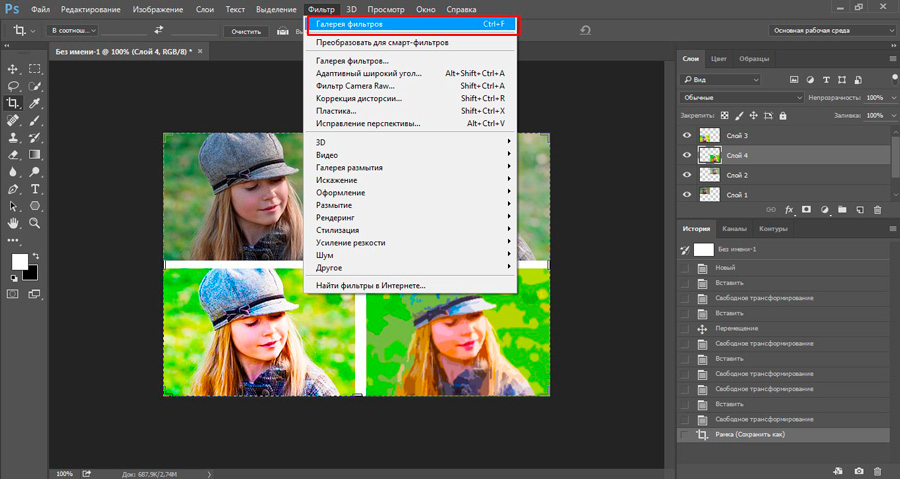
You will also definitely like the “Filter Gallery”.
You don't even have to download the program itself and spend money on it. There is a wonderful online service with a program in Russian ( https://editor.0lik.ru ), it is less functional when it comes to work, but is ideal as a toy. In addition, you can work with it for free. Create.
You tried it, got interested and want to move on
Wait. It’s too early to work with layers and other advanced functions. First, decide why you need it, otherwise you’ll just waste time.
If you don’t mind the days, weeks, months, that’s good, but when you start one thing, don’t finish it, take on a second or third, then in the end you get nothing.
How many more roads do you have to go to make real money from your hobby? Don't you really need this? Many people take on something stupid and create something incredible, earning millions from the project. And in the end, you will remain the person who knows a little more than others in each area.
How can you make money through Photoshop?
- Sell cool photographs of your own production through photo banks.
- Create your own page and offer photo processing services.
- Create illustrations for books, of which there are about a million now in print.
- Make logos for companies.
- Web design.
Don't believe that someone will actually pay for this? Pfft, no doubt about it. You can find a bunch of offers on the Weblancer website ( https://weblancer.net ).

Don't worry that you don't have enough strength or experience. Take more time to complete the project and less money so that the complaints against you are not too serious. You can always justify your own actions later: “What did you want for 1,000 rubles? If you don’t like it, don’t take it, I completed the work on time, and it’s up to you to decide whether to refuse or take the results.”
You're a newbie and that's great. Keep your ambitions to yourself as long as possible. Professionals can charge at least 5,000 rubles for a corporate identity. Don't think about big money while studying while you gain experience. In time they will come good orders and then you can set your own prices with full responsibility. In the meantime, set yourself tasks and solve them through educational articles and videos, of which there are a million on the Internet.
Start creating projects as early as possible. Make them for yourself, create projects for any money. No one will know how much you were paid, but you will have an excellent portfolio. Over time, you will learn to cope with tasks faster, which means you will be able to complete more orders.
Ambition is very strong and you want to earn a lot of money
If you are observed to be hardworking and have an impressive capacity for work, then you need to make money from it and start doing it as soon as possible. There is a lot of money in design. They can pay about 80,000 for a good website project, 30,000 for a corporate identity, 1,000 for a cool illustration. But to get that kind of money and find clients you have to really try.
Of course, you can’t get by with training videos, articles, or the random method. Real, professional training will be required. You will need to understand the intricacies of art, quickly learn the wisdom of business, see how specialists work, what they use when creating, study, so to speak, the business to the maximum and do it quickly.

Talent alone is not enough; experience is also needed. No matter what industry you start working in, you need to grow into a professional. We don't have time for this yet! If you are very hardworking, that means you are ambitious, and if the earnings don’t come, you, again, will abandon what you started without completing it. You need to do everything to ensure that others, and especially customers, like the work you do.
I recommend you the course of Zinaida Lukyanova ( https://photoshop-master.org/disc15 ). It costs about two and a half thousand rubles and provides everything you need for work. All knowledge in 18 hours. Not a day will pass before you reach good level. Of course, you will have to improve it, but at least you will know the basics. Then it’s a matter of technique; all that remains is to look for your options. No one will tell you where to put this or that element, but you will know how this can be done and will not waste time on the technical side. It’s not difficult to figure it out; if you’ve already seen how a master uses this or that tool, you’ll be able to pick up a lot of useful tricks.
You will know specifically what can be done in Photoshop and what you can do, and therefore you will be able to find quick ways creation. Why spend an hour perfectly highlighting a shape if you can quickly and easily insert it into another object?
Which Photoshop to choose
Naturally, in this case there will not be enough online versions. It is only interesting as a toy. On your own you can install your own gradients, brushes, stamps, fonts. By the way, in last time I managed to download as many as 4,000 options. Take a look at some of them. Can you imagine how they simplify the life of a designer?

Naturally, you can install them on any version. By the way, let's talk about software. First came Photoshop CS5, this version is slightly less functional compared to latest version CS6.
And the coolest one is CC 2015. I have it. Of course, it is better for a designer to choose this one. There are a bunch of additional features that you probably won't need. For example, support for 3D printing. But what does she do to you? Does it make you feel bad? There is and there is. But in addition to this, you benefit from smart sharpening, perspective deformation, and improved layer correction. CC just can’t dance!
Don't think that you won't understand such a cool version or that it will be more difficult. All Photoshops are basically the same. It's just there somewhere additional functions and buttons that you are not required to use. But what are the options? latest versions perform a little better. For example, they add glow or sharpness.

Learn one Photoshop - you will understand all the others. The main thing is to understand the logic of the developers, and understanding further will not be difficult at all.
Finally, I’ll leave you with a motivational video, where would you be without them? It's cool, they turn a girl into a robot. Great, by the way, if you remove the acceleration, I think it took him from two to eight hours to work. Agree, not so much. Just a day, and this is the result:
If you liked this article, subscribe to the newsletter and receive more useful and necessary information which will help you do right choice and earn more money on the Internet, even if you don’t know how to do anything yet.