Mikrotik hap lite does not work. Mikrotik hAP AC - Router for all occasions. Software and functionality
I honestly admit that until recently I was not at all familiar with MikroTik routers. I heard something, read something, and all the time I thought that these were some kind of network devices for professionals. Complex setup, lots of features and all. But I recently saw several MikroTik models on sale. I decided to buy MikroTik hAP Lite TC in order to see it myself, set it up, and tell you about it.
In this tutorial, I will show you how to set up MikroTik hAP Lite TC. Using this guide, you will be able to set up almost any MikroTik RouterBOARD router. RouterOS itself, on which devices from this manufacturer run, is at first glance very complicated. In fact, it is complicated not only at first glance 🙂 There are really many different sections, settings, etc. On my router, the RouterOS system itself is in English. As I understand it, there is no way to change the settings language to Russian. But, if you figure it out, you understand that for the usual MikroTik setup, you don’t need to climb through any sections there, look for something, etc. There, all the most necessary and important settings are on one page. Which opens immediately after entering the control panel. Now we will consider all this in more detail.
I also want to say a few words about the MikroTik hAP Lite TC router itself. I liked the device. The case is made of high-quality plastic, although it stinks a little. Inexpensive, cool, apparently powerful and very functional. But all this functionality is not needed by most users. It's cool that it's powered by microUSB. You can even record from the USB port of a computer, or a power bank. Or, without any problems, find another power adapter if the native one breaks. I didn’t like the very boring packaging, completely incomprehensible setup instructions (in English), and most importantly - the lack of a network cable in the kit. Such are they, MikroTik RouterBOARD routers. At least the hAP Lite TC model.
Judging by the instructions that come with the kit, this guide should be useful to many. As for MikroTik, here I am a complete teapot. So the instruction, as you understand, is for dummies like me 🙂
Connecting a MikroTik router and preparing for setup
To set all the necessary parameters, we first need to connect to the router and connect the Internet to it. Since there is no network cable included, you will most likely connect to it via a Wi-Fi network. You can configure not only from a laptop or PC. You can use a tablet, phone, or other device.
First plug in the power adapter and plug it into a power outlet. You can also immediately connect the Internet to MikroTik (network cable from ISP or modem). To port Internet.

If you have a network cable and there is no way to connect via Wi-Fi, then just plug one end of the cable into the LAN port of the router, and the other into the port network card your computer.
If in your case the network is closed with a password, or when you enter the router settings, a password request will appear, then most likely someone has already configured it. Do a factory reset according to the instructions:.
It looks like this:

Internet access may not be immediately available. We have not yet configured the connection of the router to the provider. This is fine. Let's move on to the settings.
Setting up MikroTik on the example of the hAP Lite TC model
To enter the settings of the router, you need to go to the address in any browser 192.168.88.1 . I wrote more about this in the article:. The RouterOS Control Panel should immediately open. (in my case version v6.34.2). Make sure the router is in "Home AP" mode.

As I wrote above, all basic settings can be set directly to home page"Quick Set". It is divided into blocks. We need to set up the following:
- Internet connection (Internet).
- Wi-Fi network (Wireless).
- Set a password to protect the control panel (System).

These settings are sufficient in most cases.
Internet setup on MikroTik (Dynamic IP, PPPoE)
Important point! If the Internet is already working for you through a router, then most likely your provider uses the Dynamic IP connection type, and additional setting need not. Since the connection type is "Automatic" by default. You can immediately set up a Wi-Fi network.
You should have information about the type of connection your ISP is using. As well as all the necessary data to connect to the Internet (unless you have a dynamic IP). It is also desirable to immediately find out if the provider binds by MAC address.
So, if you have a "Dynamic IP" connection type, without binding by MAC address, then everything should work right away. If there is a binding by MAC address, then you need to either register the MAC address of the router with the provider (it is specified in the MAC Address field), or to which the Internet is attached and register it in the "MAC address" field in the router settings.

PPPoE setup
We select the type of connection PPPoE, set the username and password (provided by provider) and click on the "Reconnect" button. The router must be connected to the Internet. If all is well, then go to Wi-Fi setup networks. More on this in the article below.

Configuring L2TP/PPTP
First, in the "PPP" section, you need to add "PPTP Client".

Next, set the server address (Connect To), username (User) and password (Password). This information is provided by the provider. Check the box next to "Add Default Route". Then we save the profile by clicking on the "Apply" and "Ok" buttons.

Friends, I'm not sure if the PPTP setup instructions are correct. Unfortunately, there is no way to check this. If I wrote something wrong, please correct me in the comments.
Setting up a Wi-Fi network and password on MikroTik hAP Lite TC
On the same page we are interested in the "Wireless" section. He is on the left.
In the "Network Name" field, change the name of the Wi-Fi network. In the drop-down menu "Country" it is desirable to specify your region, and in the field "WiFi Password" set the password (minimum 8 characters), which will be used when connecting to a Wi-Fi network.
Below you can set up a guest Wi-Fi network and view a list of clients connected via Wi-Fi.

Remember or write down the Wi-Fi password. You can save the settings with the "Apply Configuration" button, or set a password to protect the settings right away.
Password for the RouterOS web interface
When we went to the address 192.168.88.1, the control panel opened immediately. Anyone who is connected to the router via a Wi-Fi network, or via cable, can enter it. To protect it, you need to set a password.
On the main page, in the lower right corner, in the "System" section, in the "Password" and "Confirm Password" fields, create and enter a password. Save the settings by clicking on "Apply Configuration" .

You will be kicked out of the system. And in order to enter the settings again, you need to specify the password that you set. The username is admin. Now you will need to log in every time you log into RouterOS.

Try not to forget the password, otherwise you will have to reset the settings of your MikroTik router and set everything up again.
Afterword
I apologize in advance if I made a mistake somewhere in the instructions. There is no way to check everything for yourself. For example, connecting via PPPoE, or PPTP. You need a provider that uses a specific protocol. The setup itself seemed to me even easier than that of popular manufacturers with a friendlier interface. I agree that it will be difficult to set up, for example, filtering by MAC addresses, blocking sites, speed limiting and other functions there. Need to figure it out.
For a long time I could not understand how the RouterOS system itself works. And I understood. She works "clearly". Yes, there are many settings. But everything is quickly opened, saved, deleted, etc. Nothing hangs, and does not reboot several times.
Leave comments, share useful tips and ask questions!
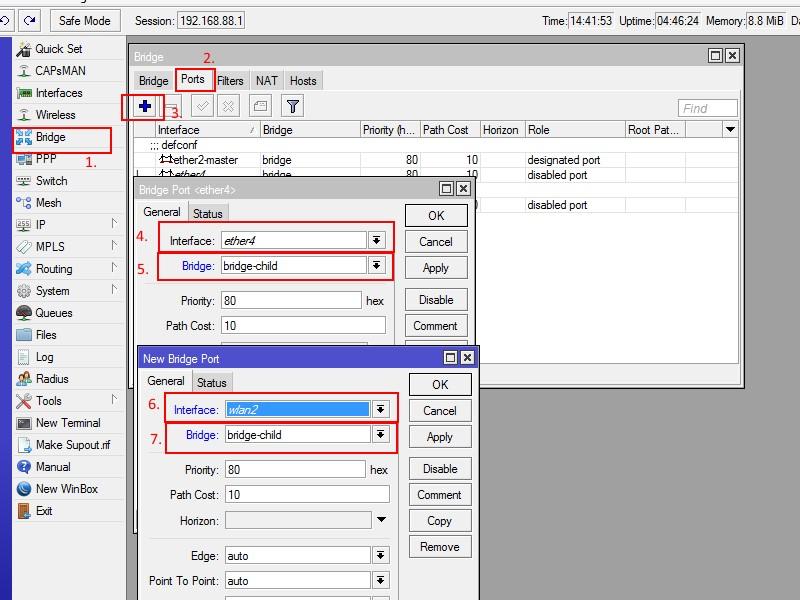
So on this moment we have a standard configuration without network separation. In order to delimit our local network, let's create a segment (part) of the network for children. To do this, select winbox→ Bridge(1)→Bridge(2)→plus(3)→General(4)→ from the menu and add the name bridge-child in the name(5) field. Save changes - OK.
Let's prepare interfaces (ports) for inclusion in bridge-child. In our configuration, the fourth ether4 port and an additional children's wifi network will be configured for the child. This means that by connecting to the fourth port with a cable and / or to the children's network via WiFi, you will have children's access to the Internet through these interfaces.
Set up a security profile for the nursery WiFi networks. WinBox→Wireless(1)→Security Profiles(2)→plus(3)→General(4)→in the Name(5) field, enter child→in the WPA(6) and WPA2(6) fields, enter the future Wifi password for the children's network . Save the settings - OK.

Let's add new network wifi. WinBox→Wireless(1)→Interfaces(2)→plus(3)→Virtual AP(4)→Wireless(5)→enter the name of the children's WiFi network in the SSID(6) field→ select a security profile(7) for our network. Save the settings - OK.

Let's configure the ether4 interface. Winbox→Interfaces(1)→Interface(2)→double left click on ehter4(3) and enter interface settings→choose none in the Master Port(4) field. Apply settings - OK.

Next, we will include our interfaces in the prepared bridge-child. Winbox→Bridge(1)→Ports(2)→plus(3)→add ether4 (4) interface→ to Bridge(5) bridge-child. We will also do the same for the wlan2(6)(7) interface. Save all changes - OK.
Let's assign an internal address to the bridge-child interface. WinBox→IP(1)→address(2)→plus(3)→fill in the fields (4),(5),(6) according to the screenshot.

Now you need to assign a DHCP server to the children's network segment, for auto tuning IP parameters of network clients. To do this, Winbox→IP(1)→DHCP server(2)→DHCP(3)→DHCP Setup(4)→ select the bridge-child interface in the dhcp Server Interface(5) field.

After that, you must click the Next button and follow the DHCP server configuration wizard without changing anything. Once you reach the Select lease time window:

Here you need to change the default lease time to 3d 00:10:00 and finish configuring the DHCP server.
If you did everything right, by now you should have two network segments:
Children's network LAN-4; wifi. Addressing - 192.168.99.0/24 Adult network LAN-2, LAN-3; wifi. Addressing - 192.168.88.0/24
Now these two networks have no restrictions and are completely equal. To start setting up restrictive functions for the children's network, you must complete presets router, namely:
- Set password and SSID (network name) to adult wifi network
- Set a password for the Admin user
- Update your router to the latest version.
If you find it difficult to do it yourself, you can find step by step instructions setting these parameters in
Judging by the sales statistics, this is the most popular router from our range. There are a great many reasons for this, but two of them, in our opinion, are the most significant: firstly, it only costs $20, Secondly, this is Mikrotik. In total it turns out "Mikrotik for $20", which is really impressive.
We will express our opinion about it in advance: the router is more than worthy of attention. It works very stably, the speeds of wired and wireless connections are quite consistent with the declared ones, and its functionality is comparable to the top-end Cisco / Juniper routers, which cost sky-high thousands of dollars in price tags. There are also disadvantages: it has only 4 Ethernet ports (including WAN port), the radio module is weak and does not support the 802.11ac standard. However, here, as in a well-known vulgar joke: "Well, what did you want for 20 dollars?"
So, let's tame the hero of our material. Our prerequisite is an ISP giving us a dynamic IP address. Let's get started:
1. Turn on the provider's cable in 1st router port
2. We turn on the cable from the computer to any remaining free port
3.
Like all Mikrotik devices, hAP Lite default IP address is 192.168.88.1. Assign to our computer network settings from the same subnet. For example, address 192.168.88.10, mask 255.255.255.0, gateway 192.168.88.1, DNS 192.168.88.1:
4. Let's go to the router via browser:

Here we make a small digression: in hAP Lite Mikrotik implemented the default configuration, which provides for a quick start. The router is already configured to receive a dynamic address on the 1st interface, the DHCP server is enabled, the bridge between the ports is configured. In fact, in our topology, the router worked as expected immediately after being turned on. That's not what we're here for though, so...
5. Let's reset the router to factory settings. To do this, click on the section System button Reset Configuration:

6. Tick the option No Default Configuration and press Reset Configuration:

7. We confirm our intention:

8. After about a minute, the router will reboot. Here there is a slight hitch: after resetting the router with the removal of the default configuration, it will no longer be assigned an IP address, and it will not be possible to access it with a browser. No problem, in this case, Mikrotik provides special application for configuration - WinBox. Download it from the site http://www.mikrotik.com/download in the section Useful tools and utilities:

9. WinBox does not require installation. Let's run it and click on the tab at the bottom Neighbors. All Mikrotik devices within the broadcast domain should appear in the list below. In our case, this will be the only hero of the article. Click on its MAC address (it is important!), then press the button Connect at the top of the screen:

10. Before us appears in all its glory the interface of the router. R window outerOS Default Configuration close by pressing OK:

11. Click on the menu on the left Interfaces. Note that in an empty configuration, the wireless is disabled on the router wired interface . It is called wlan1. Select it and click the blue checkmark at the top of the window. This will be useful to us in the near future:

12. double click open ether2 interface, change its name to ether2-master and press OK:

13. Now open ether3 interface, and change the parameter Master Port on the ether2-master:

14. We repeat the same action for the ether4 interface: open it and change the Master Port parameter to ether2-master.
This paragraph should be read only by those who are very interested in the technical side of the issue! If you opened the article just to have a setup cheat sheet in front of your eyes, then you can skip it!
And now let's decipher what was done in paragraphs 12-14: unlike more familiar household routers, ports in Mikrotik routers are not included in a single switching matrix by default, i.e. are not constituent parts switch as such. To "assemble" them into a logical switch, there are 2 ways: software and hardware. Software - bridge - uses for switching CPU router. The hardware one uses a special hardware switching chip, while the CPU is not used. Thus, for the ports to work in switch mode, the use of a switching chip suggests itself. Now back to what we did earlier: we renamed the ether2 port to ether2-master so that we can clearly see in the configuration console which port is the master port for the others, and we told the router that the ether2 port is the master port for the other two. Using the master port, we have enabled the switching chip, and the CPU is no longer involved in calculating packet switching between the ether2-ether4 ports. You can read more about switching chips and their capabilities here: http://wiki.mikrotik.com/wiki/Manual:Switch_Chip_Features
15. Let's create a bridge for the interfaces that form the loop of the local network. Click on the menu on the left Bridge, in the first tab Bridge press + , in the opened window enter bridge name(For example, LAN) and press Ok:

16. Let's move on to the Ports tab, press + , choose Interface- wlan1, Bridge- LAN, press OK:

17. Repeat the procedure for the ether2-master interface.
18. Your the final list of ports in the bridge should look like this:

19. As mentioned above, in our topology, the provider provides us with a dynamic IP address. Enable the DHCP client on the WAN port of the router. To do this, open the menu on the left IP-> DHCP Client and in the window that appears, click + :

20. The provider cable is inserted into the 1st port of the router. Choose Interface- ether1, necessarily set the parameter Add default route into position Yes and press OK:

21. Now in the DHCP client window you will see on which interface the DHCP client is enabled and what address it received:

22. Enable NAT. To do this, in the menu on the left, open IP-> firewall, go to the tab NAT, press + , in the window that appears, set the parameter Chain into position srcnat, parameter out. Interface into position ether1:

23. Without leaving the New NAT Rule window, go to Action tab, and set the parameter action into position masquerade, then press Ok:

24. Set up DNS. Menu on the left IP-> DNS. Our provider has already given us 2 dynamic servers, but their list can be supplemented (filled in the Servers parameter) with our own hands. The main thing in this window do not forget to check the Allow Remote Requests checkbox, after which you can press Ok:

25. It's time to assign an IP address to the router to work on the local network. Go to the menu on the left IP-> Addresses, in the window that opens, click + and enter IP address/subnet mask. In our case we will use 192.168.88.1/24. Parameter Interface should be set to LAN(this is our Bridge created in step 15; your name may be different), after which you can press OK:

Now our list of IP addresses should look something like this(of course, the address on the ether1 interface will be different for you):

26. By the way, we should already have access to the Internet on our computer! Let's check:

Really showed up! But the celebration will be postponed until later.
27. Now let's configure the DHCP server. Go to the menu on the left IP-> DHCP Server, in the window that opens, click DHCP Setup:

28. We choose as the interface on which DHCP will work, our bridge is LAN, press Next:

29. Set the address space. We plan to issue addresses on the 192.168.88.0 network with a mask of 255.255.255.0, That's why enter 192.168.88.0/24 and press Next:

30. Specify the gateway. Ours is 192.168.88.1. Click Next:

31. Determine the pool of IP addresses that will be issued to clients. Here we advise you to make a decision yourself, based on the network topology. We will use the range 192.168.88.2-192.168.88.254, enter and press Next:

32. Enter DNS servers(you can have your own, or use public DNS from Google or Yandex), click Next:

33. Enter the lease term for IP addresses(you can not change the default one), click Next:

On this DHCP server setup completed:

34. Now let's set up WiFi. Click on the menu on the left Wireless, in the opened window double-click to open the wlan1 interface, and set parameters:
- mode- ap bridge
- Band- 2GHz-B/G/N
- SSID- enter the name of your WiFi network
- Wireless Protocol - 802.11
- WPS Mode - disabled
After that press OK:

35. Now let's set a password for our network. let's move on in Security tab Profiles, open default profile. Now:
-set the Mode parameter into position dynamic keys
- tick WPA2 PSK in parameter Authentication Types
- put all the checkboxes in Unicast Ciphers and Group Ciphers
- in the WPA2 Pre-Shared Key field, enter the password from WiFi network
- press OK

36. Connect to WiFi, check its performance. Active connections can be viewed in the Registration tab:

37. Now disable all router management interfaces, except for WinBox(if necessary, leave the ones you need, but from a security point of view, we do not recommend using a firewall without using a firewall). For this we go to IP-> Services, select unnecessary services and click the red cross:

38. It remains to set the administrator password. Let's go to System-> Users, login to admin user profile, press Password, enter the password twice in the fields New Password and Confirm Password and click OK:


Let's test the real speeds that can be achieved by wireless Wi-Fi chips in hAP AC Lite. To do this, we will use the following scheme:

From a laptop working via Wi-Fi with hAP AC Lite, we will download a file located on the computer and connected via a wired LAN fast Ethernet interface (100 Mbps). Thus, we will simulate the situation when we download some information from the Internet.
In the first test, we will use the 802.11n standard in the 2.4 GHz band using single chain - MIMO 1:1×1. In this option, the maximum channel rate in accordance with the specification can be equal to 150 Mbps.

The test result shows that the actual download speed when using 802.11n single chain was 50 Mbps. And the real connection speed was 72 Mbps. This is because 2.4GHz is very noisy and the router can't use WiFi signal spread spectrum to set a better performance. wireless channel connections.
In the next speed test, we will also use 802.11n, but with dual chain 2:2×2. The theoretical channel speed in this case is 300 Mbit/s. To achieve this speed, support for this technology must be provided not only on the router side, but also on the client side.

The test shows that the actual download speed was 94 Mbps, which is close to the maximum bandwidth of the Ethernet interface. The channel connection speed was 144.4 Mbps, which is clearly not up to maximum values at 300 Mbps. The fact is confirmed that 2.4 GHz cannot use the maximum data transfer rates due to the noisiness of the air in an urban environment.
In this test, we will use another RB952Ui-5ac2nD wireless chip, namely QCA9887 with support for 802.11 ac technology at 5 GHz with single-chain.

The graph shows that the actual download speed was 92 Mbps, the channel speed was 433 Mbps. The limitation of the actual download speed is caused by the performance ceiling of the Ethernet interface. It follows that the 802.11 ac standard overrides the capabilities of the 100 Mbps port that hAP AC Lite uses.
From the tests carried out, we can conclude that the use of double chain in the 802.11n standard is fully justified, because single-chain does not reach the maximum bandwidth of the router.
The use of single-chain in the 802.11 ac standard also looks logical, because the performance of the wireless module is more than enough to override the capabilities of the router. Therefore, the RB 952Ui-5ac2nD looks like a very balanced device. And the use of such technologies as Triple Chain on 802.11 n and Double / Triple Chain on 802.11 ac is unjustified.
You can learn how to set up MikroTik in an online course on equipment from this manufacturer. The course author is a certified MikroTik trainer. You can read more at the end of the article.
MikroTik hAP lite or RB941 (code on the manufacturer's website) is a small model of a Latvian company. This is one of the cheapest MikroTik devices, priced at around $25. The abbreviation hAP stands for home Access Point lite - home access point (simplified version).
For those who have encountered the equipment for the first time, there is a semi-automatic setting mode for Mikrotik hAP lite. The wireless router will automatically create an access point. New devices can be connected using the WPS (Wi-Fi Protected Setup) function without too much headache.
If you are not satisfied with the basic setup scenario and you are far from new to setting up equipment, then you will be pleased with the wide possibilities of configuring the device.
Ports Mikrotik RB941
The device has only 4 Ethernet ports instead of 5, unlike the older brother MikroTik HAP AC. Work speed fast ethernet ports is 100 Mbps. The Ethernet LEDs are on the back of the router.

Nutrition Mikrotik hAP lite
This is the first device with a 5V DC power supply. Recommend pay attention to the fact that it is possible to use any standard 0.5-2A USB adapter, including adapters from many mobile phones or tablets. In emergency situations, the router can be powered by a battery power bank. Here is your mobile hotspot! microUSB port in this device cannot be used for data transmission!

Wireless module of the RB941 device
- supports frequency range 2.4 GHz;
- possible data transfer protocols: 802.11 b, 802.11 g and 802.11 n;
- transmitting antenna power is up to 22 dBm;
- gain of two internal antennas up to 1.5dbi;
- the data reception / transmission speed is up to 300 Mbit / s due to the support of MIMO 2x2 technology.
Rich functionality Mikrotik RB941
This tiny device, with RouterOS on board, has absorbed most of the modern technologies for networking.
The heart of the device is the QCA9531-BL3A-R network processor with clock frequency 650MHz which is paired with 32MB of RAM. These capabilities are enough to process requests from 2-3 people.
Huge functionality provided operating system RouterOS with level 4 license. Here is just a part of the functionality supported by the device:
- creation of virtual local networks VLAN and other modern network technologies,
- organization of encrypted VPN channels
- connection to Internet providers using PPPoE, DHCP, Static IP,
- support for integration technology into a single wireless infrastructure thanks to technology from Mikrotik - CAPsMAN,
- control and restriction of network traffic,
- support for the operation of each port both in the “switching” mode and in the “routing” mode.
This is not a complete list of equipment features with RouterOS on board.

Level 4 license restrictions:
| License Level | 4 |
| Price | $45 |
| Support initial setup | 15 days |
| Wireless AP support | there is |
| Support for Wireless Client and Bridge functions | there is |
| Support for RIP, OSPF, BGP protocols | there is |
| Number of EoIP tunnels created | no restrictions |
| Number of PPPoE tunnels created | 200 |
| Number of PPTP tunnels created | 200 |
| Number of L2TP tunnels created | 200 |
| Number of OVPN tunnels created | 200 |
| Number of created VLAN interfaces | no restrictions |
| Number of active HotSpot clients | 200 |
| RADIUS client support | there is |
| Support for Queues | no restrictions |
| Web proxy organization | there is |
| Maximum number of active User manager sessions | 20 |
| Maximum number of KVM guests | no restrictions |
The best choice in the price category under $25
It's hard to believe that a $25 device can offer so many useful features like BGP! wifi router It is small in size but powerful enough to do the job well. The stability of work is another serious plus in the treasury of the router.
Disadvantages of the Mikrotik hAP lite RB941 device
Unfortunately, when the device was released to the market at such an attractive price, something had to be sacrificed.
- No Power-over-Ethernet POE feature (how many home users know what this is?!)
- Wireless wifi network without 5 GHz band. This is already more significant, the maximum theoretical performance of 600 Mbps for the 802.11 n standard cannot be achieved.
- The WiFi adapter is not as powerful as I would like.