Enable uefi mode in asus bios. How to disable Secure Boot protection in BIOS with UEFI support. Section Exit - Exit and save
Designed over 30 years ago, the BIOS's basic input/output system is outdated by today's standards. It is being replaced by the UEFI specification, which significantly changes the established and familiar boot procedure. This article is for those who are interested in a computer with UEFI.
Replacing an outdated BIOS
The Extensible Firmware Interface was developed by Intel in 1998. The current version of the specification is called the Unified Extensible Firmware Interface. Computers released after 2010 are highly likely to work with the UEFI system. Unlike BIOS, new specification codes can be stored both on a chip motherboard, and in a special HDD section.
UEFI works with the new GPD layout, which is capable of supporting HDDs larger than 2TB and an unlimited number of partitions. In addition, the UEFI architecture is modular, hence supporting custom applications and drivers. 
And, the most important part for this article: the new specification has a built-in download manager. Thereby Windows installation 7 c USB or external HDD does not require third-party downloaders.
Create a bootable flash drive
For creation, the Rufus 1.4.3 utility is considered. The program is notable for the fact that it does not require installation, has a very small size and is distributed completely free of charge. Of course, Rufus supports GPT markup HDD and work with the UEFI specification. The current version of the utility is available for download from the official website of the manufacturer.

After starting the utility, you must specify the name of the flash drive that will be bootable ( Attention! All data will be permanently deleted from it!), file system(choose FAT32), partition scheme, and system interface (choose GPT and UEFI). Opposite "" you need to specify the path to the ISO Windows image 7.
When all the parameters are correct, you can click on the "Start" button, and the process of preparing a bootable flash drive will begin. This will take some time, depending on the speed of your computer and the USB generation.
Apart from Rufus you can use WinSetupFromUSB program. It can also be downloaded from the manufacturer's website. The interface of these two programs is almost the same, so it makes no sense to consider the process separately.
Preparing for installation
In order to start the installation from a flash drive, you must first configure UEFI. To do this, you need to restart your computer and press F2 or Delete (depending on your motherboard, press both keys to be sure). After these steps, as in the case of the BIOS, you will be taken to the main control menu.
Press F7 or select the "Advanced" section. Next, go to the "boot" menu, select the option " USB support» and install Full Initialization. In the "Secure Boot" menu, set "Windows uefi mode".
Now open the Compatibility Support Module (or CSM) menu and in the "launch CSM" item, select "enabled". Open additional options and in the item "boot device options" select "only uefi". This item will allow you to filter flash drives and HDDs that cannot work with your specification. In the "boot from storage devices" column, select "both, uefi first".
Now you just have to specify the boot priority (boot priority). Place in the first place bootable flash drive, on the second - your HDD. The settings are completed, save them with the F10 key, confirm the decision, and the computer will restart. 
Windows installation
If the previous points were followed correctly, after the computer is restarted, the standard installation of the operating system from the USB flash drive will begin. Click "next", "install", accept the user agreement, select full installation.

Now you need to call command line combination Shift + F10 . Next, enter the following sequence of commands:
diskpart (press enter after each command)
sel dis 0
clean
convert gpt
exit
exit

This place is more detailed. With these commands, you will delete all data from the HDD, mark it as GPD and format it for the subsequent installation of the system. Click "update" and "next".
The installation of Windows 7 on the HDD of your personal computer will begin. During the installation process, the PC will be rebooted several times, after which you will have to specify its name and password, time zone and set a list of users. Once the installation is complete, Microsoft Update will download and install all the necessary patches and drivers, and you will be ready to use your computer.
Secure Boot in BIOS with UEFI support
Protocol safe boot Secure Boot, based on special certified keys available only for Windows 8 and higher, will not allow you to install the operating system on your computer from any installation media other than media with "eight" or "ten". Therefore, in order to start installing another system on your desktop computer or laptop, you will need disable Secure Boot in UEFI-BIOS.
The "Secure Boot" parameter, which is responsible for disabling the secure boot protocol, is in most cases located in the " Security", " System Configuration" or "Boot" sections. But I want to say that to install, for example, Windows 7 on new laptop with UEFI-BIOS, it will not be enough to disable only "Secure Boot" in UEFI-BIOS, you also need to enable compatibility mode with others operating systems.
The parameter responsible for this is called by all manufacturers in different ways: “Launch CSM”, “CMS Boot”, “UEFI and Legacy OS”, “CMS OS”. And it is located, in the vast majority, in the section " Advanced", And in it, in the subsections" boot mode or OS Mode Selection.
On a laptop:
How to disable Secure Boot and UEFI on Toshiba laptop
When booting the laptop, press the F2 key and enter the UEFI-BIOS. Go to the "Security" section and find the "Secure Boot" option, switch it to the "Disabled" position.
In such a simple way, we were able to disable Secure Boot in UEFI-BIOS. But that is not all. Now you need to enable compatibility mode for other operating systems. We go to the "Advanced" section, find the "System Configuration" subsection and go into it.

Here we select the “Boot Mode” or “OS Mode Selection” parameter, and switch it from the “UEFI OS” position (possibly “UEFI Boot”) to the “CSM Boot” position (possibly “UEFI and Legacy OS” or “CMS OS”) .

For the changes to take effect, press F10 and confirm saving the changes by selecting "Yes". Reboot. Now we will be able to load any operating system on our laptop.
How to disable Secure Boot and UEFI on an HP laptop
Sometimes things aren't so obvious. For example, on some models of HP Pavillion laptops, to disable Secure Boot, you need to perform a few more additional operations.
We press the F10 key when booting the laptop (possibly ESC, then F10) and enter the UEFI-BIOS. We go into the "System Configuration" section, find the "Boot Options" subsection and go into it.

Find the "Secure Boot" option and switch it to the "Disabled" position. And the parameter of the compatibility mode with other operating systems "Legacy support", on the contrary, is switched to the "Enabled" position (Enabled).

We answer the warning with the consent "Yes".
In order for the changes to take effect, press F10 and confirm the saving of these changes by selecting "Yes". Restarting the computer. After the reboot, a window pops up with the warning "A change to the operating system secure boot mode is pending…”. In English, we are offered to enter the code 8721 on the laptop keyboard (in your case, the code, of course, will be different) and press Enter. After this, the changes in the UEFI-BIOS settings will be saved and the laptop will reboot again.

When you turn on the HP laptop, press the ESC key and you will be taken to the start menu. In it, select "F9 boot device Options ”and, going to the boot menu, select the installation USB flash drive (already connected) or the installation DVD with the operating system distribution kit.
How to disable Secure Boot and UEFI on an Asus laptop
(Aptio Setup Utility)
When booting up the laptop, press the DELETE key and enter the UEFI-BIOS. We go to the "Security" section and, having found the "Secure Boot" parameter, switch it to the "Disabled" position.

Then go to the "Boot" section and, having found the "Fast Boot" parameter, switch it to the "Disabled" position.

For the changes to take effect, press F10 and confirm saving the changes by selecting "Yes". Reboot laptop. Again we enter UEFI-BIOS. We go into the “Boot” section and, having found the “Launch CSM” parameter, switch it to the “Enabled” position.

Press F10 again and confirm saving the changes by selecting "Yes". Reboot. When turned on Asus laptop press the ESC key and get into the boot menu. In it, select the installation USB flash drive (already connected) or the installation DVD with the operating system.
How to disable Secure Boot and UEFI on a Samsung laptop
(Aptio Setup Utility)
We press the F2 key when booting the laptop and enter the UEFI-BIOS. We go to the "Boot" section and find the "Secure Boot" parameter.

Switch it to the "Disabled" position.

At the warning that the computer may boot with an error, press Enter.

In the same section, the “OS Mode Selection” parameter will appear below.

Switch it to "CMS OS" or "UEFI and Legacy OS".

Again, a warning will appear next boot laptop with an error. Press Enter. For the changes to take effect, press the F10 key and confirm saving the changes by selecting "Yes". Reboot laptop. Now we can download any operating system to our laptop, if it doesn’t work, contact CompraiExpress.
How to disable Secure Boot and UEFI on an Acer Aspire laptop
(InsydeH20 Setup Utility)
Press the F2 key when booting the laptop and enter the UEFI-BIOS. Here we go to the “Main” section and, having found the “F12 Boot Menu” parameter, switch it to the “Enabled” position. With this action, we allowed the appearance of the laptop boot menu when pressing the F12 key.

Next, go to the “Security” section and, having found the “Set Supervisor Password” parameter, press the Enter key. In the upper field, set the password (we will reset it later) and press Enter. In the lower field, enter the same password and press Enter again.

At the message "Changes have been saved", press the Enter key again.


In order for the changes to take effect, press the F10 key and confirm saving the changes by selecting "Yes". Reboot laptop. Since it makes sense to remove the password we previously set (the ability to disable / enable "Secure Boot" will remain), we enter UEFI-BIOS again using F2, go to the "Security" section and, having found the "Set Supervisor Password" parameter, press the Enter key . In the upper field, enter the password we previously set and press Enter. In the second and third fields, do not enter anything, just press Enter.

At the message "Changes have been saved" press Enter again. That's all! The password has been reset, and the ability to disable / enable "Secure Boot" has been preserved. For the changes to take effect, press the F10 key and confirm saving the changes by selecting "Yes". Reboot. Now we will be able to load any operating system on our laptop.
On a desktop computer:
How to disable Secure Boot and UEFI on an Asus motherboard
We press the DELETE key (possibly F2) when booting the laptop and enter the UEFI-BIOS. Press F7 to switch to "Advanced Mode".

We go into the “Boot” section, find the “Secure Boot” subsection there and go into it.

Switch the "Secure Boot" option to "Other OS".

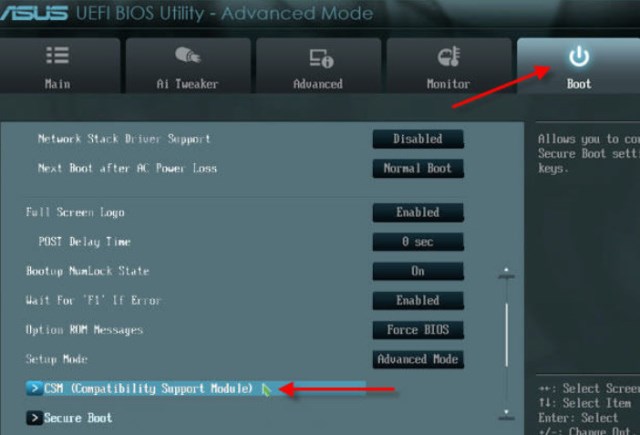
Switch the "Launch CSM" parameter to the "Enabled" position.

In the additional options that open, select "Boot Device Control" and switch to the "Legacy OpROM only" or "UEFI and Legacy OpROM" position.

Go to the "Boot from Storage Devices" parameter and switch it to the "Legacy OpROM first" or "Both, Legacy OpROM first" position.

With these steps, we were able to disable Secure Boot and enable advanced boot mode. For the changes to take effect, press the F10 key and confirm saving the changes by selecting "Yes". Reboot. Now we will be able to load any operating system on our computer.
How to disable Secure Boot and UEFI on Asrock motherboard
We press the DELETE key (possibly F2) when the computer boots and enter the UEFI-BIOS. We go to the "Security" section and, having found the "Secure Boot" parameter, switch it to the "Disabled" position.

In order for the changes to take effect, press the F10 key and confirm saving the changes by selecting "Yes". Reboot. Now you can download any operating system to your PC.
We press the DELETE key when booting the PC and enter the UEFI-BIOS. We go into the “BIOS Features” section and, having found the “Windows 8 Features” parameter, switch it to the “Other OS” position.
Then the “Boot Mode Selection” parameter is switched to the “Legacy only” or “UEFI and Legacy” position. And, finally, the “Other PCI Device ROM Priority” parameter is switched to the “Legacy OpROM” position.

To save the changes, press the F10 key and confirm saving the changes by selecting "Yes". Reboot. Now we will be able to load any operating system on our computer.
How to disable Secure Boot and UEFI on an MSI motherboard
When the PC boots, press the DELETE key and enter the UEFI-BIOS. Here we go to the "SETTINGS" section, go to the "Boot" subsection, and finding the "Boot Mode Select" parameter, switch it to the "Legacy + UEFI" position.

For the changes to take effect, press the F10 key and confirm saving the changes by selecting "Yes". Reboot. Now we will be able to load any operating system on our computer.
Write in the comments if it helped you this instruction solve the problem with installing the operating system on Personal Computer or laptop.
If you have any difficulties with setting up the BIOS, you can contact us for advice or help from a computer wizard. Call by phone:
Vitaly Voshchatinsky. 2 years ago:
Many thanks for the work done. But in my case, the Acer Aspire laptop does not have the ability to change BOOT MODE. Is there a solution to this issue?
Zoro Vitaly Voshchatinsky. 2 years ago:
Good day! And I have such a miracle)) Maybe they found a solution?
Vitaly Voshchatinsky Zoro . 2 years ago:
AT service center"vysera". oh acer. I was told. that this model has support only for Windows 10. I invited a guy according to the announcement and he took 3 hours, installed Ubuntu 17 for me, but at the same time the computer does not turn off. then everything will be slowed down. But you can physically turn off the power only by pressing the turn button.
Andrey. 2 years ago:
laptop acer aspire. set a password and boor mode did not unlock, only secure boot ... I don’t know what to do next Max Chu
Andrey. a year ago:
The same problem. How to be I do not know. Maybe only flashing the BIOS will help. but again how to do it. 10 does not allow you to install another version.
Denis Kuptsov. 2 years ago:
THANK YOU SO MUCH!!! So I have been changing Windows for myself and my friends for a long time! but 1 time I decided to reinstall it on a laptop! and the pipets thought he broke the computer)) damn what would I do without you))) I love you)))
Ivan Hello. 2 years ago:
Bliiiiiin thank you! At least this security turned it off! I'm at work right now, so I won't be able to test whether the seven will get up, but after the change I'll try ..... Thank you so much. The site is bookmarked .....
Dalai Lama. 2 years ago:
Thank you Bro for your hard work helping unreasonable users! Zae .. suffered to look for answers! Your article is great!
Irina Yusupova. 2 years ago:
I toiled and couldn’t figure it out, I’ve already rummaged through the entire Internet until I found this article - it’s quite accessible and clearly described. Thank you.
Stanislav. 2 years ago:
Many, human thanks, the detailed article for HP laptops helped, I suffered for a long time, and then with the help of you everything was possible in 5 minutes, and now Windows 7 is already completing the installation, thank you!
Stanislav. 2 years ago:
Thanks for the detailed instructions! I puzzled for a very long time, but here everything turned out to be extremely simple! The site is bookmarked, so to speak for the future!
Pavel. 2 years ago:
As if on purpose, I myself had such a problem after I activated dozens from 8ki. But the necessary programs did not work in it, I decided to install the seven 64-bit, but, like many, I ran into the notorious security boot, which did not allow me to do this. Toshiba instructions helped, thanks
Simon Markina. 3 years ago:
I wanted to install Linux on a new laptop. But nothing worked with this new BIOS for me. The article helped a lot. Now I have Ubuntu.
Dmitry Vernik. 3 years ago:
Here I have just ASUS! Thanks for the article, it helped a lot! I have been looking for detailed instructions for a long time!
Ivan. 3 years ago:
The article saved, everything is painted in great detail and shown in the photo. After reading I was able to install Win 7 instead of the pre-installed Win 8.1)))
Yuri Shokin. 3 years ago:
It's good when there are such detailed articles and guides on BIOS functions. It was not clear to me how to disable secure boot on lenovo laptop, made by analogy with other brands. With such timely tips, I managed to reinstall the operating system quickly, thanks for the valuable advice.
Evgeny Maslennikov. 3 years ago:
Tin, guys, in other words there is simply no way to describe how much I suffered over the past weekend, thank you very much for your advice!
Ivan. 3 years ago:
Respect to the author! Finally, I came across an article that normally describes how to disable Secure boot in different UEFI BIOSes. Otherwise, you will forever comb the entire Internet until you collect the complete picture. Thanks, made it very easy reinstalling windows 8.
Ivan Shchepelin. 3 years ago:
Thank you! I am completely zero in this, but with your recommendations and with the help of my friend, they managed to install Windows 7 on an Acer laptop)
If you have a need to reinstall the operating system, then in Asus uefi bios utility ez mode it is not at all necessary to change the boot priority settings to boot from a boot device, whether it be installation disk windows.
To choose where to boot the computer, you just need to press the F8 button several times when turning it on to display the boot device selection window.
Asus uefi bios utility ez mode boot menu called by F8 button
Here, using the arrow keys and the Enter key, select what to boot from.
If, however, you still need to change the boot priority in Asus uefi bios utility ez mode, then in the same window select "Enter Setup" to enter Asus uefi bios utility ez mode.

Selecting a boot device from the main menu
In its main window, you can set the boot from the disk by dragging its icon to the leftmost position in the lower left corner of the screen.
If you need to change the priority hard drives or switch to a flash drive, then press the F7 key to enter the advanced settings of Asus uefi bios utility ez mode.

Boot priority in advanced Asus settings uefi bios utility ez mode
In the advanced settings, go to the "Boot" tab and in the "Hard drive BBS Priorities" section, put the desired HDD or flash drive.

Selecting a flash drive or hard drive in Asus uefi bios utility ez mode settings
After that, in Boot option No. 1, we put the USB flash drive or hard drive selected in the previous section.
At the end of all actions, save the changes with the F10 button and reboot.
The best way thank the author of the article - make a repost to your page
Page 1 of 6
Company Asus in their motherboards under the socket 1155 provided the user with new options for managing settings through the BIOS, presenting it with a graphical shell and the ability to change settings using the mouse. Let's see what has changed compared to the old way of presenting using pseudographics (text interface).
When preparing the article, motherboards were used ASUS P8P67 (LGA1155)
and ASUS P8P67 Deluxe (LGA1155)
.
Warning: The information provided in this article is for informational purposes only.
Our portal is not responsible for possible or occurred damage in any of their manifestations, following or not following the information provided in this article.
EZ Mode
By default, the mode is enabled EZ Mode :
Several languages are supported, but Russian is not among them.
In case of operation in EZ Mode
a fully graphical shell appears, unlike the normal mode, which is as compatible and understandable as possible with previous versions BIOS from ASUS
.
Everything is simplified as much as possible - there are three performance presets and a load order manager.
Everybody.
You can switch to advanced mode like this: 
Main
The location of the main BIOS elements is typical (Advanced Mode) - at the top are the names of the sections, on the right side are hints, what each section is responsible for and which keys are available for navigation.
 The first section of the menu contains information about BIOS versions, processor, memory. You can select the language and set the system time.
 In the Security subsection, you can set a user password and an administrator password.
AI Tweaker
This is the section responsible for overclocking and operating modes of the processor, memory and power management system of the EPU.
 AI overclock tuner
- the option offers 3 overclocking options: Auto (automatic), Manual (manual), using the X.M.P. profile, where the processor and memory frequencies are set optimal to achieve the memory frequency specified in the profile).
AI overclock tuner
- the option offers 3 overclocking options: Auto (automatic), Manual (manual), using the X.M.P. profile, where the processor and memory frequencies are set optimal to achieve the memory frequency specified in the profile).
 Turbo Ratio
sets the Turbo Boost mode of the processor.
Turbo Ratio
sets the Turbo Boost mode of the processor.
 memory frequency
– selection of memory frequency.
memory frequency
– selection of memory frequency.
 EPU Power Saving Mode
- enabling the power saving mode of the motherboard ...
EPU Power Saving Mode
- enabling the power saving mode of the motherboard ...
 .. and select the energy saving option: minimum, medium, maximum.

OC Tuner
– function of auto-acceleration of the system. Use with caution.

 Subsection DRAM Timing Control
responsible for fine-tuning memory timings. The current values of the timings of the installed memory modules are also displayed.
Subsection DRAM Timing Control
responsible for fine-tuning memory timings. The current values of the timings of the installed memory modules are also displayed.
 CPU power management
- here we set the multiplier of the processor ...
CPU power management
- here we set the multiplier of the processor ...
 ... enable Intel SpeedStep technology (lower processor voltage and frequency when idle) ...
 ... and enable or disable Turbo Boost mode.
 Long Duration Power Limit
allows you to redefine the maximum TDP of the processor for continuous operation. Indicated maximum value.
Long Duration Power Limit
allows you to redefine the maximum TDP of the processor for continuous operation. Indicated maximum value.
For example, for a processor Intel Core i5-2400
the base value is 95.
 Long Duration Maintained
- The maximum duration of the processor with TurboBoost technology enabled when the Long Duration Power Limit value is exceeded.
Long Duration Maintained
- The maximum duration of the processor with TurboBoost technology enabled when the Long Duration Power Limit value is exceeded.
 Short Duration Power Limit
- second TDP limit - triggered when the value of the first limit is exceeded.
Short Duration Power Limit
- second TDP limit - triggered when the value of the first limit is exceeded.
The operating time in this mode cannot be adjusted.
According to Intel specifications, it works up to 10 seconds.
 Additional Turbo Voltage
– maximum additional voltage supplied to the processor in Turbo Boost mode.
Additional Turbo Voltage
– maximum additional voltage supplied to the processor in Turbo Boost mode.
 Primary Plane Current Limit
- the maximum current strength allowed to power the processor (step 0.125A).
Primary Plane Current Limit
- the maximum current strength allowed to power the processor (step 0.125A).
 Subsection DIGI+ VRM
allows you to more accurately configure the processor power system on the motherboard.
Subsection DIGI+ VRM
allows you to more accurately configure the processor power system on the motherboard.
These five profiles are related to Load-Line Calibration, which is used to compensate for core voltage drops when the load on the processor increases. In Regular mode, it works according to Intel specifications. The remaining profiles adjust the speed of response to voltage sag, and are necessary for overclocking. The higher the value, the more overclocking can be achieved, however, the heating of the processor and power elements of the motherboard will increase.
 VRM Frequency
– enabling automatic or manual control of the VRM frequency of the processor power module.
VRM Frequency
– enabling automatic or manual control of the VRM frequency of the processor power module.
 VRM Fixed Frequency Mode
- in manual mode you can set the switching frequency of the phases of the VRM module. The adjustment range is from 300 to 500 kilohertz, with a step of 10 kHz.
VRM Fixed Frequency Mode
- in manual mode you can set the switching frequency of the phases of the VRM module. The adjustment range is from 300 to 500 kilohertz, with a step of 10 kHz.
 VRM Spread Spectrum
- enable or disable the Spread Spectrum mode for the VRM of the processor power module (not to be confused with Spread Spectrum for the processor!).
VRM Spread Spectrum
- enable or disable the Spread Spectrum mode for the VRM of the processor power module (not to be confused with Spread Spectrum for the processor!).
 Phase control
- selection of the operation algorithm of the control unit for controlling the power phases of the processor.
Phase control
- selection of the operation algorithm of the control unit for controlling the power phases of the processor.
 Manual adjustment
- in the manual mode for controlling the power phase switching algorithm, you can select one of four presets - from conservative Regular to the fastest Ultra Fast.
Manual adjustment
- in the manual mode for controlling the power phase switching algorithm, you can select one of four presets - from conservative Regular to the fastest Ultra Fast.
These presets are related to Load-Line Calibration. In Regular mode, it works according to Intel specifications. The remaining profiles adjust the speed of response to voltage sag, and are necessary for overclocking. The higher the value, the more overclocking can be achieved, however, the heating of the processor and power elements of the motherboard will increase.
 duty control
- the module controls the control of the components of each phase of the processor power supply (VRM).
duty control
- the module controls the control of the components of each phase of the processor power supply (VRM).
Two positions are possible:
T.Probe - the module focuses on the optimal temperature conditions of the VRM components.
Extreme - maintains the optimal balance of VRM phases.
We recommend leaving T.Probe.

CPU Current Capability
- module for controlling the range of possible power consumption by the processor. There are five positions in total - from 100 to 140%:
If you are overclocking the processor, it is better to choose a higher value.
CPU Voltage - select the processor voltage control mode (Offset or Manual).

Offset Mode Sign
– defines the increment (+) / decrement (-) of the supply voltage offset value. talking plain language- increasing or decreasing the processor voltage depends on the voltage sewn into the processor, which is an accurate reading.
 CPU Offset Voltage
– sets the offset value (from 0.005V to 0.635V) of the voltage.
CPU Offset Voltage
– sets the offset value (from 0.005V to 0.635V) of the voltage.
 CPU Manual Voltage
specify the processor supply voltage manually (from 0.800V to 1.990V in 0.005V increments).
CPU Manual Voltage
specify the processor supply voltage manually (from 0.800V to 1.990V in 0.005V increments).
 DRAM Voltage
- voltage random access memory(from 1.20V to 2.20V in steps of 0.00625V).
DRAM Voltage
- voltage random access memory(from 1.20V to 2.20V in steps of 0.00625V).
 VCCSA Voltage
— supply voltage of the System Agent. Range: 0.800V to 1.700V in 0.00625V steps.
VCCSA Voltage
— supply voltage of the System Agent. Range: 0.800V to 1.700V in 0.00625V steps.
 VCCID Voltage
— supply voltage of the I/O system of the processor (ring bus). Range: 0.800V to 1.700V in 0.00625V steps.
VCCID Voltage
— supply voltage of the I/O system of the processor (ring bus). Range: 0.800V to 1.700V in 0.00625V steps.
 CPU PLL Voltage
– voltage setting for synchronization of internal multipliers (Phase-Locked Loop - phase automatic frequency control) (from 1.2000V to 2.2000V in steps of 0.00625V).
CPU PLL Voltage
– voltage setting for synchronization of internal multipliers (Phase-Locked Loop - phase automatic frequency control) (from 1.2000V to 2.2000V in steps of 0.00625V).
PCH Voltage - voltage of the "south" bridge (from 0.8000V to 1.7000V in steps of 0.0100V)


DRAM DATA REF Voltage and DRAM CTRL REF Voltage set a multiplier for each of the memory modules (from 0.3950x to 0.6300x with a step of 0.0050x).
 CPU Spread Spectrum
- when overclocking, it is better to turn off this option to increase the stability of the system.
CPU Spread Spectrum
- when overclocking, it is better to turn off this option to increase the stability of the system.
When switching Ai Overclock tuner to Manual mode, more options are available.
BCLK/PEG Frequency
– base frequency setting (from 80 to 300 MHz)
Due to the nature of the platform LGA 1155
, it is problematic to get a stable system with a reference frequency above 105 MHz.
Advanced
Advanced setup contains 7 subsections, each of which is described below.
 CPU Configuration
- it displays the current parameters of the processor and provides the ability to change them. One of them, CPU Ratio, sets the processor multiplier.
CPU Configuration
- it displays the current parameters of the processor and provides the ability to change them. One of them, CPU Ratio, sets the processor multiplier.
 Intel Adaptive Thermal Monitor
- if desired, you can disable the monitoring of the thermal state of the processor by the internal control mechanism. We do not recommend doing this, as this functionality is responsible for the health of the processor.
Intel Adaptive Thermal Monitor
- if desired, you can disable the monitoring of the thermal state of the processor by the internal control mechanism. We do not recommend doing this, as this functionality is responsible for the health of the processor.
 Active Processor Cores
– this option allows you to set the number of active processor cores.
Active Processor Cores
– this option allows you to set the number of active processor cores.
Might be useful for benchers.
 Limit CPUID Maximum
– the option must be disabled for “old” operating systems (Windows XP).
Limit CPUID Maximum
– the option must be disabled for “old” operating systems (Windows XP).
 Execute Disable Bit
- technology to protect your computer from hacker attacks and viruses. It is recommended to enable this option if the processor supports this technology.
Execute Disable Bit
- technology to protect your computer from hacker attacks and viruses. It is recommended to enable this option if the processor supports this technology.
 Intel Virtualization Technology
– required for hardware support of virtual machines (VMM).
Intel Virtualization Technology
– required for hardware support of virtual machines (VMM).
 Enhanced Intel SpeedStep Technology
- a technology that allows the OS to dynamically change the processor voltage and core frequency depending on the load to reduce power consumption.
Enhanced Intel SpeedStep Technology
- a technology that allows the OS to dynamically change the processor voltage and core frequency depending on the load to reduce power consumption.
 Turbo Mode
– enable/disable Turbo Boost technology for Intel processors(increasing the frequency of cores with increasing load).
Turbo Mode
– enable/disable Turbo Boost technology for Intel processors(increasing the frequency of cores with increasing load).


 CPU C1E
, CPU C3 Report
, CPU C6 Report
“signal” the OS that the processor supports advanced power saving modes.
CPU C1E
, CPU C3 Report
, CPU C6 Report
“signal” the OS that the processor supports advanced power saving modes.
Better turn it on to reduce CPU power consumption when idle.
 System Agent Configuration
- allows you to specify which of the video adapters will be initialized first (Initiate Graphic Adapter), perhaps something else will appear in the future.
System Agent Configuration
- allows you to specify which of the video adapters will be initialized first (Initiate Graphic Adapter), perhaps something else will appear in the future.
 PCH Configuration
- also contains 1 option - High Precision Timer, which enables / disables the High Precision Event Timer (HPET - High Precision Event Timer).
PCH Configuration
- also contains 1 option - High Precision Timer, which enables / disables the High Precision Event Timer (HPET - High Precision Event Timer).

 SATA Configuration
– in this subsection, connected devices are displayed and it is possible to set the operating mode of SATA ports (Disabled, IDE Mode, AHCI Mode, RAID Mode) and enable/disable S.M.A.R.T. check. Very convenient display of which port each device is connected to, and which port it is on the motherboard (indicating the color of the port).
SATA Configuration
– in this subsection, connected devices are displayed and it is possible to set the operating mode of SATA ports (Disabled, IDE Mode, AHCI Mode, RAID Mode) and enable/disable S.M.A.R.T. check. Very convenient display of which port each device is connected to, and which port it is on the motherboard (indicating the color of the port).
 For each of the ports, you can enable hot plugging of the device − hot plug
.
For each of the ports, you can enable hot plugging of the device − hot plug
.


USB configuration - USB devices connected to the motherboard at the time of entering the BIOS are displayed here, and you can also enable / disable the USB 2.0 and USB 3.0 controllers.
 EHCI Hand-off (Enhanced Host Controller Interface)
— Enable or disable advanced USB controller management. For compatibility with operating systems that do not support this function, - turned off.
EHCI Hand-off (Enhanced Host Controller Interface)
— Enable or disable advanced USB controller management. For compatibility with operating systems that do not support this function, - turned off.
Onboard Device Configuration
– in this subsection, it is possible to enable / disable various controllers available on the motherboard, as well as set their operating modes:  The first option enables/disables the HD audio controller.

 Below are the specifications for audio output to the front panel (HD, AC97), as well as which source to transmit "digital" audio - SPDIF or HDMI.
 Separately, you can enable / disable the operation of the USB 3.0 controller ...
 ... and FireWire (IEEE-1394) buses.
 These options set the operating mode of the Marvell SATA controller (SATA 3.0).


 The first option is responsible for turning on / off the network controller, and Realtek PXE OPROM
is an analogue of BootROM (OS boot over the network).
The first option is responsible for turning on / off the network controller, and Realtek PXE OPROM
is an analogue of BootROM (OS boot over the network).
If there is a JMB controller (depending on the type it supports SATA and IDE disk drives), it becomes possible to turn it on / off, as well as set the operating modes: 
 If you want the Marvell controller OPROM to be loaded at system boot, enable this item.
 The Display OptionRom in Post option allows you to “reduce” the amount of information displayed and thus the system will load a little faster.

 If the motherboard has 2 network controllers, then 2 more additional options appear - Intel Lan Controller and Intel PXE OPROM.
 Serial Port Configuration
– enables/disables the operation of the RS-232 serial port and you can change the address and interrupt of the port.
Serial Port Configuration
– enables/disables the operation of the RS-232 serial port and you can change the address and interrupt of the port.
 APM
– subsection that determines the operation of the system after a power loss ( Restore AC power loss
) and sources that you can use to turn on your computer. They are typical, so the possible parameters are simply shown in the screenshots:
APM
– subsection that determines the operation of the system after a power loss ( Restore AC power loss
) and sources that you can use to turn on your computer. They are typical, so the possible parameters are simply shown in the screenshots:
Monitor
A section that displays the main controlled parameters of the processor, motherboard, fan speed, etc. 
 CPU Q-Fan Control
- Enables CPU fan speed control.
CPU Q-Fan Control
- Enables CPU fan speed control.
 CPU Fan Speed Low Limit
– sets the minimum controlled processor fan speed.
CPU Fan Speed Low Limit
– sets the minimum controlled processor fan speed.
 CPU Fan Profile
- provides the user with profiles of the processor fan operating modes.
CPU Fan Profile
- provides the user with profiles of the processor fan operating modes.
Hello dear readers! Today we will talk about one topic that is difficult at first glance, which will sound like this: UEFI Boot - what is it and how to disable UEFI in BIOS.
Of course, for a simple user, all these names and abbreviations do not mean anything, but nevertheless, buying modern desktop computers and laptops, you will still come face to face with these concepts.
Yes, friends, this is the same settings section on a blue background, which you can enter at the very beginning when you turn on the computer. Here's a picture to refresh your memory:

Many more enthusiasts tried to play with the voltage and frequency of the main processor here in order to increase the power of their machine. So, the BIOS microprogram was replaced by another, more modern one.
And as you already understood, it is called UEFI. Of the new innovations, it can be noted support high resolutions screen, very large discs and mouse operation.
If you read all the lines above and did not understand anything at all, then watch a short video to reinforce the topic:
So, it should definitely be said that a full-fledged UEFI system is still far from being implemented in all modern computers. But some of its new features, hitherto unseen, have been successfully implemented in the old BIOS shell.
And one of them, the so-called UEFI Boot (full name Secure Boot). The meaning of its work is to prevent the substitution of the system boot source, thereby reducing the use of unlicensed software.
That is, it turns out such a picture that now we will not be able to boot, for example, from a flash drive or a third-party disk. Indeed, in this situation, they simply will not be in the list of available devices:

But really, decide this problem possible and very easy. To do this, you need to make a couple of settings and that's it. So let's get to work. So, enough of the theory.
And in order to disable UEFI functions in BIOS, you must immediately enter it. As mentioned above, for this you need to press a certain key combination immediately after turning on the computer.


Thus, we turned off main function UEFI protection from third-party bootloaders. Then you should go to the "Boot" section and set the parameters as in the screenshot below:

After that, we should have a list of available devices. Now by changing their position in the list, you can manipulate the download sources. Again, using the author's example, this can be done with a keyboard shortcut Fn+F5/F6:

Well, after all the parameters entered, it remains only to save the changes. This is done in the "Exit" menu by selecting the "Exit Saving Changes" item:

That's all, my friends, now you know for sure the answer to the question: UEFI Boot - what is it and how to disable UEFI in BIOS. If you still have questions, feel free to ask them in the comments.
Well, if you suddenly want to learn much about the UEFI BIOS, then watch a short video where this topic is covered more widely.