How to resize an image in Photoshop. Interpolation process. How to reduce (change) the size of a photo on a computer or phone How to change the weight of an image in megabytes without changing the size of the sides and quality
You don't know how to increase the size of a picture? This is a very simple task since everything you need is already installed on your computer. Read this tutorial and you'll learn how to resize a photo using 5 simple tools.
Method 1: How to Resize an Image in Microsoft Paint
- Find and launch MS Paint. It comes pre-installed on all versions operating system Windows. Start> All Programs> Accessories> Paint:
- Drag the image into the Paint window or use Menu > Open (Ctrl + O).
- In the main menu of the program, find the item “ Resize" and select it:
- The panel for changing image sizes and proportions will open. You can specify the value in pixels. Don't forget to check the " Maintain proportions" Otherwise the image will be deformed:
- To increase the size of the picture, click the "OK" button and save the photo.
Adviсe:
- If you can't size your photo without stretching it, you can use the Crop tool to remove unwanted edges. How to do this is described in paragraph 3;
- To open a photo faster, click on it right click mouse and select from context menu paragraph " Open with Paint»;
- It is best to save the image in the same format as the original.
Method 2. How to resize an image in MS Photo Gallery
- If Microsoft Photo Gallery is not installed on your computer ( Start > Photo Gallery), you need to download and install it as part of Windows Essentials 2012;
- Launch MS Photo Gallery and find your graphic file;
- Right-click on it and select “Resize...”:
- Select a ready-made preset: " Small 640 pixels", "Medium 1024", "Large 1280", etc.
- Click " Resize and save" After you increase the size of the picture, the image will be placed in the same folder, and the original will also remain in it.
Adviсe:
- If you need to set the exact image size, select " Custom" and set the size to the larger side of the photo;
- To resize multiple photos at once, select them while holding down the Ctrl key.
Method 3: How to Resize an Image in Photoscape
You can increase the size of the picture in Photoshop. Or use Photoscape for this.
- Download Photoscape and install it. Launch the program;
- Go to the "Editor" tab and find the photo you want to edit:
- At the bottom of the image there is a button " Resize", Click on it.
- Set a new photo size. Make sure the option " Maintain aspect ratio" is enabled and press the "OK" button:
- Save the edited image.
Adviсe:
- If you need to resize multiple images, use the " Batch editor" Add a folder and resize all the photos in it;
- If you don't know the exact size, you can set the "Percentage" of the original size.
Method 4. How to resize an image in IrfanView
- Install IrfanView - a great tool for viewing and enlarging pictures;
- Add a photo by dragging it into the program window, or by clicking the first button in the toolbar:
- Go to the "Image" tab, select " Change size/proportions» ( Ctrl+R);
- Set the new size in pixels, centimeters, inches, or as a percentage of the original image:
- Save the image.
Adviсe:
- You can use standard sizes: 640 by 480 pixels, 800 by 600 pixels, 1024 by 768 pixels, etc.;
- To save high quality photos, make sure the DPI is set to at least 300.
Method 5. How to resize an image online
- To resize a picture online, go to PicResize.
- Click the button Browse" to select a photo. Click " Continue»:
- Select a percentage of the original image, such as 50% smaller. The tool will display the output image size. Alternatively, you can enter your exact size by selecting " Custom Size»:
The desire to resize a photo appears when there are unsuccessful shots (when unnecessary and superfluous details are captured), placement of an avatar (on a personal page on a social network, in a forum on a website, in an online store), creating various photo portfolios and under other circumstances. There are special tools for this.
You can resize a photo in three ways: using standard operating room programs Windows systems, by using third party programs and in online mode through the Internet. Let's look at each method in more detail.
Three easy ways to resize a photo
How to resize a photo in paint
In all Windows versions There is a Paint program. Launch it and click the “menu” button in the upper left corner. Select “Open” and find the photo you want to edit. We load it into the work area. Next, if you need to trim it, select the appropriate item in the top panel of the program. Using the cursor, we determine the area of the photo that needs to be left. We crop and save the result.
The second option is to select the “Select” function. Select the desired area of the photo and press the key combination Ctrl+X (cut). Next, open it again Paint program. The work area in it is empty, point the cursor there and press the key combination Ctrl+V. Insert photo fragment into new document Paint. If White background the working area will be larger than the inserted photo; it can be reduced using the same cursor. We successfully save the result.
There is a third option - when you need to reduce the photo to certain pixels. Select the “resize” item at the top of the program.

Windows 7 has a program Picture Manager. It is very similar to Paint. Launch it and select “File” in the upper left corner. Click on “Find drawing”. We find a photo. Next, select the “Drawing” item, there are two processing options – “Crop” and “Resize”. You need to use them in the same way as with the functions of the Paint program. We change the image and save it safely on the computer.
How to resize a photo using programs
There are many quality programs from third party developers. Particularly worth highlighting:
– Image Resizer,
– Movavi photo editor,
– Adobe Photoshop CC,
– PIXresizer
– Fotosizer,
– BImage Studio, etc.
Most of them are free and freely available on the Internet. The download and installation process will take from 5 to 30 minutes. As an example, consider the Image Resizer program.
We find it using search engine, download, install on your computer, launch. A program window opens in which you need to click on the Add files menu. Then select the desired photo and go to the Settings section.
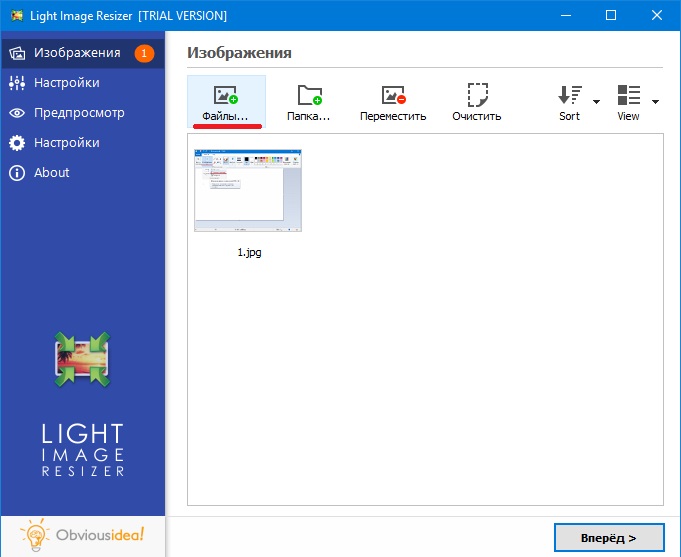
In the settings, enter the desired size and click Execute. The photo with the new dimensions is saved to the desktop in a folder specially created by the program. Ready!

Download Image Resizer– https://light-image-resizer.ru.uptodown.com/windows
How to resize a photo using online services
As well as third-party programs, there are many on the Internet online services, prompting you to crop your photo or resize it by entering pixels. The most popular and frequently used of them are:
– imgonline.com.ua,
– resizepiconline.com,
– croper.ru,
– resizenow.com
– inettools.net,
– optimizilla.com.ru,
– reduction-image.com,
– pichold.ru.
Let's take a closer look at the imgonline.com.ua service. Go to the website and click on the Resize tab.

Next, click the “Select file” button. Find a photo on your computer and upload it. Next, enter the desired width and height in pixels. Select the type of resizing. If necessary, we do it additional settings, select the format of the future image and click “OK”.

Will open new page with information about the photo. There are two options - either open the photo for viewing (if you don’t like something, you can “Go back”), or download it. Ready! The photograph has received new dimensions.

In general, the use of the listed methods is very simple. The main thing is to follow the prompts and enter data into required fields. The output will always be a high-quality image with the required pixel parameters.
How to reduce the weight of a photograph or any other picture very quickly, without getting into the jungle of Photoshop? Eat simple program! Moreover, which does not need to be installed, since it is available on almost all computers with the Windows operating system. Don't want to understand the program? Reduce photos using the online service webresizer.com, read about it in detail below!
It is necessary to make the weight of images less for the reason that the site pages on which they are located will take a long time to load, which means that those whose Internet speed is not very fast will close them before they see their contents. There will be many refusals and, accordingly, a decrease in rankings in search results.
We use photographs for illustration purposes in every blog post. Each of them is uploaded to the hosting and takes up space. Add plugins, texts, a dozen editions to them - a blog can weigh like a cast-iron bridge. Not everyone knows Photoshop, and for such a simple operation it is not needed.
Reducing the weight of a photo or image in Picture Manager
To reduce the weight of photographs, for the last few years I have been using the program included in the package Microsoft Office, - image processing manager. It's called. if you have text editor Word, then this program should be there too. With its help, you can quickly reduce the weight of both one photo and a group of images at once.
Let's go into the program. Microsoft program path Office Picture Manager: "start" — "all programs" — "microsoft office tools" — "microsoft office picture manager". Or even easier - click on the desired image, then right-click on it and select "to open with". Several programs will be offered, including Picture Manager.
Open the image in the program:

In the upper left corner, click tab "file" — "add picture shortcut".
In the window that opens, find the folder in which one or several photos are stored. Click "add". All photos from this folder will be loaded into the program.
Important: If you run a blog on the Internet, you should always remember to optimize images. The optimal weight of images for a blog is 50 kb. and less.
How to reduce the weight of one photo
Select the desired photo with a mouse click.
In the top toolbar, go to the tab "drawing" and select the option "compress pictures":
A column will appear on the right side of the screen "Compress pictures":
In field "Compress for" choose suitable size. At the bottom ( "Expected total size") see what weight suits you. Usually I choose for "web pages". As you can see, the original photo in my example weighed 1.82 MB. After compression, the photo will weigh 76.2 KB, which is enough to illustrate articles on my blog: the quality is preserved and the weight is small.
By selecting required parameter compression, press "ok".
Now the photo needs to be saved. It's better to leave the original - full version, and save the compressed photo as a separate file. In the top toolbar go to "file" — "save as". In the window that opens, select the path in which folder to save the photo, give a name (different from the original), select the format (JPEG) and click on "save". Thus, we ended up with two photographs: the original and a compressed copy.
If you don't want the original, then after you've selected the compression option and clicked "ok", in the top toolbar go to "file" — "save"(without HOW) - the reduced image will be saved on top of the original, leaving only one photo on your computer's hard drive.
How to reduce the weight of several photos
Everything is absolutely the same, only at the beginning, when the photos from the folder are loaded into the program, select all the photos, not just one, by holding shift. And when saving, click on "save everything"- compressed copies will be saved on top of the original, so if you need to save the folder with the original dimensions, then create a copy of the folder in Explorer before loading it into the program.
How to compress a photo even faster
If Microsoft program Office Picture Manager is on your computer, so when you open any photo in Explorer, there are several programs to choose from. I'm just clicking right mouse from the photo that I'm going to reduce. A window appears: 
I choose "to open with" — Microsoft Office Picture Manager— the photo immediately opens in the program. I go to the tab "drawing" — "compress pictures"- I choose for "web pages" — "ok". Then "save" or "save as". Takes very little time. That's it, the weight of the image is compressed several times!
Reduce photo online
To reduce the weight of photos online we will use the service webresizer.com, which will reduce not only images in jpeg format (regular pictures, photos), but also gif (animation), png (transparent background). The webresizer.com service has detailed, step-by-step instructions for setting up how to compress photos to any size and quality online, so that even a novice user can figure it out. 
One of the everyday tasks that not only every photographer, but also any computer user faces is reducing or enlarging photographs and other images. For example, reducing the size of a photo may be necessary to place it on a website.
True, first, we need to decide what size we are talking about! Sometimes there are certain requirements for the size of a photo - measured in pixels. A pixel is a small dot, which is what photographs are made of! For example, you may need to reduce a photo to a size of 800*600 pixels.
And there is another size - it is measured in megabytes, kilobytes or bytes. This is the size of the information contained in the file. Since each pixel can carry a different amount of information, an image that is smaller in terms of pixels will not always contain a smaller amount of information. Therefore, sometimes when reducing the size of an image, you should pay attention to the amount of information it contains after reduction. Usually this volume can be seen either directly when reduced (especially in Photoshop), or by hovering the cursor over the file icon - then the corresponding information will appear.
There are several ways to reduce a photograph, including reducing its size, reducing the “weight” of a photograph without reducing its linear dimensions, or both...
Here are the ways you can achieve the desired result:
1. Reducing the size of a photo in Paint.
Paint is installed on almost every computer that has Windows installed, so let's start there.
First, open Paint. Secondly, in the menu (opens at the top left), find your photo and open it.
The third step is to choose how much you want to reduce your photo and click OK.
Step four - in the main menu (top left of the window) select "save as", select jpeg as the format (unless otherwise required), and save... Done!
2. How to reduce photos in Photoshop (Photoshop)
There is a whole small video tutorial on this topic. Please take a look... it's online, it's free!
3. Reduce photo online
We go to the site... and what do we see?? Doesn't matter! You need to find the “Upload images” item, click the “browse” button, select your photo, select the size just below - to which you need to reduce the photo and other parameters that are quite understandable without comments - if desired.

Next, click the “upload” button, the photo is uploaded, and... voila! On the page that opens, find the “open” link and enjoy looking at the thumbnail photo! You can save it to your computer either by dragging it onto your desktop (if your browser does not prevent this), or by right-clicking on the photo and selecting an item like “save image as...” (the name of the item depends on your browser) . I hope that now reducing the size of the photo will not create any problems for you!
The need to reduce photographs or pictures arises quite often, but many people are interested in how to do this without losing quality. The ability to reduce photo size for users is especially important social networks, because everyone knows that the larger the photos, the longer they will take to load.
It is worth remembering that there are two types of photo sizes:
Image size in pixels (height and width change).
Photo size in kilobytes (image weight).
But it is worth considering that by changing the size of a photo in pixels, its weight will change under any conditions.
There are many ways to reduce the size of a photo without losing its quality. To do this, you can use standard programs that are in the operating system, downloaded software, or online resources.
Any version of the Windows operating system has standard program Paint. It is quite easy to use and designed for minimal photo and image processing.
To launch the Paint program, you need to go to Start, find Accessories in the list and click on the desired line. In the program window that opens, click the Open button and find the required photo in a new tab.

Now you need to click on the Home tab and find the Resize button.

The Resize button will open a new window in which the parameters of the uploaded photo will be displayed. The program allows you to resize it horizontally and vertically. To do this, you need to put new data in the boxes opposite, as well as a tick in the Save proportions column. Now you can click OK.

If after resizing the image manipulations are completed, then new file can be saved to your device by clicking the corresponding button.

It should be noted that any changes in size will affect the quality of the drawing, so you cannot radically change the size and make a very large image from a small one or vice versa.
Working with Photoshop
You can definitely reduce the size of an image without losing quality using Photoshop. This software is much more complex, and you need to work with it step by step. To reduce the size of a photo, you must first upload the file to the editor. To do this, select File – Open.

Now you can perform any actions with the new file, but to change its size without losing quality, you need to click on the Image tab and select the Image Size line there.

In the window that opens, in the Width field you need to put a value that is half smaller than the original size. If you check the Maintain proportions box, the value in the Height field will change automatically. And so that the photo does not lose quality, you need to select the “Bicubic” option. To save the new size, click OK.

Changing the width and height is enough to ensure that the quality is not lost and the pictures look good, so after saving the new parameters, you can save the photo. To do this, in the File section, select the Save line.

Resizing with IrfanView
There is another, no less popular, editor for reducing photos without losing quality. It's called from IrfanView. It is not as complex as Photoshop, but it also needs to be installed on the device.
To reduce an image in the IrfanView editor, you need to launch it and in the window that appears, select the Image tab - Resize image.

This command will bring up a window that presents various ways reducing the photo. Without loss of quality, the picture can be reduced by setting new values in pixels, centimeters and inches, it is also possible to set the size as a percentage or click the Reduce by half button. In this case, you need to install the Lanczos algorithm (the slowest) in advance, which guarantees that the photo is saved without loss of quality. After setting the new parameters, click OK.


Reducing photos using an online program
There are many online services on the Internet that allow you to process photos without downloading an editor to your computer. One such program is called Optimizilla. To start working with it, you must first upload a photo to the site. There is a button of the same name there for this purpose. The difference between this program and other editors is that the photo size in kilobytes changes. At the same time, quality remains without loss. In order to edit a picture, there is a special scale with a slider that allows you to set the required quality level. To download finished photos, you need to click on the appropriate button.

You can use the above methods all at once, or depending on your personal preferences.