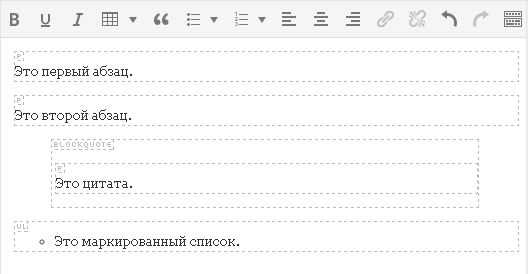
How to set up an editor to work with Git on Windows? How to set the default program to open a certain type of file in Windows! Setting up content display in the editor
We have posted on the page component Component- a special element of the system designed to display information from the site’s Database.
Component template
Parameter Component template responsible for appearance. Most components have only one default template ( .default).
If there are several templates, select the one you need in the drop-down list. Please note that when you change the template, the appearance of the created page will change.
Basic Parameters and Data Source
Here we set the source of the published data (information block, forums, web form, survey, etc.):

In some cases, the source should be specified using code that passes the data element identifier (however, this is rarely the responsibility of the content manager).
You should immediately set the sorting parameters (by what criteria and how the data is sorted), for example:

Link templates
Here we configure the page addresses (contact the administrator for more information):

Managing page addresses
Here we configure the mode CNC CNC is a web address that is human-readable. This is an abbreviation for the phrase “human-readable url” (where “url” is slang for URL).

Mode control AJAX AJAX- technology for accessing the server without reloading the page.
Here we are setting up AJAX in the component. AJAX technology does not update (load) the entire page, but only some part of it after user actions (for example, when a button is clicked). Thus, the user will quickly see the result of his actions.

Caching settings
Here we define behavior cache Cash- this is a kind of storage to speed up viewing information on the site. When a user views information on a website, it is not always requested from the database, but rather taken from the cache. for the component:

Caching is used to reduce the load on the server and speed up the display of data. The caching time depends mainly on the frequency of information updates: the less often the information is updated, the longer the caching time can be. Be careful, make cache settings only in agreement with the site administrator.
Additional settings
Additional parameters are defined here - breadcrumb trail, page headers, date display formats, etc.:

What are the other pop-up menu items for? Let's figure it out.
In addition to the editing command, we see a list of components that are used in the area of interest to us. For each component we see three commands:
- Copy template;
- Edit template;
- Disable the component.
The first two commands are used to work with the template, most often this is the task of the site administrator. Here's the team Disable component can help the content manager. This option makes the component inactive. Data from this component will not be shown on the page until you turn it on again
The location of the component when editing mode is turned on will be indicated by a square with red
dot. To enable a component, follow the reverse steps:
 .
.
In this difficult lesson, we figured out how to configure components. It is worth noting that each component has its own set of parameters. For detailed information on the component and its parameters, please contact. In the next lesson, we will reinforce what we have learned with real examples of using components.
Hello readers. I was recently asked to explain how to customize a style sheet in WordPress. And I decided to describe the key skills. I won’t explain what a style sheet is, probably everyone knows. If you don’t know, then first you need to visit “Yasha” or “Gosha”.
Any modern website cannot work without this table. If he can, he will take on a wretched appearance. Like, for example, the first sites that were written in .html.
WordPress is full of ready-made templates with hundreds of options. Just choose and do it. However, all web masters have a problem changing it. Make improvements to remove unnecessary fields, reduce the font, the distance between lines, indents, etc. All these numerous operations can be done by editing just one file. Well, there may be more of them on different templates.
And so let's get started.
Find the styles file.
You can access the style file in two ways: either directly through the server or through the console. I usually use consoles, it's convenient and fast.
Appearance - Editor
Here you will see a list of all site files. You need to select the desired file at the bottom to configure and edit style.css WordPress
The second picture shows the style sheet itself in .css format, usually this file is called style.css
And so we decided on the file. And we will edit it. Before you start editing or changing anything, I advise you to copy this original file to your computer.
Customization, css editing
To customize the style sheet, use special programs to make your life easier. But in my case everything is simpler and nothing is needed.
I use Google Chrome. Perhaps for me the best browser. And when editing the style sheet I use it. But you can also use it with Opera.
Why am I saying all this? We are interested in the right-click function on the site. More precisely, to the area we need. Right-clicking opens the “View Element Code” function

In this case, the element is highlighted and its code appears below. And on the right appears what we need. Values from the style sheet that apply to the selected element. 
Here we see all the elements of the selected element. The gray highlight is indentation. From the values you can see that the padding is 15px on the top and 14px on the side.

If we need to change this value, we can change them right on the spot. and see what it will look like now. If you have selected the desired size, now you need to find and change this value in the style sheet itself.
How do we do this? I have highlighted it in the picture with red lines. .nav > li > a is exactly the element that contains the padding: 15px 14px; We need to find this line in the style sheet. You even have a hint style.css:520, which means it is in the style.css file and line number 520.

Let me give you another example:
We will change the color.
Right-click on the area we need and look at the code.

We see that this dress is painted blue. background : #3b8dbd ; For testing, we can change the color on the spot. After which we select the desired color, look for .s1 .sidebar-toggle in the style sheet and find it. 
Here you can see background: #3b8dbd; this is our color in the form of a code. we will just need to change it to our color and save the changes.
That's all for now. Now you can change any elements. If you have any difficulties, I can demonstrate editing in other areas. See the continuation of the article.
*You can connect the visual editor in the “Plugins” section of the console.
Plugin TinyMCE Advanced adds additional buttons to the standard editor for text formatting. Here are some of them:
- Font size
- Font type
- Background color
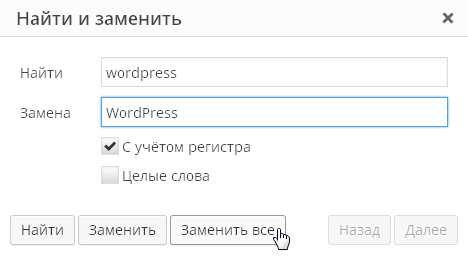
- Function to search and replace text on a page
You can also disable automatic removal of blank lines.
You can add or remove settings buttons from the toolbar, and arrange them in the order that suits you.
Editor settings are located in the console section “Settings” - “TinyMCE Advanced”.
Plugin settings
The plugin settings are located in “Settings - TinyMCE Advanced”. Don’t be afraid that the plugin is not translated into Russian - the buttons themselves in the TinyMCE visual editor are almost all translated into Russian, so you don’t need knowledge of English. Yes, and the cat is crying for settings here - in fact, you just need to use your mouse to drag the necessary buttons onto the toolbar of the visual editor. Yes, and this is not mandatory - almost everything is duplicated in the editor menu:
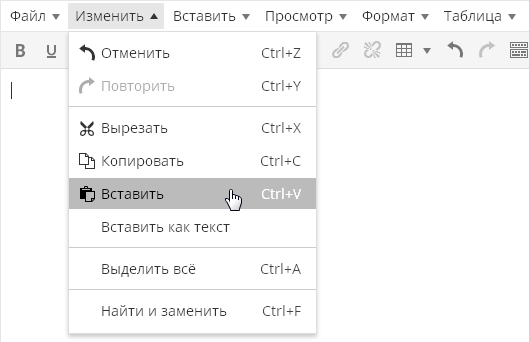
By the way, the menu can be disabled by the first plugin setting:

The buttons themselves are in English, but it’s easy to understand what they mean:
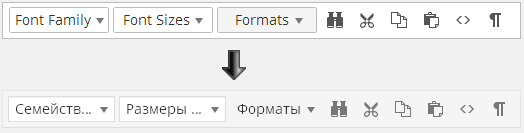
As you can see, everything in the plugin settings is in English, but when editing a post, all English inscriptions are automatically translated into Russian. Even if you don’t understand something, drop a button on the panel, save the settings, switch to editing the entry and see what this or that button means.
It's not a good idea to add every possible button to the toolbar, as you'll never need many of the buttons. Moreover, it is better to remove some buttons from those that are already there. The simpler the editor, the more convenient and efficient it is to use.
The “Find and Replace” button brings up the following dialog:
Ability to select font and size:

This is also a very useful function that allows you to format the text of your article the way you like without editing template styles.
There is also a “block viewing” function:
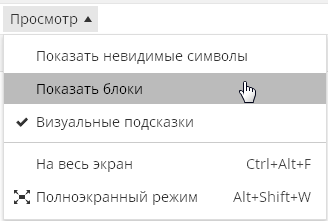
It allows you to visually evaluate how your text is formatted. This is important because it is often very difficult to understand in a visual editor how this or that piece of text is formatted. Or where do the extra indentations come from in some piece of text:
In the WordPress editor, paragraph and line break tags are placed automatically and you don’t see them at all. Any text after which you press “Enter” is taken into paragraph tags, which you cannot see even if you switch to the “Text” tab of the visual editor.
Sometimes this editor behavior causes complete stupor. For example, in this screenshot you can see that the text included in the tags
automatically turned out to be also wrapped in paragraph tagsBy the way, the TinyMCE Advanced plugin makes it possible to see the real source code of your text, without cut out tags. To do this, in the “Tools” menu, select the “Source Code” menu item:
This feature will allow you to see the actual source code of your article, rather than the one you see when you switch to the Text tab. For example, on the “Text” tab the code could be like this:
And when you use the Source Code function, you will see:
That is, you will see your text with paragraph tags already placed. And this will be exactly the code that will be displayed in your published post on the site.
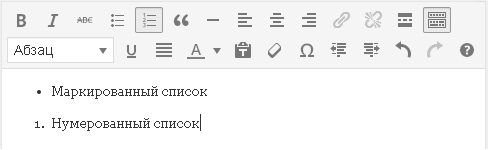
The plugin also expands the ability to insert standard lists. The default editor has only one type of list:
The plugin allows you to insert lists of various types:
Insert emoticon button:
A fun button that allows you to evaluate how an emoticon will look in a published post, since in the visual editor emoticons will still be displayed in text form. Just don’t forget to go to “Settings\Writing” and check the “Convert emoticons like 🙂 and 😛 into pictures” option.
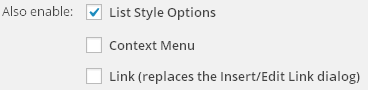
Now it is worth mentioning the settings that are located below the panel for selecting unused buttons:
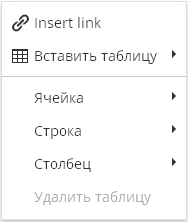
By default, only the option “ List Style Options", which includes advanced options for inserting lists, which are described above. Option " Context Menu"includes the plugin context menu, called when you right-click in the editor:
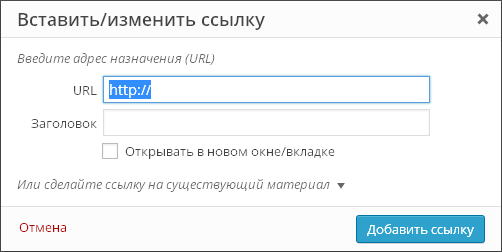
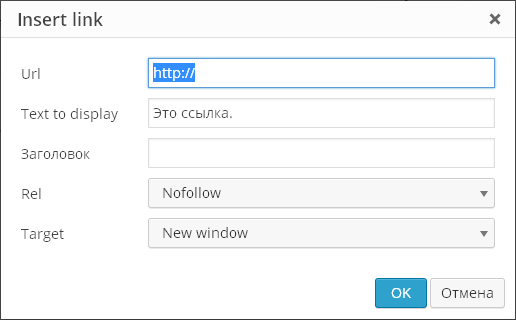
Option " Link (replaces the Insert/Edit Link dialog)" refers to the link insertion dialog. By default this dialog looks like this:
The plugin can replace it with this:
That is, in fact, the plugin dialog only allows you to enter for links, and everything else is in the standard dialog for adding links. Whether you need this plugin feature or not, decide for yourself.
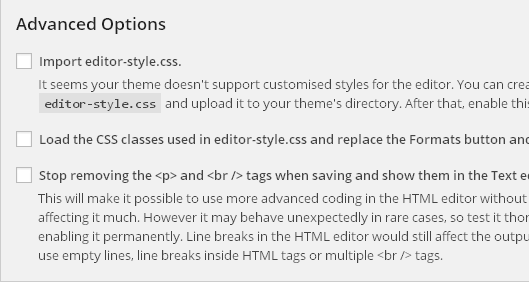
The last part of the plugin settings is the “advanced” settings:
Load the CSS classes used in editor-style.css and replace the Formats button and sub-menu— this function is not supported on Prihod.ru.
Stop removing the
And
tags when saving and show them in the Text editor — The most recent plugin setting causes the editor to show paragraph and line break tags in the Text tab. That is, when editing a post, everything will be the same, but on the “Text” tab you will see the full html markup. However, the editor will still be weird with its auto-formatting. For example, here's the code:
After switching to “Visual” and back to “Text” it will turn into:
That is, the editor removed one line break, taking the remaining two breaks into paragraph tags. But after saving the page everything
will disappear.But when you enable this setting, WordPress stops “eating” empty lines that you enter with the Enter button in visual editing mode. The editor inserts code in place of the empty line
and does not delete it when saving, even if there are many such lines on the page.The article was taken from here and slightly expanded :)
Viewed (4481) times
The editor that Git uses is chosen from the following list, in this order (from man git-commit):
- GIT_EDITOR environment variable value
- The value in the Git core.editor configuration. The usual Git settings priority is used:
- --local - for this project.
- --global - for this user. It is logical to configure the editor at this level.
- --system - for this working machine (within the OS).
- VISUAL environment variable value
- The value of the EDITOR environment variable (why are there so many variables?)
- If all these options are not installed, then Vi/Vim is used.
2. Why -w?
Why do most of the above commands use the -w (--wait) parameter? Git opens the editor and waits for the exit code to return before it can continue working based on the data in the file. If this option is not present, Git will continue working immediately and will not wait for you to edit and save the file.
W, --wait Wait for window to be closed before returning.
3. Customization by changing core.editor.
Does not require direct file editing and is flexible in customization levels. The downside is that other applications will continue to use the default editor.
In general, the configuration setting looks like this:
Git config --global core.editor "editor --parameters"
3.1 Linux, OS X
Many editors (Atom, TextWrangler, and others) do not include command line support when installed. They must be enabled separately by finding the Install Shell Commands command in the menu.
These lines can be immediately copied and executed in the terminal:
Git config --global core.editor "atom -w" git config --global core.editor "subl -n -w" git config --global core.editor "mate -w" git config --global core.editor " edit -w" git config --global core.editor \ ""C:/Program Files/Notepad++/notepad++.exe" -multiInst -notabbar -nosession -noPlugin"
Notepad++, on 64-bit OS:
Git config --global core.editor \ ""C:/Program Files (x86)/Notepad++/notepad++.exe" -multiInst -notabbar -nosession -noPlugin"
The WordPress Visual Editor is a useful tool that gives you an idea of what your content will look like once it's published. It's packed with features that help simplify the process of creating and formatting content for your website. While the visual editor is a useful tool, it has its limitations.
In this article, we'll show you how to get the most out of the WordPress visual editor and introduce some plugins and CSS tweaks that will help improve your user experience.
1. Achieve more with a standard visual editor
Let's start with the base. If you have studied the visual editor inside and out, then you can skip this point and move on to the next one.
VS Visual Editor. Text editor
WordPress comes with both a visual and text editor. The text editor shows you the source text with HTML markup and allows you to customize the text completely:
Within the text editor itself, you can directly manipulate images and other media files instead of using the Add Media button.
The visual editor uses the WYSIWYG principle. This gives you a much better idea of how your content will look once published, and in the editor you will see the formatted text and all the images. However, it doesn't show how the page or post will fit into your theme, nor does it show post width, text style, or hyperlink color.
Remember that in a text or visual editor you are always editing the same block of content, but from different angles. The changes you make in the visual editor will change the HTML markup of your post, you just don't see those tags in the visual editor like you do in the text editor.
Because changes occur regardless of the editor you use, you can switch between them as you create content. Switching from a visual to a text editor (or vice versa) is very simple, just click on the corresponding tab in the upper right corner of the post editor:
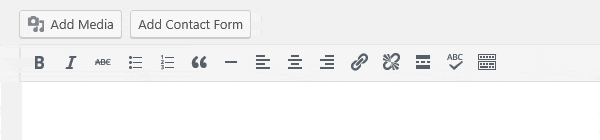
Visual Editor Buttons
By default, the visual editor displays one row of buttons. To display the second row, you can click on the toolbar icon, often called the Kitchen Sink. Each button in the panel shows an icon, but you can open a tooltip by hovering over the button:
Most icons are obvious, but some are less clear. Let's take a closer look at them.
Quote
The quote button is used to display quoted text. The display method depends on your theme. For example, this is what quotes look like in the Divi front end:
Other themes may use a colored border or large quotation marks. Before publishing, it’s better to check what the quote looks like and change something in the settings if you don’t like it.
This button inserts a horizontal line to break the text, as in the image below:
The Read More line does not appear on the front end of the site when you publish a post. The line simply controls the length of the piece of text that will appear in your post feed. The text will break where you place the line.
Paste as text
The Paste as Text button is used to clear text that you copied from another source of formatting. If you simply copy and paste, the text may appear in a completely different format from the desired format. The Paste as Text button removes all formatting and HTML tags.
Clear formatting
You can use this button to remove all formatting (including bold, italics, underlining, and color) from a selection of text:
Special characters
The Special Character button allows you to insert characters that are not usually found on the keyboard, but when you click the button, a pop-up window will appear:
Keyboard shortcut
By clicking the Keyboard Shortcuts button, you will see a pop-up window that shows the editor's built-in shortcuts. You can use them to speed up the process of completing certain tasks:
Keyboard shortcuts can offer some additional functionality not found in the toolbar, such as copy, paste, and code. “Code” is used to highlight blocks of code in the text:
Full screen mode
Some people are distracted by the editor's environment. If you prefer a clean workspace, then click on this button and get rid of the sidebars and focus on the content.
2. Plugins for the visual editor
The standard visual editor has all the basic features you need to create and format your content. However, there are many other formatting options you can use. You can do this in a text editor by marking up the text using the appropriate HTML tags. Of course, many people are not familiar with code, while others simply prefer to do it in a visual editor.
Fortunately, it is now possible to quickly and easily add visual editor functionality using plugins. In this section, we'll take a look at two great plugins to enhance your visual editor.
Don't forget that some features only work with a specific plugin. If you are using features that are enabled by a shortcode or plugin, they may no longer work after you disable the plugin. That is, after removing the plugin you will need to do some formatting.
TinyMCE Advanced
With over a million installations, TinyMCE Advanced is a huge success among WordPress users. This is an easy to use plugin that allows you to add, change and remove buttons from the WordPress visual editor toolbar. It also allows you to customize up to four rows of buttons to suit your needs.
There are additional buttons: Font Family, Font Sizes, Insert Date/Time, Page Break and many others. TinyMCE Advanced also makes it easy to create and customize tables. The plugin allows you to enable an editor menu that offers even more options for creating and editing content.
Please note that additional buttons will not appear automatically after installation, so you will need to go to the Settings section of the plugin and configure the new toolbar. Once installed, your editor screen will look like this:
Main Features:
- Drag-and-drop buttons to customize your toolbar
- Additional options for inserting lists
- Find and replace functions
- Text alignment
- Ability to insert a page break
- Ability to add emoticons
Price: Free
WP Edit
WP Edit isn't as popular as TinyMCE Advanced - 100,000 active installs - but it also offers a range of features. The free version adds many features to the visual editor and has layout options that both posts and pages can use.
Premium version of WP Edit Pro includes two additional rows of buttons and additional features, for example, 80 ready-made styles, integration with Dropbox and Google Fonts. You can also use custom fonts and create custom editor styles.Main Features:
- Easily insert media files such as images, videos and illustrations
- Creating and editing tables
- Easy access to shortcodes
- Inserting columns in a content field using shortcodes
- Allowed shortcodes in widget fields
Price: The basic plugin is free, and the premium version starts at $17.50.
3. Setting up content display in the editor
The WordPress visual editor has one huge limitation that is not solved by the above plugins. Although the visual editor gives you an idea of what your content will look like, there are still differences between what you see in the editor and how your content looks on the front end of the site. You may find it awkward to use the preview button.
Of course, it would be great if in a visual editor you could see how the content will look after publication. Luckily, you can customize the visual editor to better suit your theme.
You can also use a frontend editor, like in . This intuitive editor allows you to edit pages or posts right on the front end of your website without using code.
Conclusions
Although the WordPress visual editor is a useful tool, it has its limitations. By applying the tips in this article, you can strengthen your visual editor and improve your content creation process. Let's remember:
- Make the most of the standard visual editor: The standard visual editor has a lot of features, especially if you are familiar with the interface.
- Add custom functionality: Plugins like TinyMCE Advanced and WP Edit can expand the capabilities of the WordPress visual editor.
- Customize content display in the editor: If you feel confident with the code, then further setup is quite simple.
Do you have any secrets for customizing the WordPress visual editor? Share them with us in the comments!