Which tag describes client image maps. Image map in HTML. AREA tag attributes
"I made a template for placing links to different web pages (“”) in certain areas of it
Now if you click on the figures with inscriptions, the pages corresponding to them will open: profile, diary or all posts from the section “ Photoshop Lessons"(attention! after transferring the blog to WordPress and redesigning it, the links do not work! but the lesson remains relevant!)
In order for the picture to work, I wrote approximately the following HTML code:
This code can be inserted into the message field (with the “Source” button pressed) or in the epigraph...
By the way, there are other posts on the topic: “What is HTML", "HTML code of pictures", "Picture link” and so on.
1. Coordinates
To compose the above code, I remembered a little geometry :)
Coordinate system: X axis - top to bottom, Y axis - left to right
To set the coordinates of a figure, you need to set:
- a square (or rectangle), the sides of which are parallel to the axes - coordinates of two opposite angles - X1, Y1 and X2, Y2
- polygon - coordinates of ALL angles
- circle - center coordinates and radius.
In my case, it turns out I need coordinates points A,C— for the “Profile” link (rectangle), points D,E,F,G,H— for the “Diary” link (polygon), Q and length R — for the “Photoshop Tutorials” link (circle). All these numbers in the HTML code above are highlighted in red.

In addition, you need to know the size of the image in pixels (green color) There is no need for special precision, so you can determine the coordinates using the “ruler” in Photoshop - to call it, click
Ctrl+R It was more interesting for me to have someone else calculate the coordinates. To do this I launch MS Paint

(Start - All Programs - Accessories - Paint) and open a drawing in it. When you hover the cursor over the desired points, their coordinates appear in the bottom panel, which I carefully record
2. HTML code
Navigation maps are specified by the tag The map tag includes tags
, which define the geometric regions of the drawing map and the links associated with them.
— This is how I figured it out: to create a navigation map you need:
— tags with image description
— map tags
area tags
- In my case, the values turned out to be: width="640" height="367"
- — image dimensions
- src="https://site/f02c73a3cd94.jpg" - image address on the site usemap="# picture" — conventional name of the image-map
- (can be any) map name="picture" (— card name fully
The values for link areas—href—the target of the link, shape—the shape of the area, and coords—coordinates—correspond to three areas in the image.
Rectangle "Profile"
- href="https://site/profile/" — profile page address
- shape="rect" - designation of the "rectangle" shape
- coords="235,61,472,117" — coordinates of points A (235,61) and C (472,117)
Polygon "Diary"
- href="https://site/blog" - address of the diary page
- shape="poly" - designation of the "polygon" shape
- coords="235,118,362,118,474,152,457,207,229,146" - coordinates of the corners of the polygon: points D (235,118), E (362,118), F (474,152), G (457,207) and H (229,146)
Circle "Photoshop Lessons"
- href="https://site/showjournal.php?journalid=2447247&keywordid=929323" — address of the page of posts from the “Photoshop Tutorials” section
- shape="circle" - designation of the "circle" shape
- coords="551,198,65" — circle coordinates: center — point Q (551,198) and radius — R=65
3. Finish
I substituted all the obtained values into the “system” HTML code for the navigation image map and got the following:
It is this code that, when used, “turns” into a picture with link areas.
For training, there is a “lightweight” easy option for creating link areas - the post “Training: link areas in the image”
If you find an error, please highlight a piece of text and click Ctrl+Enter.
Image Map allows you to attach links to image fragments. By clicking on individual parts of the image, the user can follow one or another link to different Web pages.
The image map is defined by a paired tag . An HTML document can contain multiple image maps, so each map must be given a unique name, which is determined by the attribute.
name .
An image map consists of image regions and their corresponding links.
Describes a section of the image and assigns a single tag to it as a link
Tag attributes
By default, coordinates are measured in pixels.
The coordinate origin is the upper left corner of the screen, i.e.
Examples of different shapes of image map areas
If two described areas overlap each other, then the link belonging to the first one is used. This feature can be used in a situation where the user clicks on a point that does not belong to any of the map areas, by defining the last map area as a rectangle with the width and height of the entire image. To use an image as a map in a tag, which specifies the name of the image map. This name is preceded by a "#" sign.
Example of using Image Map

When you click on different areas of a given image, the color of the corresponding text changes.
In an html document.
Now let's find out what an image map is.
With an image map, you can make it so that when you click on different areas of the same image, you are taken to different pages. An image map is also called a navigation map by some.
I understand that this is difficult to understand in words, so I suggest looking at an example of what an image map looks like in real life.
Just pay attention: the picture is the same, but the areas and transition path are different.
Don't be afraid, it's not difficult at all. The most important thing is to understand the theory and consolidate it with practice.
Well, let's get down to theory.
Image maps (navigation maps) are specified by the tag
.
Tag - this is a box inside which tags are placed
.
Tag is intended to define a geometric region with a reference attached to each region.
Area attributes
1. shape attribute
shape – defines the shape of the area ( rectangle, circle, polygon).
Rectangle - "rect". Example: shape=" rect";
circle - "circle". Example: shape=" circle";
polygon - "poly". Example: shape=" poly"
2. coords attribute
coords is the arrangement of a geometric shape.
Let's look at an example using the geometric shape of a rectangle.
You already know that if you need a rectangle shape, then you need to set the value in the shape attribute « rect ».
The reference point starts from the upper left corner of the picture, the coordinates of which are (0;0)
This means you need to specify the coordinates work area A rectangle has an upper-left and lower-right corner.
For the example with rectangle No. 1, take the following coordinates:
x1=25, y1=36, x2=114, y2=98

This is what the code will look like:
So far so good. But now we need to associate the picture with the map.
To do this, come up with any name for the map, for example, “karta1" and write it in the tag
Now let's connect the card with the picture. To do this, we use the usemap attribute.
Writing example:
usemap=" #map_name"
In our case it will look like this:

Now let's put everything together and write down the coordinates for another rectangle No. 2 with the same data (x1=153, y1=11, x2=219, y2=127).

Now look at the result. Click on rectangle #1 and on rectangle #2
First you need to specify the area type. To do this, set the value “circle” in the shape attribute.
Now let's move on to the coordinates.
To create coordinates for a circular area, you need to enter data to the center (xy) and specify the length of the radius (R).
The order of recording coordinates for the coords attribute will be as follows:

For circle No. 1, take the following coordinates:
x=46, y=48; and the radius length is R=35

Now let's put everything together and write down the coordinates for circle No. 2 with the following data x=158, y=75, R=53.


Now look at the result. Click on circle #1 and circle #2:
The most polygonal area difficult area in the navigation map.
First you need to specify the area type. To do this, set the value “poly” in the shape attribute
Now let's move on to the coordinates.
The order of recording coordinates for the coords attribute will be as follows:
Explanation:
x1 ,y1 -
coordinates of the first corner;
x2 ,y2 -
coordinates of the second corner;
xN,yN -
last corner coordinates
That is, for polygon No. 2 it looks like this:

Now let’s give the map a name and link the map to the picture:

Now let's put everything together and write down the coordinates for hexagon No. 1 with the following data: x1=54, y1=20, x2=109, y2=20, x3=147, y3=58, x4=109, y4=96, x5= 54, y5=96, x6=16, y6=58.


Now look at the result. Click on polygon #1 and on polygon #2:
Possibility of combination
There are cases when you need to use different areas at the same time in one picture, for example, a circle and a rectangle:

Addition using TITLE
For each area, you can add tooltips using the title attribute.
Now look at the result. Hover your mouse over the circle and then over the rectangle:
That's all. We figured out the image map in HTML (navigation map).
pros
- Image maps allow you to define any shape for the reference area, which is especially useful for indicating a geographic area. Therefore, image maps are most often used in geographic areas.
- It is more convenient to work with one picture - you don’t have to worry about joining individual fragments when cutting, and the picture can be easily placed in the right place.
Minuses
- With a complex link area shape, the amount of HTML code increases. The contour is approximated by a set of straight segments; for each point of such a segment, two coordinates should be specified, and the total number of such points can be quite large.
- Accordingly, the complexity of specifying coordinates increases. It is not convenient to specify them manually, so you have to use special programs, which visually show areas and allow you to edit them.
- When changing the image, for example, when increasing the scale, you will have to re-set the coordinates of all reference areas.
- You cannot apply various effects to image cards that are available when cutting one picture into fragments: rolling effect, partial animation, individual optimization of pictures for fast loading.
- There are no clearly defined link boundaries. Therefore, these boundaries have to be highlighted using different means directly in the image. If the picture does not load for some reason, then understanding the set of links becomes very problematic.
From the standpoint of user convenience, image maps have only one advantage - the inclusion of links of various forms. This adds clarity to the presentation of information - we are not limited to the rectangular shape of the link and can use links of complex configuration for our own purposes.
Image cards are implemented in two different versions - server and client. If the server option is used, the browser sends a request to the server to obtain the address of the selected link and waits for a response with necessary information. This approach requires additional time to wait for the result and separate files for each image card.
In the client version, the map is located in the same HTML document as the link to the image. To indicate that an image is a map, use the element's usemap attribute . The value is a pointer to the description of the card configuration, which is set using the element
Example 1: Creating an image map
![]()
Inside the container
Element has the following attributes.
- shape - defines the shape of the active area. The shape can be in the form of a circle (circle), rectangle (rect), polygon (poly).
- alt - Adds alternative text for each area. Serves only as a comment for the link, as it is not displayed on the screen. Required attribute if href is present.
- title - displays a tooltip when you hover over an area.
- href - specifies the address of the document to go to; its effect is similar to a similar element attribute .
- coords - sets the coordinates of the active area. The coordinates are measured in pixels from the upper left corner of the image, which corresponds to the value 0, 0. The first number is the horizontal coordinate, the second is the vertical coordinate. The list of coordinates depends on the shape of the area.
For a circle, three numbers are specified - the coordinates of the center of the circle and the radius.
HTML images added to web pages using a tag . The use of graphics makes web pages more visually appealing. Images help better convey the essence and content of a web document.
Using HTML tags
Inserting images into an HTML document
1. Tag ![]()
Element represents an image and its fallback content, which is added using the alt attribute. Since the element
is lowercase, it is recommended to place it inside a block element, for example,
Or
Tag has a required src attribute, the value of which is the absolute or relative path to the image:

For tag The following attributes are available:
| Attribute | Description, accepted value |
|---|---|
| alt | The alt attribute adds alternative text to an image. Displayed where the image appears before it is loaded or when graphics are disabled, and is also displayed as a tooltip when hovering the mouse over the image. Syntax: alt="image description" . !} |
| crossorigin | The crossorigin attribute allows you to load images from resources on another domain using CORS requests. Images loaded into canvas using CORS requests can be reused. Allowed values: anonymous - Cross-origin request is made using an HTTP header, and no credentials are transmitted. If the server does not provide credentials to the server from which the content is requested, the image will be corrupted and its use will be limited. use-credentials — Cross-origin request is performed by passing credentials. Syntax: crossorigin="anonymous" . |
| height | The height attribute specifies the height of the image in px. Syntax: height="300" . |
| ismap | The ismap attribute indicates that the picture is part of a map image located on the server (a map image is an image with clickable areas). When you click on a map image, the coordinates are sent to the server as a URL query string. The ismap attribute is only allowed if the element Syntax: ismap. |
| longdesc | An extended image description URL that complements the alt attribute. Syntax: longdesc="http://www.example.com/description.txt" . |
| src | The src attribute specifies the path to the image. Syntax: src="flower.jpg" . |
| sizes | Sets the image size depending on the display options. Works only when the srcset attribute is specified. The attribute value is one or more strings, separated by commas. |
| srcset | Creates a list of image sources that will be selected based on screen resolution. Can be used together with or instead of the src attribute. The attribute value is one or more strings, separated by commas. 
|
| usemap | The usemap attribute specifies the image as an image map. The value must begin with the # symbol. The value is associated with the value of the tag's name or id attribute |
| width | The width attribute specifies the width of the image in px. Syntax: width="500" . |
1.1. Image address
The image address can be specified in full (absolute URL), for example:
url(http://anysite.ru/images/anyphoto.png)
Or via a relative path from document or root directory website:
url(../images/anyphoto.png) - relative path from the document,
url(/images/anyphoto.png) - relative path from the root directory.
This is interpreted as follows:
../ - means go up one level, to the root directory,
images/ - go to the folder with images,
anyphoto.png - points to an image file.
1.2. Image Dimensions
Without setting the image dimensions, the drawing is displayed on the page in its actual size. You can edit the dimensions of the image using the width and height attributes. If only one of the attributes is specified, the second will be calculated automatically to maintain the proportions of the picture.
1.3. Graphic file formats
JPEG format (Joint Photographic Experts Group). JPEG images Ideal for photographs, they can contain millions of different colors. Images compress better than GIFs, but text and large areas of solid color may become splotchy.
GIF format (Graphics Interchange Format). Ideal for compressing images that have areas of solid color, such as logos. GIFs allow you to set one of the colors to be transparent, allowing the background of a web page to show through part of the image. GIF files may also include simple animation. GIF images contain only 256 shades, which makes the images look blotchy and unrealistic in color, like posters.
PNG format (Portable Network Graphics). Includes the best features of GIF and JPEG formats. Contains 256 colors and makes it possible to make one of the colors transparent, while compressing images into a smaller size than a GIF file.
APNG format (Animated Portable Network Graphics). Image format based on PNG format. Allows you to store animation and also supports transparency.
SVG format (Scalable Vector Graphics). An SVG drawing consists of a set of geometric shapes described in XML format: line, ellipse, polygon, etc. Both static and animated graphics are supported. The set of functions includes various transformations, alpha masks, filter effects, and the ability to use templates. Images in SVG format can change in size without reducing quality.
BMP format (Bitmap Picture). Represents the uncompressed (original) raster image, whose template is a rectangular grid of pixels. A bitmap file consists of a header, a palette, and graphic data. The header stores information about the graphic image and file (pixel depth, height, width and number of colors). The palette is indicated only in those Bitmap files that contain palette images (8 or less bits) and consist of no more than 256 elements. Graphic data represents the picture itself. Color depth in this format can be 1, 2, 4, 8, 16, 24, 32, 48 bits per pixel.
ICO format (Windows icon). File icon storage format in Microsoft Windows. Also, Windows icon is used as an icon on websites on the Internet. It is a picture of this format that is displayed next to the website address or bookmark in the browser. One ICO file contains one or more icons, the size and color of each of which can be set separately. The icon size can be any size, but the most common are square icons with sides of 16, 32 and 48 pixels.
2. Tag
Tag
The tag has a name attribute available, which specifies the name of the map. The value of the name attribute for the tag

Element
3. Tag
Tag describes only one active region as part of a client-side image map. The element does not have a closing tag. If one active area overlaps another, the first link from the list of areas will be implemented.
| Attribute | Short description |
|---|---|
| alt | Sets alternative text for the active map area. |
| coords | Determines the position of the area on the screen. Coordinates are specified in length units and separated by commas: For circle— coordinates of the center and radius of the circle; For rectangle— coordinates of the upper left and lower right corners; For polygon— coordinates of the polygon vertices in the required order; it is also recommended to indicate the last coordinates, equal to the first, for the logical completion of the figure. |
| download | Complements the href attribute and tells the browser that the resource should be loaded the moment the user clicks the link, instead of, for example, having to open it first (like a PDF file). By specifying a name for an attribute, we are thus giving a name to the loaded object. It is allowed to use an attribute without specifying its value. |
| href | Specifies the URL for the link. An absolute or relative link address can be specified. |
| hreflang | Specifies the language of the associated web document. Only used in conjunction with the href attribute. Accepted values are an abbreviation consisting of a pair of letters indicating the language code. |
| media | Determines what types of devices the file will be optimized for. The value can be any media query. |
| rel | Expands the href attribute with information about the relationship between the current and related document. Accepted values: alternate - link to alternative version document (for example, printed page form, translation or mirror). author — link to the author of the document. bookmark - Permanent URL used for bookmarks. help - link to help. license - link to copyright information for this web document. next/prev - indicates the relationship between individual URLs. Thanks to this markup, Google can determine that the content of these pages is related in a logical sequence. nofollow - prohibits search engine follow links on this page or a specific link. noreferrer - indicates that when following a link, the browser should not send an HTTP request header (Referrer), which records information about which page the site visitor came from. prefetch - indicates that the target document should be cached, i.e. browser in background loads the contents of the page into its cache. search - Indicates that the target document contains a search tool. tag - indicates keyword for the current document. |
| shape | Specifies the shape of the active area on the map and its coordinates. Can take the following values: rect — rectangular active area; circle — active area in the shape of a circle; poly — active area in the shape of a polygon; default — the active area occupies the entire area of the image. |
| target | Specifies where the document will be downloaded when the link is clicked. Accepts the following values: _self — the page is loaded into the current window; _blank — the page opens in a new browser window; _parent — the page is loaded into the parent frame; _top - the page loads in the full browser window. |
| type | Specifies the MIME type of the link files, i.e. file extension. |
4. Example of creating an image map
1) Mark the original image into active areas of the desired shape. The coordinates of the areas can be calculated using a photo processing program, for example, Adobe Photoshop or Paint.
 Rice. 1. Example of image markup to create a map
 2) Set the name of the card by adding it to the tag
Jpg" alt="flowers_foto" width="680" height="383" usemap="#flowers">
!}
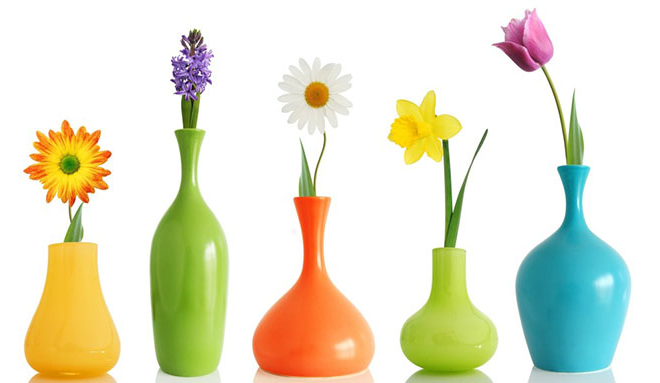 Rice. 2. An example of creating an image map, when you click the mouse cursor on a flower, you go to a page with a description