Working with animation in Photoshop. How to create animation in Photoshop. Step-by-step instruction. Animation from pictures
Create a new size file 700 x 300 px.
Opening the window Timeline( (Window - Timeline)).
Click on the button " Create Frame Animation» (Create frame animation).

Using the tool () create 3 layer with text ("Animation", "this", "just").
With the tool (Move Tool / V Key) place the text as in the image below.

In the window Timeline(Timeline) select the first frame and click on the button « Duplicates selected frames» (Create a copy of selected frames).

We create 4 copies of selected frames.


Select in the window Timeline(timeline) second frame and leave only the layers visible " Animation" and " Background».
Choose fourth frame and leave it visible all layers.

Let's set the repeat parameter for our animation. In the window menu Timeline(Timeline), change the repeat parameter from " once" on the " Constantly” (image below).

Now we can use the animation to start playing.

 Animation settings in "File - Save for Web" (File - Save for Web) Photoshop CC. Final result
Animation on the Internet has long ceased to be a simple page decoration and has become a useful tool for improving usability. It helps the user interact with the interface, draws attention to important points.
Animation is a sequential display of similar frames one after another. Each frame changes slightly, so it looks like the picture is moving.
To animate the interface, create interactive prototypes or commercials, special programs are used, for example, Adobe Animate or After Effects.
To create a simple web banner or presentation, it is not necessary to deal with special programs. The built-in Photoshop tools are also suitable for this.
Where to start
The first step is to decide what we will animate and what result we plan to achieve.
To create the animation, I took one of the bright projects from Behance and redrawn it in Photoshop. Aligned to the content grid, picked up the sizes and placed each element in a separate layer. As a result, I had the first screen of the site rendered in PSD format, which I then animated.
time scale
Before creating an animation, you need to prepare the necessary tools - turn on the display of the "Timeline", which helps you manage frames in the animation.
To do this, I open the "Window" tab and check the box next to the "Timeline" line.

A wide bar should appear at the bottom of the window in Photoshop, with which you can control the frames in the animation.
To create the first frame, I click the Create Frame Animation icon on the Timeline.

After the first frame has appeared, you can start creating movement.
Intermediate frames
In Photoshop, an element can be animated in several ways:
- Draw multiple frames by manually changing the position and properties of the elements. If the animation is long enough, then drawing each frame takes a long time.
- Insert intermediate frames. You only need to manually set the layout states: at the beginning and at the end of the animation. The necessary frames between these states will be added by Photoshop itself. This method is suitable to make the object appear and disappear gradually or to show its movement.
First I animate the balalaika image. For a smooth appearance of the image, I use the "Insert intermediate frames" tool. In order for Photoshop to animate an element on its own, you need to set two states for the element - start on the first frame and end on the next.
So I'll add another frame to the Timeline using the Duplicate Frames button.

After adding a new frame, I switch to the first one and remove the visibility of the balalaika layer. You can also set the layer opacity to 0%.

On the next frame, I check if the balalaika layer is visible.

After working with the image of the balalaika, I set up the appearance of a text line. On the first frame, I select the "Soul sings" text and move it to the right outside of the layout. I do the same with the text “3 strings” - I shift it to the left until it disappears.

In the second frame I return the text back.

Fine. Now let's insert intermediate frames between key frames.
To do this, I click the "Create intermediate frames" button on the "Timeline".

In the dialog box that appears, specify how many frames to add.
The more frames, the longer the animation and the smoother the element moves. If there are too few frames, the elements will move in jerks.

The first part of the animation is ready. Now you can play it back and see what happens.
I press the play button on the Timeline.

Inserting intermediate frames helped to quickly create animation with smooth appearance and movement of elements.
Appearance, disappearance and movement can be combined with each other to achieve even more interesting effects.
Frame-by-frame animation manually
In addition to linear animation, sometimes you need to create chaotic movement or show complex interaction of elements. Usually, for this, several copies of the first frame are created, and then each copy is slightly modified - the animation is drawn frame by frame.
I'll copy the last frame a few times to create the movement of the arrow and the "go to shopping" text.

In the next frame, I select the desired layer with the text and the arrow, move it a little up, and in the last frame - down.

Now you can run the animation and see the result.
Since the frames change quickly, the eyes do not have time to focus on the last frame and fix the final position of objects on the screen.

Therefore, I increased the duration of the last frame: you need to click on the arrow next to the inscription "0 sec." and choose another time from the list.

For the last frame, I set the duration to two seconds. Now playback slows down at the end. Therefore, it is comfortable to observe the movement of elements.
Save and export

In the preview window, you can view the animation again and change the save settings.
By default, the animation stops after playing. Therefore, I change the playback mode to "Repeat" and save.

Here is the resulting animation:

Conclusion
In Photoshop, it's easy to create short interactive banners and presentations, and animate individual elements. It is convenient to experiment with the result.
To make an animation, it is not necessary to have some phenomenal knowledge, you just need to acquire the right tool and use it correctly. There are quite a few such solutions, but the most famous of them is Adobe Photoshop. This article will show you how to quickly create an animation in it.
If Photoshop is not on your PC, download it from the link above, then install it following the instructions from this article and run it.
Stage 1: Preparing the Canvas and Layers

Now you can draw on them what will be shown in the animation. In our simple example, this will be a moving square. On each layer, it moves a few pixels to the right.

Stage 2: Working with the timeline

Everything! Animation is ready. You can view the result by clicking on the button "Start Animation Playback". And then you can save it as gif.

In such a simple but proven way, we managed to make a GIF animation in Photoshop. Of course, it can be greatly improved by reducing the frame time, adding more frames and, of course, creating something more original and qualitatively better instead of a black square. But it already depends on your preferences, desires and skills.
02.08.2016 27.01.2018
In this tutorial we will learn how to create animation. Animation is an image that has been given movement, unlike static images (such as photographs), it can change frames or parts of a frame.
From Latin Anima is translated as "soul". We can say that by creating animation, we "animate" the picture, give it life.
Animation panel appeared in Adobe Photoshop CS3, before that, in the CS version, the ability to create animation was carried out through a separate program, Image Ready CS2, which came with Adobe Photoshop. Now, in new versions of Adobe Photoshop, an animation tool is included in the program and has the name time scale. Lesson done v Adobe Photoshop 2015.5, if you have an earlier version of the program, some settings may differ, but the basic concepts are identical.
Let's start learning how to create animation. Open the picture you want to "animate" File-Open (File Open). I have this cute picture with a girl and a cat admiring the starry sky.
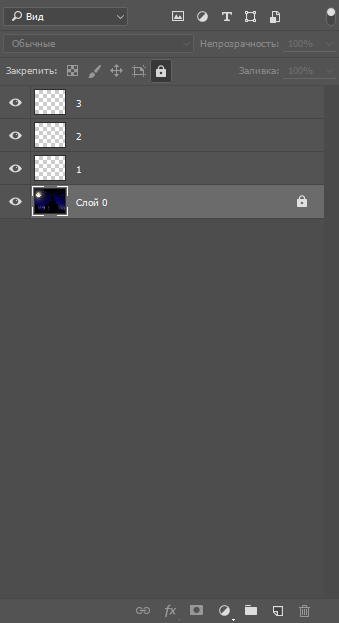
Create three new empty layers, Layers-New-Layer (Layer-New-layer) or click on the thumbnail for creating a new layer in layer panels.

Name them, respectively, "1", "2", "3". This will help you avoid confusion later on.
Choose brush tool (brush):
First click on the triangle next to the brush size, then on the gear on the left:

The brush download menu will open:
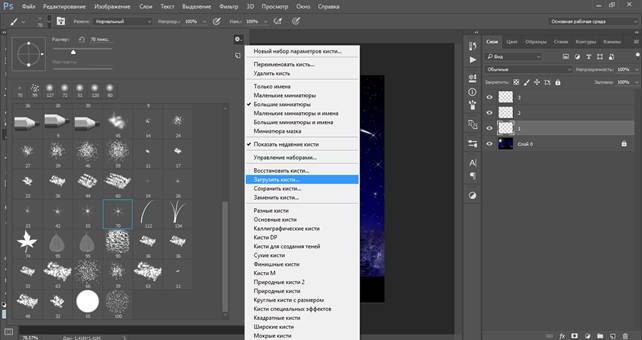
Download the star brushes (https://cloud.mail.ru/public/G2co/RTne1N3f9):

Select single brushes and, by changing the size, paint on those three layers that we created earlier. The color of the brush is white or close to white. The main thing is not to place them in the same area on all layers, try to randomly scatter stars all over the sky.
Well, now the most important thing: let's move on to the magic of animating the picture. Let's go to the menu Window-Timeline (Window-Timeline), the following window will appear:

Animation panel has two types: timeline and frame animation. The first type is rarely used, because it is intended mainly for working with video, let's switch to frame by frame, to do this, click on the button " Create video timeline", and then to this icon:

The following window will open:
To create a new frame, click on this icon:
Our animation is simple, three frames will suffice. We add two more frames to the existing one by default, then we become on the layer with the girl and the cat and make it visible and the first layer with asterisks (for this, simply click on the eye of the layer on layer panels):

We do the same for the second and third frames, only including the visibility, respectively, of the second and third layers with stars. The layer with the girl and the cat is always visible. For clarity, screenshots for the second and third frames:


Clamped keyShift select all layers in the animation panel, right click and change the frame duration, from 5 second, set by default, up to, for example, 0.2 seconds. We click on the button "Selecting Cycle Options" and change the value to "Constantly":

If the parameter is set "Once", then the animation will play once and stop, with the parameter "Constantly" it will flash continuously.
To see what the animation looks like, click on this button:
For a smoother transition between frames, you can add intermediate frames - make the active frame in animation panels and click on this icon:
A window will appear in which you can select the number, location, and style of inbetween frames. I added 3 intermediate frames to the first two frames with these settings:

And the last, third, frame is also 3, but with different settings to loop the animation and make the stars appear and disappear smoothly, without jerks and abrupt transitions:

Well, we made the animation in Photoshop, it remains only to save it. Go to File-Export-Save for Web (old version) (File— Export— Save for web (old version)):

Choose a format gif, you can also choose the number of colors (the more colors, the more the file will weigh, but the fewer colors, the worse the quality), size. The rest of the parameters can be left as default.
That's all! We learned how to make animation in Photoshop!

You will learn:
- How to open and close and customize the animation panel.
- How to add, remove and edit key and animation frames.
- What is the Tween button for?
- How to make a simple star drawing animation.
- How to set time intervals for each animation frame.
- How to optimize animation to reduce Gif file size.
- How to import GIF files into the program.
- How to switch from frame animation to timeline.
The lesson consists of the following sections:
1. Instructional video.
2. What is animation.
3. Part 1. Frame-by-frame animation.
4. Setting intervals.
5. Setting the frequency of repetitions.7. Animation optimization.
8. Saving animation.10. Open GIFs.
11. Buttons for unifying animation layers.
12. Closing the animation panel.
13. Questions.
14. Homework.
What is animation
Animation is a sequential change of images, as a result of which it seems to us that the object is moving, changing shape, appearing and disappearing, and other dynamic actions can also occur with it.
Using animation in Photoshop, you can create slide shows from photos or pictures, make avatars, banners, screensavers for web pages, dynamic postcards and various presentations. It should be borne in mind that Photoshop is still a graphics editor, and is not designed for complex animation processes. There are two ways to create animation in the program - frame-by-frame animation and animation in timeline mode. We will consider both types of animation in turn. We will devote the entire lesson 36 to the study of frame-by-frame animation. And in lesson 37, we will deal with the timeline. Some simple tasks are more convenient to perform in the frame-by-frame animation mode. Even if you know how to work with the timeline from other programs, anyway, I advise you to try the tasks from this lesson. Based on the knowledge gained, you will be able to decide which method you will use in each case.
Part 1. Frame-by-frame animation
Panel Frames appeared a long time ago. Let's consider its settings on the example of the animation of drawing an asterisk.
Create a new document 800 x 800 pixels, 72 resolution, RGB color mode. Create a new layer by clicking on the icon at the bottom of the Layers palette. Or press Shift+Ctrl+N.
On the toolbar, select the brush tool  black, 35 pixels in diameter with blurry edges. Draw the first slanted line (put a dot, press Shift and put the next dot - the line will be straight).
 Create a second layer. Draw the next line. Then the third layer
and another line, and so on. You should have six layers, including the background layer.
To open the Animation panel, click the Animation item on the Window menu. Or in menu Window (Window) install Workspace (Workspace) on Video and Film/Video (Video). Make sure the panel is in frame-by-frame animation mode.
Otherwise, click the icon
at the bottom right of the animation panel.
Turn off the visibility of all layers except the background layer in the palette Layers (Layers) by clicking on the icon to the left of the layer thumbnail. This will be the first frame of our animation.
Click the icon at the bottom of the Animation panel. The second frame (a copy of the first frame) will appear. To change it, turn on the visibility of the first layer in the palette Layers (Layers). Click the icon again and turn on the visibility of the second layer.
Keep creating new frames and turn on the visibility of the next layers until the entire asterisk appears in the last frame.
At the bottom of the Animation panel are tools for adding, removing, and viewing animations.
- conversion to animation on the timeline.
- Tween(Creation of intermediate frames).
- Duplicate сurrent frame (Creating a copy of the selected frames).
![]() - Playback buttons (Like any tape recorder).
- Playback buttons (Like any tape recorder).
Selects First Frame(Selectfirstframe); Selects Preview Frame (Selectpreviousframe);
play(start animation);
SelectsNextframe(Select next frame).
- Delete selected frames. Please note that the keyDelon the keyboard does not delete the selected frame, but deletes the selected layer from the palette Layers (Layers).
Setting intervals.
 Now let's set the time intervals during which animation frames will be visible.
Under each frame, 0 s is written at the bottom. and there is an arrow. Click on the arrow and select the frame rate. Choose a value of 0.5 for all frames (meaning there will be a frame change after half a second).
Setting the repetition frequency.
The next step is to set the frequency of animation repetitions. Click the arrow at the bottom of the animation panel. The periodicity selection menu appears.
 If you select Forever (Forever / Permanently), then the animation will repeat over and over again. This process is called looping.
If you select Once, the animation will play once and stop at the last frame.
If you select Other, you can set a different number of repetitions within the range (from 1 to 999).
Now let's play the created animation. To do this, click the Play button (Start animation). If you like everything, go to the next step, if not, then adjust the animation as you wish.
Go to Animation Panel. Click on the Duplicate current frame icon. Select all layers except the background layer.  Turn off the visibility of the background layer. Press Ctrl + Shift + Alt + E. A new layer will appear on which all selected layers will be stamped.
The layer thumbnail will show a star on a transparent background. Name this layer Star.
Double click on the layer to go to the style settings. Set the shadow and color overlay. Choose the color of your choice.
 Go back to the first frame of the animation
and remove the visibility of the layer with the star
in palette Layers (Layers).
Select the last frame. In the Layers palette, leave only the Star layer and the Background layer visible.
Duplicate this layer and change the style settings: Change color, set embossing or stroke. Go to Animation Panel. Click the Duplicate current frame icon. Go back to the first frame in the Animation panel and deselect this layer in the palette.
Duplicate the layer again and change the style. Select the tool Move (Move) or press Ctrl + T to go to the tool Free transform. Change the scale. Go to Animation Panel. Click the icon. Go back to the first frame and deselect this layer.
Duplicate the layer again and zoom in a little more and change the style. And add an animation frame. You should end up with a storyboard like this: 
Press the Play button (Start animation) and look at the result of the work done.
Animation optimization.
Click on the icon at the top right of the animation panel. An additional menu will appear.
 After the work is completed, the animation should be optimized to reduce the size of the Gif file and better load in the web browser. The reduction occurs due to the exclusion of areas that do not change during the transition from frame to frame.
Select Optimize Animation…(Optimize animation). Check both boxes.  BoundingBox(bounding box)- crops frames by the changed area compared to the previous frame.
Redundant Pixel Removal (Removing extra pixels). If a pixel has not changed from the previous frame, it becomes transparent.
To have PhotoShop save frames that include transparency, select the option  "Automatically". To do this, select one or more frames. Right click on the frame thumbnail. Choose from three options:
Automatic(Automatically)— the current frame is discarded if the next frame contains layer transparency.,
Donotdispose(Do not dispose)-The current frame is visible through the transparent areas of the next frame.,
Dispose(Position)- the current frame is not visible through the transparent areas of the next frame.
Save animation.
Now it's time to save the animation. Of course, in the process of work, it was necessary to save the file in PSD format so as not to get into a situation with a sudden power outage or an unexpected reboot of the computer. But now I mean another save. The animation can be saved as an animated GIF using the Save for Web command.
Select Save for Web from the File menu. Set the Gif format in the settings. Pay attention to the size of the future file. Reduce its size if possible. How to do this, we discussed in detail in the lesson Image Size (Image size). When optimizing, use the Adaptive, Perceptual, or Selective color reduction model to ensure color consistency across all frames. Click Save, enter a name, path, and click Save again.
Previously, to record the animation, we went to the ImageReady application.
Photoshop CS2 introduces the Animation panel. But in order to save the animated file, you still had to switch to ImageReady. For the transition, the button at the bottom of the toolbar or the menu File (File) - Edit in ImageReady (Go to ImageReady) served.
Starting with Photoshop CS3 and above, no additional programs are needed to record animation. For editing, the Animation panel is now used, and for recording, the item has been adapted in the File menu (File). Saveforweb(Save forweb) .
Let's consider another small example of creating a frame-by-frame animation, in which we will analyze what the button is for. Tween(Create tweening).
 Create a new document 500 x 250 pixels. Select tool Type (Text), font Impact, size 150 pt. and write any word. Set the opacity to 100%. Add layer styles: shadow, gradient and emboss. You can choose a different style, you don't have to do it like mine. Text deformation can also be animated. In the animation panel, set the interval to 0.2 seconds. Press the button to copy the first frame. Go to the palette Layers (Layers) and reduce the opacity to 0. Change the layer style (for example, instead of a gradient overlay, add a color overlay). Switching between frames, you can watch how the image changes.
Let's add movement. Select the tool Move (Move) and move the text down, off the sheet. Go to the animation panel and click the button

In the window that appears, you can set the number of added frames. The more of them, the smoother the transition will be. In the graph TweenWith(inter-frames) you can choose from the list where the frames will be inserted:
Last (Last frame); Selection (Selection); Previous Frame (Previous frame); First Frame (First frame); Next Frame The list changes depending on the selected frame.
Leave all default settings. Click OK.

Click on Play (Start Animation). If everything suits you, then proceed to save the animation.
Opening GIFs.
In Photoshop CS3 and CS44, video and GIF animation files do not open through the menu File (File) – Open (Open). When I try to open it, a window appears:
 Be sure to install QuickTime Pro 7.1 or higher.
Photoshop CS5 does not have this problem. Files are easily opened in the usual way.
Select from the menu File (File) –Import (Import) - Video Frames to Layers (Frames of video
into layers...). You will not be able to select GIF files in the file type field. However, this shortcoming can be easily bypassed if you first copy the name of the .gif file and paste it into the file name field or manually type the name in this field. Or enter * in the Filename field and click Load, then  the name of the gif file will become visible and it can be opened (Other files will become visible, even those that cannot be opened in the program).
 Leave the settings in the window that appears as default. From Beginning To End and Make Frame Animation should be checked. Unfortunately, files opened this way will not have a transparent background - instead it will be white. When you open such a file in CS5, the transparent background will be preserved.
Buttons for unifying animation layers.
Take a close look at how the palette has changed Layers(Layers) when working with frame-by-frame animation. Buttons have appeared that allow you to apply changes in the current frame to all other frames. Check the Propagate Frame 1 checkbox.

Let's see how they work... Open the star drawing animation file. Select any frame and turn off the visibility of the background layer. Click Play (Start Animation). Only the selected frame became transparent. Click the Unify layer visibility button. A window will appear: .
 Click Match(Synchronize) and run the animation again. The drawing of the star will take place on a transparent background throughout the animation. The transparency of the first frame is now assigned to all animation frames. Similarly, you can control the position and style of the layer.
In palette Layers (Layers) select item Animation Options (Animation options). By default, the unify layer buttons appear Automatic when you turn on the frame-by-frame animation bar. You can change this rule by selecting Always Show or Always Hide.
Close the animation panel.
There are several ways to close the animation panel:

You can minimize or close the animation panel, and also go to Preferences by clicking on User Interface Preferences.
Questions:
- What happens if you select a frame in a frame-by-frame animation and press Del on the keyboard?
The selected frame will be deleted.
The layer selected in the Layers palette will be removed from all animation frames.
The layer selected in the palette Layers (Layers) will be deleted only for the selected animation frame.
The layer selected in the Layers palette will be removed from all animation frames except for the background layer.
- You have three frames. The animation will be continuous. What needs to be done to add
5 intermediate frames between last and first frames?
Select first frame. Push button
In the settings in the column Tween With (Intermediate frames) select Next Frame (Next frame).
Select last frame. Push button
In the settings in the column Tween With (Intermediate frames) select Previous Frame (Previous frame).
Select last frame. Click the Tween button.
In the settings in the column Tween With (Intermediate frames) select First Frame (First frame).
- What is animation optimization for?
To convert to timeline animation.
To reduce the size of a Gif file by excluding areas that do not change from frame to frame.
To set the frequency of animation repetitions.
Homework:
1) Perform a frame-by-frame animation of drawing a star (according to the lesson).
2) Perform frame-by-frame animation of the text.