Setting up a monitor for the eyes of windows 10. How to calibrate and adjust the monitor at home. Personalization of inactive windows
Improving the image quality using the side buttons on the monitor is not always enough for the indicator to be at the peak of a good display. The built-in calibration tool in windows 10 will make sure your monitor can perform better. The main thing for content producers is to make sure that the work will appear on other devices, the same standard in quality. For ordinary users, the viewing of movies and photos will be improved. Before calibrating the monitor in windows 10, please reset the monitor to factory settings and turn off the lights in the room to avoid glare.
Where are the monitor calibration settings
1 way... Since Windows 10 is updated and the location of the settings is changing all the time, I decided to add two ways to enter the Monica calibration parameters.
- Open " Options"and just in the search write" Calibrating Monitor Colors".
- After opening a new window, go to the bottom method "How to adjust colors with the color calibration tool".
2 way... Click on right click mouse on the desktop and select "Display Settings".

In the window that appears, click "Advanced display options".

So we come to the two parameters that we need: "Color Management", "Color Calibration". Let us examine these two parameters in detail below.

How to use color control in windows 10
To calibrate your monitor in windows 10, you need to use "color management", which shows the preset profiles for your monitor. The line "Devices" shows the profile of all connected devices to the computer and associated profiles. On the "All Profiles" tab, all available profiles are displayed. Select several options to see how they appear. For truly accurate results, you can create a color profile using the Color Calibration function.

How to adjust colors using the color calibration tool
To adjust colors and calibrate your monitor in windows 10, you need to use the monitor buttons to adjust a certain color aspects. Drag the welcome window onto the calibration monitor. Even if you have multiple monitors of the same make and model, you need to configure them separately each. Click Next.

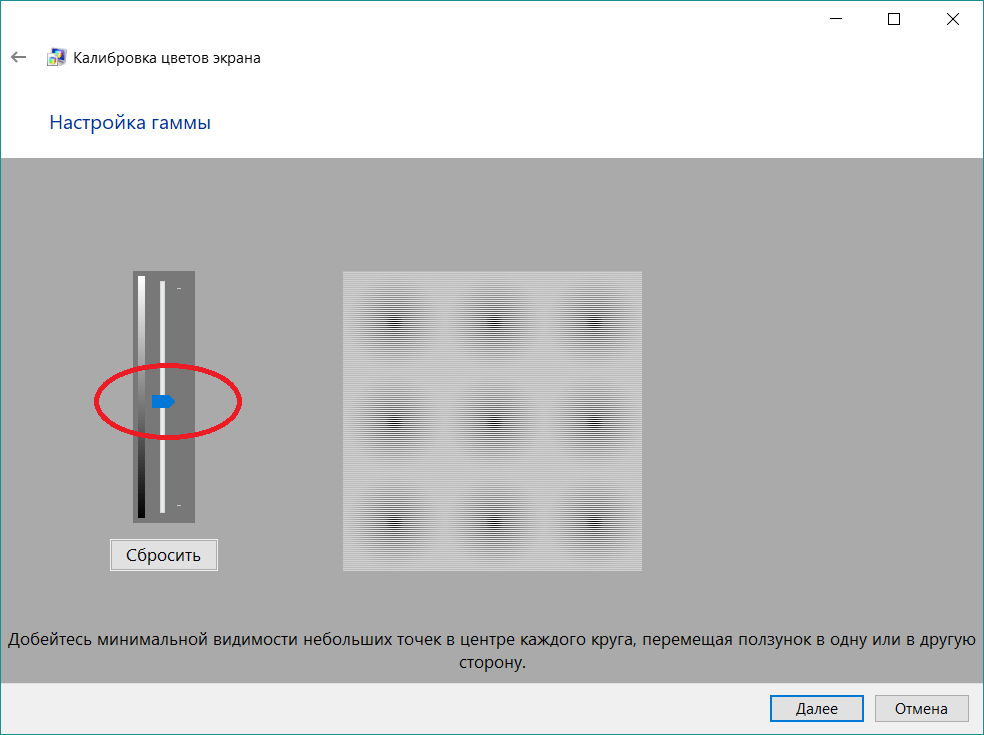
The wizard shows that gamma controls the amount of light emitted from a particular color. By clicking "next" you can use the slider to adjust.

Achieve minimal visibility of small dots in the center of each circle, as the wizard tells us.

Brightness and contrast will be adjusted from your buttons on the monitor. On some monitors there are buttons that immediately adjust the brightness and contrast, while on others you will need to enter the menu on the monitor and select these two parameters there. Click Next to start configuring.

Adjust the brightness so that the shirt doesn't blend in with the suit, and the X is barely visible, as suggested by the master.

Adjust the contrast to the average pattern as recommended.

With color balance, colors should not "flow" into grays. Click next to adjust.

Drag the sliders to calibrate the colors.

You can now switch between the previous calibration and the weaving one. If you are happy with everything, click done, otherwise click cancel to cancel.

Troubleshooting that may occur
If the colors still don't look right, then most likely your video card is out of order or your monitor needs to be replaced. Try connecting another monitor to your computer and check. If the problem persists, then you will need to replace the video card or check it by replacing it with another one. Correctly calibrating your monitor in windows 10 will significantly improve the quality of work for photographers, videographers, graphic designers and creatives. Improves the quality of images and computer games.
The standard Windows 10 tools include a utility for calibrating the image on the monitor (display) screen of your computer or laptop. It allows you to adjust the color, brightness and contrast of the screen for the most comfortable work in your environment.
Note: in this article we will not go deep into the professional subtleties of screen calibration using a special software or equipment. This manual describes the procedure for setting up the monitor using standard Windows tools, without the need to download additional programs. It is perfect for beginners who have noticed some deviations in the quality of the screen picture of a laptop or desktop computer, or just want to adjust the image a little for themselves. The perception of color / contrast / brightness is purely individual, so you should be guided by your own instinct, but do not go too far.
One more note: All procedures must be carried out with account administrator. Otherwise, you will need an administrator password.
Calibrating a monitor or display in Windows 10
You can go directly to the monitor or display calibration interface in Windows 10 by entering a command into the window Execute... Click on Win+ R and enter dccw.
If you are not looking for easy ways, then you can find the screen calibration menu along the following path:
- Open up Options - System - Screen... Go down a little lower and find the item Graphics adapter properties.

- In the window that opens, find the tab Color management.

- A larger window will open. On it you need a tab In detail... Open it and then press the button Calibrate the screen at the bottom of the window.

- This will open the screen color calibration wizard.

- The first step is to adjust the gamma. Before directly Windows setting will show you examples of incorrect and correct calibration.

- Try to adjust so that the picture matches the standard, but at the same time, no one prevents you from setting the parameters that suit you.
- If you don't like the setting, use the button Reset.
- The next step is to adjust the brightness and contrast. If you do not need to configure these parameters, click Skip brightness and contrast settings.

- At this stage, you will need to use the image controls directly on the monitor itself. Each manufacturer has a different menu and control buttons. How to change the brightness and contrast of your monitor should be indicated in the instructions for the screen - contact her for help, or google it. In this step, Windows will only show you sample images for accurate calibration.

- Click on Further and start experimenting.

- Adjusting the contrast will help you set values for correctly displaying the brightness of highlights. Again, follow the on-screen prompts and sample images, then adjust the picture in the menu. the monitor itself.

- Next comes the color balance adjustment. Here, calibration is already performed by means of the system (although almost every monitor in the menu has the ability to change the color balance - try playing with these parameters too.

- You need to make sure that the large stripes on the screen remain as gray as possible. If you notice impurities in other colors, remove them with the red, green, or blue sliders.

- In the final step, you can compare the color settings you created with the previous preset. To do this, click on Previous calibration... Button Current calibration will display the parameters you created.

- To save the new settings, click Ready... Button Cancellation will return everything to its previous state.
How to customize ClearType
Pay also attention to the point Run Configuration Tool ClearTypeafter clicking the "Finish" button... With its help you can adjust the quality of displaying fonts on the screen. We recommend that you spend another three minutes in order to fine-tune the monitor operation as accurately as possible.

In these two screenshots above, you can see the difference between ClearType enabled (top) and disabled (bottom). It is unlikely that anyone wants to voluntarily disable it, but someone will definitely need a more precise setting.

If you want to customize ClearType without screen calibration, then you can do it in the following ways:
After that, configure the fonts as described above. Spend a few minutes fine-tuning your screens. The result of your work will be a more pleasing to the eye picture, which will have an extremely positive effect on your experience of using your device.
Correctly calibrating your monitor is one of the main factors for accurate display of the final image to the user. There are a lot of professional tools that allow you to calibrate the monitor, but they are designed, first of all, for high-quality matrices, for which specialists work. For simpler ordinary people who also want to get a picture as believable as possible, but at the same time do not have a desire to understand much about professional programs or purchase a spectrophotometer to adjust your image, Microsoft has built-in tools in Windows 10. They allow you to calibrate your monitor quickly and easily.
Table of contents:Please note: Calibration is not required for all monitors. It should be carried out only if the colors displayed by the screen do not suit you for one reason or another. Using the tools discussed below, you can calibrate your computer monitor by adjusting only the basic settings.
How to calibrate your monitor with a dedicated Windows 10 tool
Windows 10 has a dedicated monitor calibration tool. To run it, you can go in two ways:

 Important: To calibrate the monitor, you must have administrator rights on your computer.
By running the calibration option, you can proceed directly to the steps to adjust the ideal image. Click on the "Next" button, and then "Next" again (after reading all the informational messages) to proceed to setting the first parameter - "Gamma". 
Gamma determines the ratio of the primary colors (red, green, blue), as well as the intensity of their emission. The Image Calibration Utility will display 3 pictures that indicate how low gamma differs from high gamma. Click Next to start configuring. 
To adjust the gamma, it is suggested to use the slider on the left side of the window. By moving it up and down, you can make the gamut higher or lower. The gamma is considered to be set to reproduce the most realistic colors if the dots displayed in the center of the screen of the adjustment utility are minimally visible. If you want to return to the original value, you can use the "Reset" button. When the setup is complete, click Next to proceed to the brightness and contrast calibration. 
An informational message will appear stating that the brightness and contrast should be adjusted manually by adjusting the monitor settings. That is, you will need to use the instructions for the custom screen to understand which buttons respond to adjusting the specified parameters. Click "Next" again to proceed to adjusting the contrast. 
An information window will open with information about what the contrast and brightness of dark colors is, and which of the settings can be considered optimal, and which are overexposed or darkened. Click "Next" to proceed to setup. 
A picture will appear with a man in a black shirt against a black wall. Using the brightness settings of the monitor, you need to set the level of brightness and contrast in such a way that the shirt does not merge with the wall, and the letter "X" displayed in the background is barely visible. When the configuration is complete, click Next. 
A page with information about contrast and brightness of light colors will open. Read it and click "Next" again. 
Using the contrast settings, you need to adjust the new test image so that the buttons and folds on the man's white shirt remain visible. After completing the configuration, click Next. 
The next screen explains what color balance is and how to properly adjust it. Settings can be made using the Windows tools that are available on the next screen. Click "Next" to go to them. 
Please note: Almost all monitors allow you to adjust the color balance through the display settings.
To adjust the color balance, it is required that there are no color highlights on the gray stripes. To remove them, you can move the color sliders of the red, green and blue spectrum at the bottom of the window. After adjusting the perfect color balance, click "Next". 
That's it, the screen calibration utility in Windows 10 will offer to compare the old calibration and the new one. Click Old Calibration to see how much the new version differs from the old one. 
Note: At the bottom of the final screen, it is recommended that you check the box next to Run ClearType Tuner. How to work with it is described below.
Click Finish to apply the new calibration. If the previous option is better, click Cancel.
Setting ClearType for Screen Calibration
After calibrating the screen, it is also recommended to use the ClearType utility. This remedy Windows allows you to customize the quality of the fonts. If you did not use the option to open the ClearType utility through the calibration utility, you can open the ClearType setting by searching for the corresponding query. 
With the ClearType Utility open, click Next to proceed to the settings. 
On the first screen, a permission check will take place. If the resolution is set correctly, it corresponds to the basic one, the system will inform you about it. Click Next. 
On the next screen, you need to select one of the texts, indicating which one looks best on your monitor. Choose the best one and click "Next". 
The next screen will offer 6 text options. The task is the same - to choose the best one and click "Next". 
The next screen offers 3 text options. Select the best one again and click "Next". 
The fourth setting again offers 6 text options. Choose the best one and click "Next". 
The final fifth stage also offers 6 text options. Choose the best one and click "Next". 
That's it, this completes the ClearType setting. Click Finish to apply your changes. 
After you calibrate the screen and adjust the ClearType settings, the screen image should be more in line with your needs and expectations.
Calibration refers to the process of adjusting the color, brightness and contrast of an image on a monitor or other visualization device (such as a projector or TV) in order to achieve the closest possible match between tones, colors, and tints on the screen and when printed. In everyday life, calibration is aimed at simply making the image natural and pleasing to the eye.
Almost everyone faced the need to calibrate the monitor - when they brought it home from the store and turned on for the first time. For those who do not work in graphic editors and is not engaged in photography, it is enough to do it "by eye", using the adjustment buttons on the monitor itself or Windows tools. Greater accuracy is not important here - the main thing is that the image should be without obvious color distortions, moderately bright and moderately contrasting.
Artists, designers and photographers need a deeper - professional calibration, which is carried out either with the help of programs or special devices - calibrators.
The first option is available to everyone - most of these applications are free and not too difficult to use. However, to achieve a good result, you also need a diamond eye. The second option provides maximum accuracy, but few use it. The reason is the high cost of calibrators. Even a budget device costs like good smartphone, but some artists and photographers rent them or use the services of calibration specialists, since this does not need to be done often.
Since we don't have a calibrator, let's talk about how to set up a monitor using programs.
Easy monitor calibration using Windows
The tool we are interested in is called Color Calibration. In Windows 10, it is called through the "Settings" application - section "System" - "Display" - "Advanced display settings".

In Windows 7 and 8.1 - through the Control Panel and the "Display" section. Or through "Display Settings" in the context menu of the desktop.

After launching the utility, follow the suggested operations step by step. But before that, be sure to expand the window to full screen and sit right in front of it, otherwise the result may be inaccurate. The distance from your eyes to the screen should be the same as during normal operation.
The first step is to set basic color parameters
Open the monitor menu by pressing the button on the monitor panel and set the default color settings. If you have a laptop, go to the next step.
The second step is adjusting the gamma
Here is an image of a square with dark spots inside and a setting slider. There is a point in the center of each spot. Your task is to make the points invisible (merged in brightness with the background).

The third step is to adjust the brightness
Open the monitor menu again or the Power supply section in the Panel Windows management- now we need a brightness adjustment slider. Instead, you can use the "Brightness-" and "Brightness +" buttons on the monitor panel or laptop keyboard.
Move the slider to adjust the brightness so that the details of the suit and shirt of the person in the picture are moderately visible, and the “X” on the wall behind it does not blend in with the background, but is barely noticeable.

Fourth step - contrast adjustment
Using the slider for adjusting the contrast, make sure that all the folds and buttons on the white shirt are clearly visible, and the shirt does not merge with the wall.

Fifth step - color balance
Move the sliders for the three colors, red, green and blue, to make the stripes in the center of the screen appear neutral gray.

Sixth Step - Save Calibration
Compare the current (new) calibration with the old one. If it suits you, click "Finish". If you want to proceed to customizing the display of text, first select the checkbox "Run ClearType ...".

Setting the display of text
Here you should select an example where a pangram (text that includes all letters of the alphabet) reads best and apply the setting.

Windows Calibrator is sufficient to properly set up your monitor for non-graphics editing and fine art printing.
To check the quality of the calibration, you can use specially created wallpapers from the RealColor.ru website. Select a set of wallpapers according to your screen resolution so that the picture does not change in size.

Calibrating Your Monitor for Photo Printing and Graphics
How to get the best results
To get a really good picture, where black is black (not dark gray), white is white, and color is independent of screen rotation, you need a professional monitor. Photographers and graphic artists prefer IPS ( best option- with S-IPS).
On budget monitors with TN matrices, alas, it will not work to achieve high accuracy of shades and colors, and the point is not that the programs do not allow this, but in the qualities of the screen itself. But we will work with what we have.
So, let's start by preparing the workplace:
- The monitor should be where you normally use it.
- The room must be sufficiently lit. Calibration is best done under the lighting conditions in which you are working. If you are working in both natural and artificial light, it is best to create two color profiles... Directional light sources should be removed from the screen during calibration.
- The monitor must run for a while before starting the calibration. CRT monitor - at least an hour, for the rest, 30 minutes is enough.
- The background image should be set to neutral, preferably in gray tones.
Adobe gamma
WITH with Adobe Gamma calibrates monitors for Photoshop. Since the applications were created by one developer, they are optimal for sharing - the profiles generated in Gamma are displayed in the Photoshop menu, and the user can quickly switch between them.
The utility is included in the Photoshop package, but if you wish, you can download it separately, however, not from the official site (it is not there), but from third-party resources. It does not require installation, you just need to start it.
If you are calibrating for the first time, select the Step by Step version.

Next, we will create a description of a new profile (in Latin letters).

Next, we move on to the calibration process. Using the monitor settings menu, adjust the brightness and contrast so that the gray square in the center of the window almost merges with the black, but is visible against its background. At the same time, the frame should remain white.

The next step is to determine the type of glow (chromaticity of the phosphor). The desired value can be taken from the factory monitor profile (it will be set by default if you have not previously changed anything in the settings). If you are at a loss, leave "Own" or "HDTV (CCIR 709)".

Now let's adjust the gamma for the correct color rendition (the ratio of red, green and blue channels). Use the slider to equalize the brightness of the gray square against the background of black and white stripes, or set one of the default values. For an LCD monitor, it is better to choose 1.8, for a CRT - 2.2.
If you deselect the Consider one gamut checkbox, instead of a gray square, there will be three - red, green, and blue, with separate adjustment tools. With their help, you can remove the color tint of the screen, if any. If not, it is better not to touch them.

After adjusting the gamma, determine the color temperature of the white point of the monitor. This parameter depends on the ambient lighting. For daylight operation, it is optimal to set 6500 ° K, with artificial heat (incandescent lamps) - 5000 ° K, with artificial white (fluorescent lamps) - 9300 ° K.
To determine the color temperature visually, press the "Change" button.

Three light squares will be displayed on a darkened background. Your task is to choose the most neutral gray.

At the final stage, we will set the display of the white point as a hardware value and save the profile.

For quick editing of existing profiles, it is more convenient to open the program in the form of a control panel. Here, all settings are in one window.

Calibration Quality Assessment Using Web Services
Online services for checking monitors are convenient to use as an addition to calibration programs. With their help, you can evaluate and adjust not only brightness, contrast and color, but also sharpness, geometry, presence dead pixels, flicker level, etc. This is important if you are using a monitor for photo editing or professional graphics work.
There are no configuration items in the services, so if you need to fix something, you will have to use third-party tools - buttons and monitor menus, Windows tools or programs.
Monteon.ru

Monteon.ru service allows you to evaluate the following:
- Color accuracy.
- The presence of dead pixels.
- Smooth gradient transitions.
- Flickering (phase synchronization on VGA monitors) and moiré (wavy streaks that shouldn't be normal).
- Sharpness of boundaries.
- Brightness and contrast.
- Zonal brightness (difference in brightness in the center and at the periphery of the screen).
- Geometry and grids (edge clipping, peripheral distortion on a widescreen 16: 9 aspect ratio).
Online Monitor Test

Online Monitor Test is an English-language service. There are 4 testing options to choose from:
- Simplified - for Smart TV, tablets and smartphones.
- In browser window format (recommended to run in full screen mode).
- In windowed format with a resolution of 1920X1080 (the resolution can be reduced).
- As an application that runs outside the browser. Works without installation.
Online and offline versions of the program (except for the simplified version) contain the same set of tests.
Those who use two monitors can also check for the input lag of one of them.
Online Monitor Test allows you to evaluate:
- Displays close shades of gray.
- The seven primary colors are accurate and the color gradient is smooth.
- Matrix response time (6 different tests).
- Uniformity of lighting and color fill (5 colors).
- The presence of dead pixels.
- Shimmer and moire.
- Readability of text written in several small fonts. The color of the text and background can be changed using the sliders.
Each test is accompanied by a hint in English, but figuring out what's what is easy without it.
This is how quickly and easily every user can calibrate their monitor at home. To maintain image quality, monitor manufacturers recommend recalibrating every 3-4 months.
Learn how to adjust color settings today. operating system Windows 10. You can choose the color of the main background and customize Extra options... To control color options, open the Start menu. In the window that opens, click on the tab - Options.

Automatic selection of the main background color, by default the background color is set automatically. If you turn off this parameter, then you can choose the color of the main background yourself.

Show color in the Start menu, taskbar, action center and window title, this option is disabled by default, you can enable it.
Make Start Menu, Taskbar, and Action Center Transparent is enabled by default, but you can turn off transparency.

At the bottom of the page, you will have a High Contrast Settings tab where you can adjust the contrast settings.

We've covered the basic color settings on Windows 10. Good luck!
Customization Windows colors 10 updated: Jul 24, 2016 Posted by: Ilya Zhuravlev
info-effect.ru
Windows 10 customize window colors
At the end of last year, Microsoft released another update for Windows 10 that allows you to change the colors of the titles of active windows. But this function is not available to all users.
Requirements
Customizing the color scheme of the explorer elements is available only to users who use activated Windows 10 with installed update 1511. For a non-activated OS, the window color change function, like the entire personalization section, will be unavailable, and it also does not work without the specified update.
Therefore, update your activated (or jailbroken) Windows 10, preferably with all available updates, and restart your computer.
If you don't want to, install at least update 1511 (build number 10586). You can check if it is installed in the system parameters. See the lines "Build OS" and "Version".
Algorithm for changing the parameters of the conductor by means of "tens"
In Windows 10, window colors change without all sorts of hacks, which consist in replacing themes and parameters in their configuration. Now everything can be done by means of the operating system.
- We call context menu desktop, select "Personalization" from the drop-down list of available functions.
The same can be done in a more complex way: go to "Start", click "Settings", and then - "Personalization".
- We activate the tab "Colors", which allows you to change the design windows windows 10.
- We activate the option shown in the screenshot.
- Choose the color you like from a small list of suggested ones and save the new window decoration settings.
Keep in mind. When you activate the option to automatically select the main background color Windows 10 will automatically select the color of windows and other explorer components (if the corresponding option is enabled), based on the gamut of wallpapers installed on the desktop. Moreover, if the wallpaper is not static, the palette of the explorer elements also dynamically changes, based on the picture currently set as its background.
Set your own design parameters for the active window
If the color that you would like to see in the title of the windows is missing from the proposed list, you can add it yourself, rather than using the 10 options that the developers offer.
- We start the registry editor by executing the system command "Regedit" in the search line or in the line of the command interpreter.
See More: Easy Windows 10 Upgrade
- Find the first or one of the first keys called "AccentColor" and double-click on it.
- In the "Value" field, enter the color code in hexadecimal notation.
Such a code can be found using the appropriate online service for converting colors or using a utility, for example, Color point.
Surprisingly, instead of color encoding in this case, for some reason, BGR is used, and not RGB. This means that the first two characters in the code must be swapped with the last two. For example: you need to set the color code 65AD01. 65 change places with 01 and enter the code "01AD65" in the "Value:" field.
Immediately after clicking on the "OK" button, the new parameters will take effect without requiring the user to restart the computer or explorer. You just need to switch to a new window.
After turning off the option to change the color gamut of the window title, the key value will be reset, and the next time it will have to be re-entered manually.
Personalization of inactive windows
V Windows registry 10 also has the ability to change the color of an inactive window. To do this, go to the registry key, as above. Create a string parameter named "AccentColorInactive", enter its color, as before, given that Microsoft uses BGR encoding for this.
Configuring Start and Taskbar Colors
The current registry key contains several more keys that allow you to set the color of the "Start" and "Taskbar" without affecting the window design.
- In the "Color" tab of the "Personalization" menu, we activate the option responsible for displaying the color in the start, notification center and taskbar.
- Switch to the Registry Editor and change the "ColorPrevalence" value to "0".
As a result, the above elements will be painted in the color selected from the list, and the window titles will not change the color gamut, that is, they will remain as they were, even if their color value was entered manually, taking into account the RGB-BGR conversion.
Change the color scheme of the "Taskbar"
To set your own color for the "Taskbar", you need to go to the section:
Here we find the already known parameter called "ColorPrevalence" and enter its value equal to "2".
Then you will have to restart Windows 10 or Explorer. We will choose the second option due to its simplicity. We start the "Task Manager", on the "Processes" tab we find the element of the same name, call its context menu and select "Restart".
In principle, the Winaero Tweaker utility allows you to do all this, automating almost everything routine tasks to find, create and edit keys, so setting the color of the windows will take only a few seconds.
(Visited 4,745 times, 7 visits today)
windowsprofi.ru
Adjust contrast on a Windows 10 computer
Hey! We continue to dismantle the operating room Windows system ten ! Today you will learn how you can adjust the contrast to Windows computer 10. You will be able to select and customize ready theme with contrast settings. To adjust the contrast, at the bottom left of the screen, open the Start menu. In the window that opens, click on the icon or the "Options" tab.


At the top of the page, click on the field, select a topic. In the theme, you can customize:
Disabled text color.
The color of the selected text.
The color of the button text.
Background color.

After setting the parameters, click on the button below - Apply. Then the contrast on your computer will change.
Still have questions? Write a comment! Good luck!
Adjust contrast on Windows 10 computer updated: January 27, 2017 by Ilya Zhuravlev
info-effect.ru
Adjusting the monitor color: a step-by-step guide
Everyone knows that spending a long time at the computer is bad for your health. This is especially true for the human vision. The fact is that a person is not able to see the flickering frequency of the monitor screen, but the eye catches this frequency, and over time, weakening of vision may occur. Behind the computer, the eyes gradually get tired and stop clearly focusing on the image. But for many, a computer is a job, which means that avoiding this harm will not work. In order to reduce it as much as possible, you need to correctly adjust the color of the monitor, as well as its resolution.
Configuring with Adobe Gamma
For optimal display of colors, it is necessary to carry out the adjustment using a special program called AdobeGamma. The first thing to do is to install it on your computer. After installing the program, you should set the screen saver in the form of a solid gray color on the desktop. Configuring monitor colors in Windows 7 for the desktop is located in the “Personalization” section, which appears in a pop-up window when you right-click on its splash screen (background). There you need to select the item "Desktop background" and in it the drop-down menu "Image location", in which there is a menu item "Solid colors". The gray color can be seen immediately.
Now is the time to proceed immediately to the procedure itself. After launching the Adobe Gamma application, setup is performed using the setup wizard (you need to select this option) - a special program that allows you to go through the whole process in steps. The next step is to select a “color profile”. It is usually recommended to leave the default profile (for inexperienced users). Now you need to press the "Next" button to continue and set the contrast to the maximum value. The brightness should be adjusted in such a way that the square, which is located inside another square, is as close as possible to the black color, but still stands out a little on its background. The next step can simply be skipped.

Further it is necessary to adjust the gamma correction using the lower tab of the general settings window. If the program for adjusting monitor colors is not localized, then it will be called WindowsDefault. To the right of it there is a small field where you are prompted to enter a value for the Gamma parameter. The most frequently used is 2.2. In the same window, you need to uncheck the ViewSingleGammaOnly parameter to display the gamma values by color. Now, using the mouse, it is necessary to bring the result to such a state that all three squares become absolutely indistinguishable from their background. At the next stage, the value of the color temperature is set, which should be equal to 6500K. The setting is now complete. After completion, it is possible to compare the result obtained with the original value. To do this, use the Before and After buttons. Color setting Windows monitor 10 is carried out in a similar way, with the only difference that the versions of the AdobeGamma program may differ.
Adjusting the Picture Using Monitor Functions
Almost all monitors have a special functionality (menu), with which you can quickly adjust the color. The interface of such a menu is as clear as possible and for most devices it is translated into Russian, so to change the contrast, color or brightness of the screen, you just need to select the appropriate item using the buttons below. For more detailed information, you can refer to the manufacturer's instructions, which usually come with the device. For example, setting the color of a Samsung monitor is done using a special Menu button located under the screen, when pressed, the monitor menu drops out. It has two main sections for color rendering - Picture and Color, which will help you make all the necessary adjustments. Different manufacturers and different models may have different names for these sections, but the meaning in the end result is still the same.

Adjusting the image through the system
Windows itself also provides functions that allow you to adjust the color of the monitor. For this there is a program called “Calibration”, which can be found by searching in the “Start” menu. The application itself will tell you how to proceed further after its launch. An important parameter is the correctly selected screen resolution, which is optimal for the monitor you are setting up. Usually it is marked as “Recommended” in the drop-down menu with the list of acceptable screen resolutions. It is him who should be chosen. This parameter is located in the video card settings. To get there, you need to right-click on the desktop and select the appropriate item in the menu that appears. Different manufacturers of video cards call it differently, for example, in NVIDIA you need to look for a line with the name “NVIDIA Control Panel”, and in Radeon - “Graphics characteristics of Radeon”. All other color settings are also located there. For best results other than a properly sized screen resolution, select the highest 32-bit color depth. As a rule, this setting is always located in the same place where the screen resolution setting is, so it will not be difficult to find it.

Adjusting the screen brightness
Surely many have noticed that the monitors standing in the store on the stand visually distinguish the image. On one it is more dull, and on the other, on the contrary, it is too bright. This is due to the different color settings for each individual device. If the customer is not satisfied with the default color settings of the monitor, he can change them. To do this, press the button with the name Menu and in the panel that appears, select the value Picture (image), where the brightness and contrast settings are located with the adjustment sliders located to the right of them. It should be noted that for different models and manufacturers, the names of these parameters may differ or even be marked with schematic figures, but general meaning for the end user is always clear.
After finding the desired settings, you need to take a blank white sheet of paper, put it in front of the monitor, create a regular blank document using the Notepad program and compare the color of the sheet of paper with the white background of the document in the program. This procedure is carried out to assess and then adjust the white color of the monitor. Further, for the slider responsible for the brightness of the picture, you need to find such a position so that the white color on the monitor matches the white color of the sheet of paper on the table.
Adjusting the screen contrast
To adjust the contrast, 2 images of identical shirts of different colors can help: one shirt is black and the other is white. The main thing is that the colors are monochromatic. Both images need to be opened and positioned next to each other. Now you should move the slider for contrast until the folds on both shirts are clearly visible. When this effect is achieved, you can still slightly tweak the brightness. This completes the brightness and contrast settings. The resulting white color may differ from the default monitor settings at the time of purchase. However, experts say that this is only an optical illusion caused by the habituation of the eye to the original meanings.

Adjusting laptop color using Windows
Laptops have long been an integral part of our life. It is enough to configure the laptop correctly once, so that later there will be no unnecessary problems and you do not have to spend extra time. The setting of the colors of the laptop monitor does not differ much from the settings of a regular monitor. They are located in the "Color Management" section of the Windows control panel. Having entered the section, you need to select the "Details" tab and then click on the "Calibrate screen" button. Then just follow the instructions provided by the setup wizard.
Adjusting laptop color using intelHDgraphics application
But this is not the only way to solve this problem. For example, there is software that solves this problem more qualitatively. If the laptop runs on an Intel processor, then adjust the color through the "Graphic characteristics" section. You can get there with the help of the same pop-up menu called by the right mouse click. When you open a section, a window will appear with several categories responsible for the video card parameters. To adjust the color, select the “Display” category. There, in the "Color" tab, you can find the "Advanced" tab, in which the necessary color adjustment controls are located. The only parameters are hue and saturation, with the help of which the adjustment takes place. The level of increasing or decreasing values is determined by the user himself based on his needs.

Features of adjusting the brightness on a laptop
It is known that if you need to adjust the monitor screen quickly, you can use the interface of the buttons located on its body. But on a laptop, things are a little different, and, in truth, for many uninformed users, this becomes a real problem. The fact is that there are simply no such buttons on the laptop case. This is due not at all to the lack of space for this functionality, but to the fact that the optimal image is selected by the equipment developer.
But sometimes the need for a quick color correction appears. To solve this problem, the laptop has a special Fn key, which is responsible for additional functionality. Holding down this key activates additional functions of the keys, which have icons highlighted in a different color. To adjust the brightness of the monitor, you need to use the keys with the image of the sun (standard brightness icon).

Color Testing Using Real Color
There is one more substance, which in certain circles is considered a reference. This is a special Real Color wallpaper that bears some resemblance to the customization grid used in the past in televisions. When using this method, special wallpapers with the optimal resolution for a computer or laptop are installed on the desktop. When looking at the screen from a normal distance, you can determine if the color reproduction is correctly calibrated. If the setting is correct, a smooth gray gradient should be distinguished, and if stripes appear and shades are mixed, then the color is incorrectly set.

Summing up, we can say that adjusting the color of the monitor is a rather painstaking task and depends on many factors. Therefore, for each individual case, its own parameters must be applied, satisfying the specific needs. But in order not to be scattered among many different methods, you need to do this: for quick setup, use the built-in system parameters, and for a more complex task, you can resort to third-party applications.
xroom.su
How to adjust colors on a laptop
A laptop is a constant companion of a person of the 21st century at work, at home, on the road. It is known that the time spent on setting up the software will pay off with interest later, when you do not have to spend it on unnecessary actions or waiting for the operating system's response. It is equally important to correctly adjust the color reproduction of the laptop display - this is necessary for both designers, photographers, etc., and for ordinary users. It is not so difficult to make your eyes less tired and your vision does not deteriorate.
To avoid color distortion, the laptop should be located in a place where it is not exposed to extraneous light. Designers, for example, use special shutters - then neither glare nor flare will threaten.

The simplest and quick way- display calibration using the built-in program (on Windows example 7). To launch it, go to the "Control Panel" and select "Color Management". In the "Details" tab, you need to click on the "Calibrate screen" button and then follow the instructions.

There are others special programs that help adjust colors are Adobe Gamma, Corel Draw, Ati Catalist Control Center. In order to use one of them, for example, Adobe Gamma, you will need a source color scheme, which can be used as a guide when changing color parameters. The scheme is represented by stripes with gradations of different colors. For correct adjustment, first set the color temperature. Further, to calibrate the display of a home laptop, look at the gray strip - 32 rectangles should be clearly distinguishable on it, including the extreme left and right. To evaluate the result, print the resulting image, be sure to use the "Grayscale" mode. If necessary, change the adjustments further until the colors on the paper and the display are identical, then save the result.

The convenience of this program is that it can be added to "Startup", then the personal screen settings will be loaded along with Windows. To do this, copy the Adobe Gamma shortcut to the Startup folder (you can open it from the All Programs tab in the Start menu).

Adjusting the brightness, contrast, and color gamut will fade. It should be so. Over time, as your eyes adapt to the changes, you will stop noticing it.