Firmware using cwm recovery. CWM Recovery Android - installing Custom Recovery. Installation via Fastboot mode
Anyone who takes the first steps in learning the procedure for flashing Android devices initially pays attention to the most common way to carry out the process - flashing firmware through recovery. Android Recovery is a recovery environment that almost all users of Android devices have access to, regardless of the type and model of the latter. Therefore, the method of flashing firmware through recovery can be considered as the easiest way to update, change, restore or completely replace the device’s software.
Almost every device running the Android OS is equipped by the manufacturer with a special recovery environment, which provides, to some extent, including ordinary users, the ability to manipulate the internal memory of the device, or more precisely, its partitions.
It should be noted that the list of operations that are available through the “native” recovery installed in devices by the manufacturer is very limited. As for the firmware, only official firmware and/or updates are available for installation.

In some cases, through factory recovery, you can install a modified recovery environment (custom recovery), which in turn will expand the ability to work with firmware.
At the same time, it is quite possible to carry out the main actions for restoring functionality and updating the software through factory recovery. To install official firmware or updates distributed in the format *.zip, perform the following steps.


How to flash a device through a modified recovery
Modified (custom) recovery environments have a much wider range of capabilities for working with Android devices. One of the first to appear, and today a very common solution, is the recovery from the ClockworkMod team - .
Installing CWM Recovery
Since CWM recovery is an unofficial solution, you will need to install a custom recovery environment on your device before use.


- For Samsung devices, in most cases the application is used.
- For devices built on the MTK hardware platform, the application is used.
- The most universal method, but at the same time the most dangerous and difficult, is flashing the recovery via . The steps taken to install recovery using this method are described in detail at the link:
Firmware via CWM
Using a modified recovery environment, you can flash not only official updates, but also custom firmware, as well as various system components represented by cracks, add-ons, improvements, kernels, radios, etc.
It is worth noting that there are a large number of versions of CWM Recovery, so after logging in on different devices you can see a slightly different interface - background, design, touch controls may be present, etc. In addition, some menu items may or may not be present.

The examples below use the most standard version of the modified CWM recovery.
At the same time, in other modifications of the environment, when flashing the firmware, items are selected that have the same names as in the instructions below, i.e. A slightly different design should not cause concern to the user.
In addition to design, the management of CWM actions differs in different devices. Most devices use the following scheme:

- Hard key "Volume+"— move one point up;
- Hard key "Volume-"— move one point down;
- Hard key "Nutrition" and/or "Home"— confirmation of choice.
So, the firmware.


Firmware via TWRP Recovery
In addition to the solution from the ClockworkMod developers, there are other modified recovery environments. One of the most functional solutions of this kind is. How to flash devices using TWRP is described in the article:
This is how Android devices are flashed through recovery environments. It is necessary to take a balanced approach to the choice of recovery and the method of installing them, and also flash only the appropriate packages obtained from reliable sources into the device. In this case, the process proceeds very quickly and does not cause any problems later.
If, after flashing the Android operating system, problems arise in the operation of the device, you need to understand the current situation and find the reasons. Very often, due to their inexperience, users use pirated firmware, which does not allow for high-quality firmware. In this case, you are left for a long time without a reliable assistant - your smartphone or tablet.
Many users who have already encountered the problem of low-quality Android firmware have tried the method of flashing Android OS via recovery. This firmware method involves first installing a special program on the mobile device, which acts as a bootloader. Recovery is activated by clicking until a certain key combination is loaded (power button + volume button).
If the user chooses this method, he must find out . Regardless of the device, it comes with its own factory recovery. It can be launched after turning on the device. Also, the factory program can install and configure system updates from update. zip, and clean the entire system.
To flash your phone through recovery, you need to find and download the ClockworkMod Recovery program (installed in the internal memory of the device, in place of the factory version). It is intended: for flashing Android firmware and kernel, creating backup copies for system recovery, and for other system updates. This utility differs significantly from its factory counterpart.
If the user is interested in how to flash Android through the recovery menu, this issue needs to be considered. Custom Recovery Menu is a special application that has a package of popular utilities. After installing the application on the device, it will be overwritten instead of the old version of the similar application.
Custom Recovery Menu is necessary for users who plan to flash their device very frequently.
Flashing Android firmware via the Custom Recovery Menu is very simple. It can be done using a PC or laptop. To do this, you need to go to program activation and select the appropriate firmware items.
Entering recovery mode.
— Turn on the phone (Power button);
- after 2 s. press the volume button in both directions simultaneously;
- after another 2 s. release the power button;
— carry out the Wipe process (Wipe data/factory reset);
— after the process Data wipe complete appears;
— reboot the device and go into recovery again;
— Select One of the Items (install zip from sdcard, choose zip from internal sdcard). It depends on where the firmware is located;
— if everything is entered correctly, the firmware begins.
At the end of the phone firmware process, you need to reboot the device and start using it.
What should you do if your Android smartphone suddenly starts to freeze and behave as if it wanted to live its own life? How to reflash Android? This question is asked by many users of modern gadgets of various brands - from top-end Samsung and Sony to the Chinese Xiaomi (more often colloquially called Xiaomi) and Meizu, which are now gaining popularity.
Possible solutions to problems
One of the simplest tips would be to reset your device to factory settings. Indeed, in this case, no third-party intervention is required - all settings and resets are done at the software level. But this trick will only work if the smartphone’s malfunctions are caused only by software and clogged memory. After resetting the settings, and in frequent cases erasing the content, the device turns on like new.
What is "Recovery" and what is it eaten with?
Many immediately give up their positions and throw out the white flag, rushing to contact service centers. But any experienced user will tell you that this is not worth doing. After all, you can save yourself extra nerves and money by just following the simple steps from these instructions.
“Recovery” is a smartphone software based on the Android OS, which is something like a “BIOS” on a PC. That is, using “Recovery” you can completely reset your smartphone to factory settings, you can also install operating system updates and simply flash it. When purchasing in a store, the user most often receives a device with a factory “Recovery” menu, which is slightly limited in functionality and will not allow you to successfully flash the operating system.
If we talk about “custom” (translated from English custom - “made to order”) “Recovery”, then it will allow you to more fully “communicate” with the phone system, make backup copies of firmware and restore them, as well as make a more complete and deep reset of the device.
How to enter "Recovery"
To flash your device via Recovery, you must first get into this very menu. This couldn’t be easier to do, especially since on many devices the input combination is exactly the same. So, if the smartphone has a physical central button or a “Home” button (most often found in older Samsung and LG devices, but it can also appear in more modern devices), you need to hold down the “Home” buttons with the gadget turned off. and “Volume +”, then, without releasing them, press the power button.

The device will turn on in the desired mode. If you have a more modern device without a physical Home button, you need to repeat the process described above, but using only the Volume + button and the Power button. If the desired result was not achieved, you should refer to the extended list of ways to enter the “Recovery” menu for different manufacturers.
What else will you need?
In order to understand how to reflash Android, you first need to download the firmware for your device. Most often, firmware files are hidden from public view for security purposes and to protect the manufacturer’s data. That is why ordinary users create backup copies of their operating systems and form databases of stock firmware from them, links to which can be found on specialized sites. It is the firmware file itself, located in the archive with the *.zip extension, that you will need to understand how to restore Android using Recovery.

There are also times when you are tired of the old stock firmware and want something new. That is why there are always craftsmen who create custom firmware, “cutting out” the unnecessary from them or, conversely, adding something new. In such cases, it will not be possible to use the standard “Recovery”, and here those same custom CWM Recovery (ClockWorkMod Recovery) or
Installation or TWRP
It is not necessary to install Recovery on Android via a computer; most often, on the contrary, it is easier to use the stock one. All you need to do is download the necessary file, again located in an archive with the *.zip extension, and place it on the external flash card of your smartphone.

After that, going to the stock “Recovery”, you need to select the “Apply update from external storage” item and in the list that opens, select the same file with the custom “Recovery”. After confirming your choice, the installation process will begin, after which the device will prompt you to reboot. The process is complete.
How to flash Android via Recovery
Moving directly to the process of installing the firmware itself, I would like to say that all unofficial files of the Android operating system, created directly by users of certain devices, should be installed at your own peril and risk. If, however, the decision is made to install a non-native version of the software, you should make sure that the firmware is “written” specifically for the phone that you plan to reflash.

If we are talking about stock firmware, then you should not bother installing CWM Recovery or TWRP. All manipulations that need to be done are limited to downloading the factory firmware file and placing it on an external memory card. After this, the process is similar to installing a custom Recovery. That is, you need to go to the stock “Recovery” menu, select “Apply update from external storage”, then specify the firmware file directly and confirm the action. After the process is completed, you need to take one more step that will help avoid freezes and glitches when turning on and operating the device. Immediately after the firmware is completed, you need to select the “Wipe data/factory reset” menu item and confirm the action. This will clear information about previous software and files that were present on the device before the firmware process.
After completing these steps, you must select the “Reboot system now” menu item. The device will reboot and the process of setting up the smartphone from scratch will begin. If the switching process takes a long time and the device logo “hangs”, it’s worth remembering whether the settings reset item was performed after flashing.
Custom versions of Android
How to flash Android via Recovery is, in principle, clear. It remains to figure out what to do with OS versions written directly by device users. The answer is simple: the process needs to be repeated, performing the same manipulations in custom “Recovery”. The only difference is that the firmware file itself can now be placed not only on an external memory card, but also on the internal memory of the device. This adds convenience in the event that a flash card is simply missing. In this case, you will have to select the “Apply update from internal storage” option.

It is also worth noting that in CWM Recovery and TWRP the “Wipe data/factory reset” item has been replaced with two separate items: “Wipe data” and “Wipe cache”. After installing “Android” through “Recovery” (namely, the custom version) has succeeded, in the modified ClockWorkMod or TeamWin menu you need to select the “Wipe Dalvik cache” sub-item, which will significantly increase the chances of successfully turning on the device with the new operating system.
Restoring stock firmware
If you don’t like it or don’t get used to it, there is always the opportunity to return everything to its place. Many people ask the question: “How to restore Android through Recovery, namely the stock version?” The answer lies in the point above. Roughly speaking, returning everything to normal occurs in the same way as making the initial changes.

All you need to do is download the firmware from the manufacturer to a flash card or internal memory, then select the appropriate “Recovery” menu item and do a complete reset of settings/content. In principle, nothing complicated.
It seems that understanding how to flash Android via Recovery is not so difficult. But if some points are unclear, or you are not confident in your knowledge, it is better not to get involved with such processes. But even if something doesn’t work out, you can always restore the device’s firmware through the corresponding menu item. The main thing is to make a backup copy before flashing Android via Recovery. To do this, you will need a custom “Recovery” and a little patience, because the process of backing up the firmware takes a lot of time.
If something goes wrong, you can always turn to knowledgeable people. At least an authorized service center will definitely help you. The main thing is not to lose heart and move forward confidently. This is the only way to achieve any results. Good luck with the flashing!
For each smartphone or tablet, there are both official and custom firmware. Their installation is carried out in different ways: OTA updates come over the air, firmware in ZIP archives are installed manually via CWM, TWRP Recovery or the ROM Manager application, using a computer, you can flash Android using the Fastboot and SP Flash Tool utilities.
After updating Android firmware, all data from the internal memory will be erased, so to save contacts, settings and applications, first.
Android firmware via Recovery
Unofficial firmware in ZIP format, such as CyanogenMod, can be installed through custom Recovery: CWM or TWRP, as well as applications that use Recovery, for example, ROM Manager. Cores and patches are sewn in the same way. To download the official “Update.zip”, the capabilities of the standard recovery mode are enough, for more details, see the article at the link above.
Install the ZIP file in CWM
All devices out of the box have stock Recovery from the manufacturer; instead, you need to install CWM using . Then find and download the ZIP archive with the firmware. Please note that firmware of other formats cannot be installed via CWM.
1. Now go to Recovery. To do this, turn off the device and press a certain combination of buttons. Depending on the manufacturer, the key combination differs; below are all possible options (the new one says how to enter Recovery on specific models):
- Volume up + power button
- Volume down + power button
- Volume up/down + power button + “Home”
- Volume up + volume down + power button
Great, you are in Recovery. Movement is carried out using the volume buttons, and confirmation of the choice is done with the power button.
2. Before installing the firmware, you must first reset the settings: select “wipe data/factory reset”.


4. Great! Return to the main menu and select "install zip".

5. After that “Choose zip from /sdcard”.

6. Navigate to the folder where you saved the firmware and select it.

7. A confirmation message will appear. Click “Yes – Install...”.

8. The firmware installation process will go through and at the end the message “Install from sdcard complete” will appear at the bottom of the screen.
Great, Android is flashed. We return to the main menu of CWM Recovery and reboot the system. To do this, select “reboot system now”.

How to install firmware via TWRP Recovery
If you prefer TWRP Recovery rather than CWM, flash it using . You can also install firmware from a ZIP archive through it:
1. Download the firmware and place it in any convenient location in your smartphone’s memory.
2. Go to TWRP. This is done in the same way as CWM.
3. Now you need to reset the system. To do this, select "Wipe" from the main menu.

4. To initiate a factory reset, drag the slider to the right.

5. When you finish cleaning your smartphone or tablet, press the “Back” button.

6. You will be returned to the main TWRP Recovery menu. Now let's move directly to the firmware itself. To do this, select “Install”.

7. Navigate to the location in memory where the firmware is saved. Click on it.

8. Drag the slider to the right to begin installing the firmware.

9. The process will begin. It usually lasts 2-3 minutes.

10. At the end, a message indicating the successful completion of the firmware will appear. Click on "Reboot System" to boot into Android.

Considered another way to flash Android using a ZIP update. You can also use a special application. More on this below.
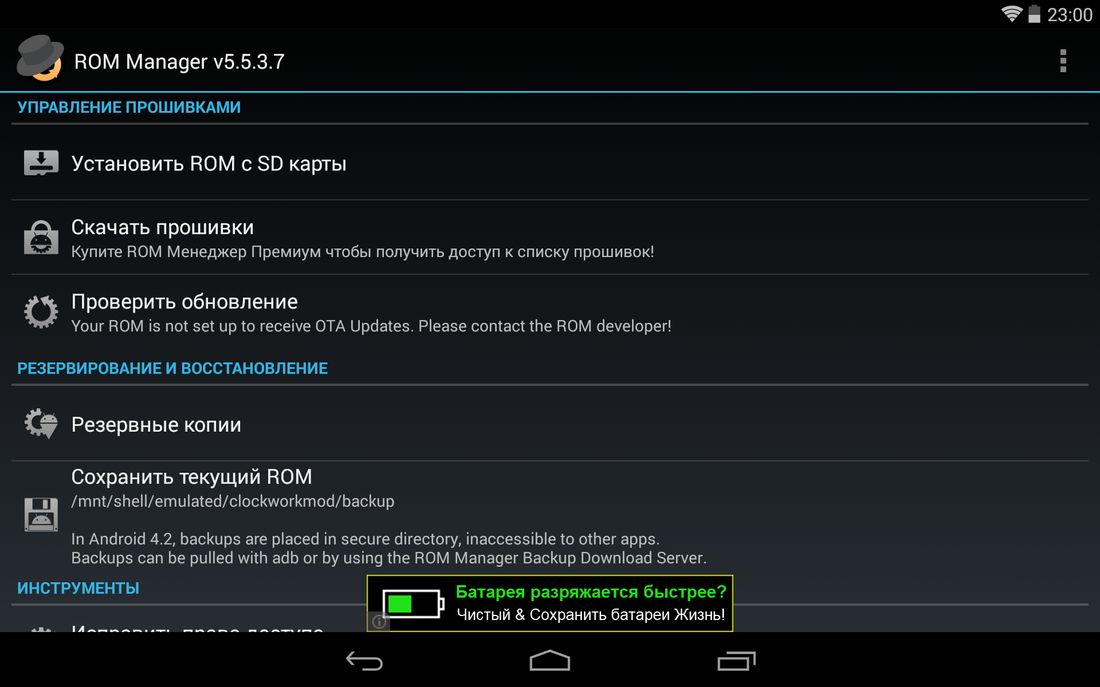
Using ROM Manager
The ROM Manager application allows . By the way, I advise you to make a backup of the internal memory before flashing the firmware in order to restore the data later. Now we will use another function of the program: flashing the phone using ROM Manager.
To operate the utility you need root rights - they are obtained using exploits: , or .
Custom Recovery must be installed (essentially, using ROM Manager you flash the device through it, but at the same time you work with a simple and clear application interface, not Recovery). Links to instructions are in the previous paragraphs.
So, install ROM Manager, find and download the required firmware for your device. Open the application and follow the instructions:
1. Place the .zip archive of the firmware in the memory of your Android phone or tablet.
2. In the ROM Manager menu, open the “Install ROM from SD card” item.
3. Find the archive and click on it.
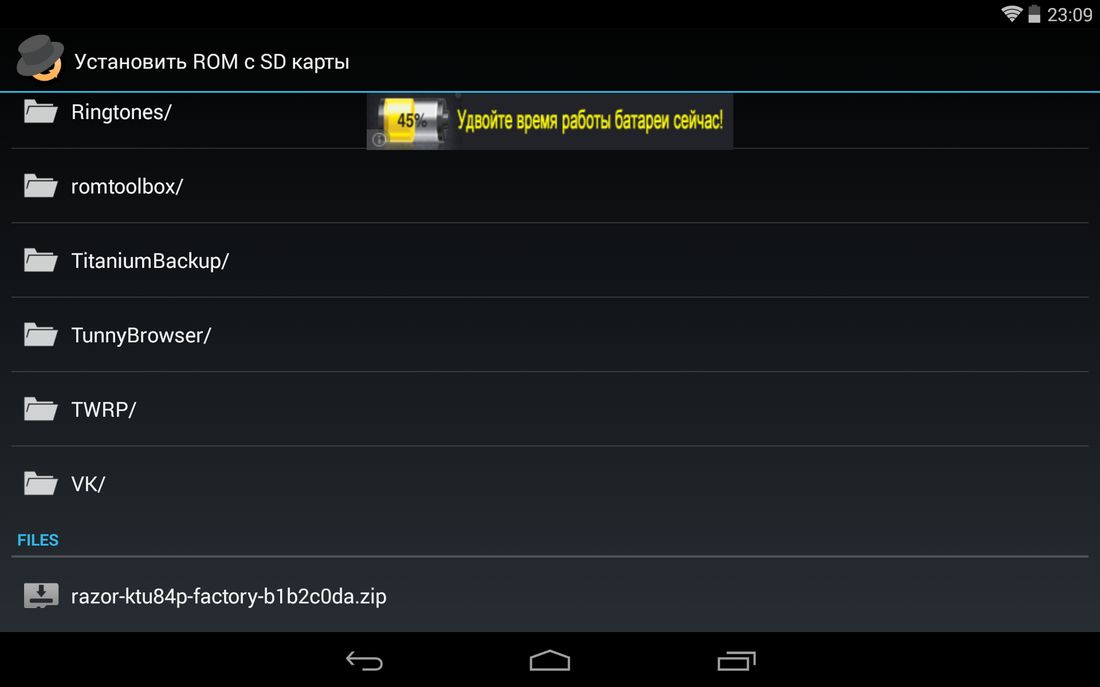
4. In the menu that opens, select “Reboot and Install”. I advise you to check the box next to “Save current ROM” so that you can restore the system if necessary.

5. In the next window, click “OK”, after which the device will boot into Recovery mode and the firmware process will begin.

ROM Manager also has a function to search for ROMs for a device. In the main menu of the program, select “Download firmware”. Some of them are only available in the premium version of the program.

Above, I talked about three ways to install firmware from ZIP archives on the device itself. Next will be information about updating Android firmware using a PC.
How to flash Android via computer
Many mobile devices are flashed using special PC utilities: below are instructions for working with Fastboot and SP Flash Tool. Through the second program various manipulations with Chinese phones are performed based on Mediatek processors.
Fastboot: instructions for flashing phone firmware
Many firmwares must be installed from a computer using the Fastboot utility, rebooting the mobile device into the mode of the same name. The program is included in the Android SDK Platform Tools, the installation of which is described in. In addition, you will need drivers (all information is available at the link).
Also, on devices from some manufacturers, you must first unlock the Bootloader:
- How to do it on HTC:
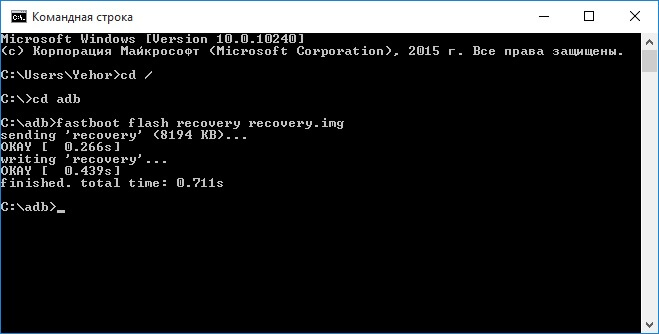
Next, download the archive with the required firmware and unzip it in the “platform-tools” folder, which contains “ADB” and “fastboot”. It should turn out something like this (I have the necessary components in a separate “adb” folder).

Then we connect Android to the computer via USB and put the smartphone or tablet into fastboot mode. The easiest way to do this is as follows:
- Turn on
- On the computer go to the command line
- We enter the commands sequentially and after each press “Enter”:
CD path to the "adb" file
For example, it is located in "C:\Program Files (x86)\Android\android-sdk\platform-tools". Then the path will look like this:
cd Program Files (x86)\Android\android-sdk\platform-tools

Then the Android gadget will reboot into fastboot mode.

Before flashing any partition of the system, you first need to format it so that there are no problems with operation. To do this, use the commands (after entering each one, press “Enter”):
fastboot erase boot
fastboot erase userdata
fastboot erase system
fastboot erase recovery
fastboot erase cache
After cleaning the partitions, you can flash them. Enter the commands (there may be more of them - it all depends on the presence of certain files in a particular firmware; below is a set of basic ones):
fastboot flash boot imya-fayla.img
fastboot flash userdata imya-fayla.img
fastboot flash system imya-fayla.img
fastboot flash recovery imya-fayla.img
fastboot flash cache imya-fayla.img
“Imya-fayla.img” is the name of the corresponding firmware file. For example, since in my case Recovery is being created and its image is called “recovery.img”, I enter:
fastboot flash recovery recovery.img
Usually the firmware can be installed in its entirety, that is, flashing all the files at once. To do this, “flash-all.bat” must be located in the folder with the firmware files. If it is, then simply enter this command and the firmware installation process will begin:

As a result, at the end a message indicating the successful completion of the firmware will appear.

You can boot the system. To do this, you need to exit fastboot mode on the device itself or using a computer. In the second case, you need to enter another command:
Installing ZIP updates in Fastboot
Using Fastboot you can install ZIP firmware. To do this, download and place the firmware in the folder where “ADB” is located. Put your smartphone or tablet into fastboot mode and enter the command:
fastboot flash zip imya-fayla.zip
“Imya-fayla.zip” is the name of your firmware, replace it with your own.
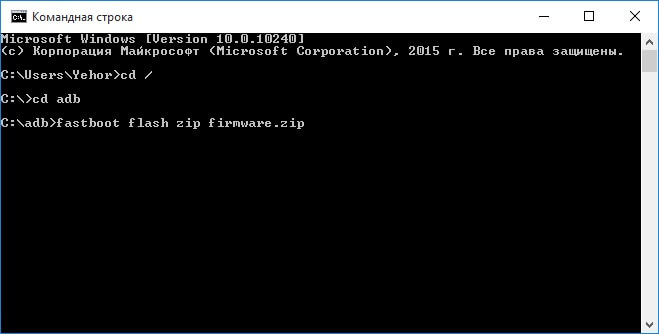
Wait for Android installation to complete and reboot your device.
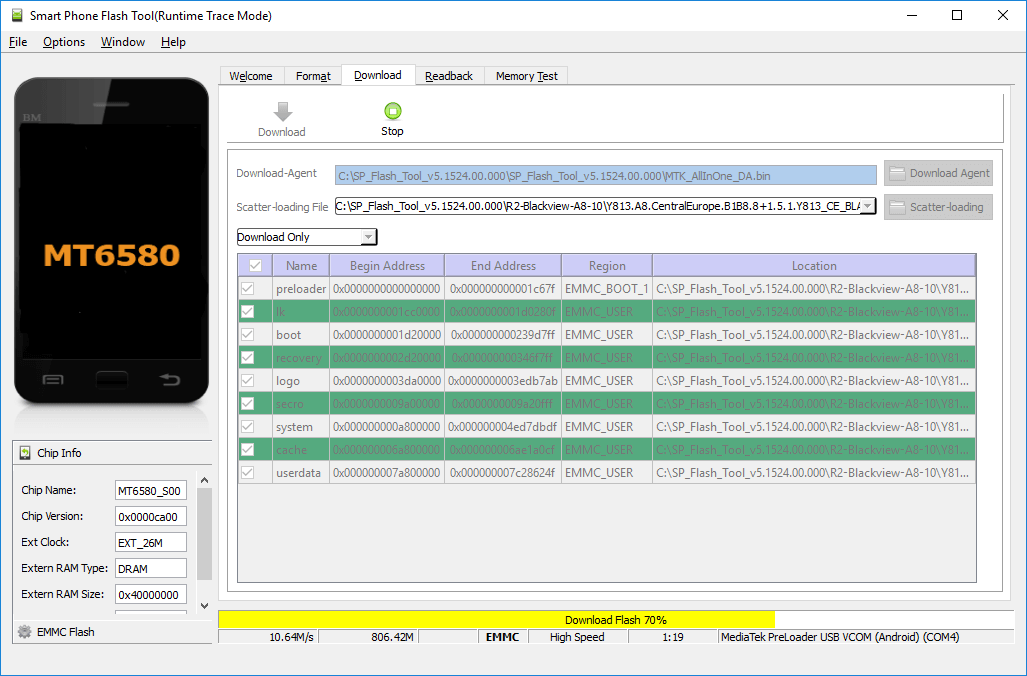
SP Flash Tool: flashing Chinese Android smartphones on MTK
Chinese smartphones Fly, Lenovo, Xiaomi, Meizu, ZTE, Doogee, Bluboo, UMI, Elephone, Oukitel, Blackview and others running on MTK processors are flashed with a special SP Flash Tool utility. She can sew individual partitions, format the system and create backup copies. Models based on MT6572, MT6577, MT6580, MT6582, MT6589, MT6592, MT6750, MT6737, Helio P10, Helio P20, Helio X10, Helio X20 and other less popular chips are supported.
The current version of the program is available on the website: http://spflashtool.com/. Before starting the process, install USB drivers for the MTK processor (the link to the FAQ is in the “Fastboot” paragraph of this manual).
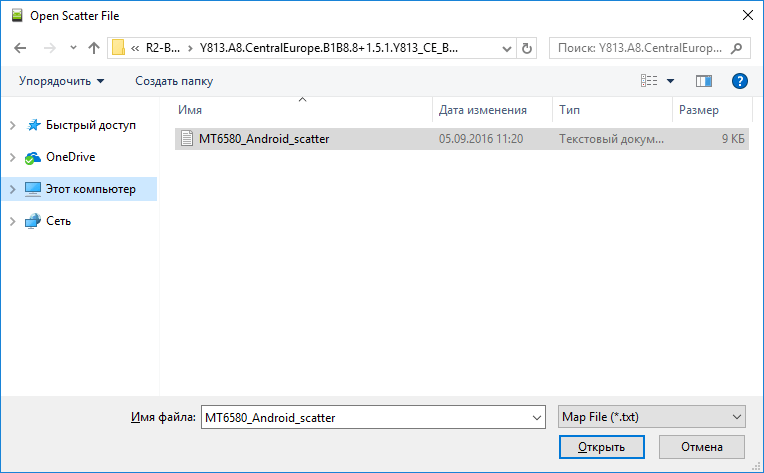
1. Unzip the SP Flash Tool folder on the “C:\” drive and place the firmware next to it. The path to the files must not contain Cyrillic characters.
2. The folder contains the file “flash_tool”. Launch it.

3. In the “Download-agent” field the path to “MTK_AllInOne_DA.bin” will already be indicated. Next, you need to click “Scatter-loading” and select the scatter file in the folder with the firmware.

4. Leave the switch on “Download Only” and mark which partitions need to be flashed (by default, all are selected).

5. Click “Download”. Then turn off the phone, remove the battery for a few seconds, insert it back and connect the turned off Android smartphone to the computer via USB.

6. First the red bar “Download DA 100%” will appear.

7. Then yellow with the firmware process. The percentages indicate how close the installation is to completion.