Raspberry pi 2 installation and configuration. Raspberry Pi. Installing the Raspbian OS. General display settings
Raspberry Pi 3 is a miniature, one might say pocket computer.
All computing power and memory are located on a single printed circuit board.
The development was created at the University of Cambridge back in 2006, and the miniature gadget got into mass production only after 6 years.
Initially, the device was planned as a way to attract the use of modern computer science users from the poorest countries and families due to low cost, but the possibilities and scope of operation of Malinka turned out to be much wider.
Device
The third generation Raspberry Pi is an oversized printed circuit board the size of half a notebook leaf, on which attachments are soldered, such as an ARM processor, SD slots for external memory, audio output, USB ports and outputs for connecting peripherals and a network cable.
In the third generation of gadgets, Wi-Fi and Bluetooth appeared to exchange data when paired with other devices without wires and work in wireless networks.
This miniature piece of iron works under the control of a specially sharpened * nix distribution.
Moreover, the power of the board is enough to play video in low resolution and run old games that are undemanding to hardware resources.
Specifications
Technically, a microcomputer is device with the following characteristics and features:
- Broadcom BCM2837 single-chip system with quad-core ARM processor Cortex-A53 with clock frequency 1.2 GHz;
- video accelerator VideoCore IV also from Broadcom;
- RAM DDR2 (1 GB) with a frequency of 900 MHz;
- soldered adapters: 10/100 Ethernet, Wi-Fi, Bluetooth version 4.1;
- interfaces: 4 USB port, HDMI output for connecting a visual information output device, CSI, DSI, 3.5 mm audio output, a separate slot for a MicroSD flash card.
What you need
As you can see, the updated Raspberry Pi 3 with a 64-bit processor is only a computing center, which is nothing without devices for input, output and storage of information, and even without a case, a board with a bunch of elements does not look very good, and it is not practical.
To start working on a computer, we will definitely need:
- passive cooling system in the form of copper radiators;
- case, the most popular is acrylic;
- 5V power adapter (the power source must provide at least 2 A of electric current, but it is recommended to use an adapter with a current of 2.5 A);
- MicroSD flash drive with 8 GB of free space for recording an image with the operating system.
This is with regard to the additional costs of acquiring peripherals.
You also need to have a mouse and / or keyboard with a USB port or connected via Bluetooth, which will be much more convenient.
To display the image, you need a small display with an HDMI interface.
The presence of a Bluetooth and Wi-Fi module is really convenient, because half of the USB ports do not have to be occupied by appropriate adapters at a price of $ 5, which is a significant waste compared to the cost of the computer itself.
Appearance
The microcomputer is classically delivered in a miniature cardboard box, made in white and red colors, where on the front side, in addition to the name of the device, there is a forest sweetness, after which it was named.
All this is wrapped in a pimply antistatic bag.. Inside the box, there is also a brief safety statement and a piece of paper with certification.
Raspberries are produced by a British company RS Components with partners and Chinese Element14. Depending on the manufacturer, the appropriate logo is applied to the packaging, and the board - "Made in UK" or "Made in PRC".
launch
Step 1. First of all care should be taken to cool the printed circuit board and the elements applied to it, for which you need to install radiators.
The Chinese make them from aluminum, copper and ceramics (because it is more accessible and cheaper, albeit inefficiently).
It is better to opt for a copper (or copper-plated) cooling system because the thermal conductivity of copper is higher than that of aluminum.
In principle, any radiator is suitable, but it is better to spend money on the one recommended by the manufacturer, especially since the processor can warm up to the boiling temperature of water when running synthetic tests.
Another couple of supplied pieces of iron are designed for microcircuits GPU and USB, one of which powers the computer.
From the outside random access memory a small copper plate is attached.
Step 2. Nutrition. Asians produce power supplies specifically for the device, connected to it via a microUSB connector.
And it should be remembered that this PC is quite demanding on the energy resource.
If there is insufficient current, the Raspberry Pi 3 will start, but it will work slowly and with brakes, and when there is a problem with power, most likely it will not even start.
Also, speed problems may arise due to the use of an economical flash card with a speed class below ten or a problem with the USB cable.
The lack of power is signaled by a yellow lightning bolt icon located in the corner of the screen.
Step 3 Assembling the Case– the next step before starting the microcomputer.
It will be unpleasant if the board burns out from a discharge of static electricity or is damaged mechanically (shock, fall, spilled coffee, etc.).
The case is made of a stainless steel tin with a bunch of milled holes or plexiglass and is a do-it-yourself kit: top and bottom walls and four sides.
Software part
Everything is ready to launch. It remains to install the operating system.
A huge selection of OS is available for the device based on *nix, however, it is better to follow the developer's advice and stick with the Raspbian distribution (takes up less than 2 GB).
The developer recommends using NOOBSfor deploying an OS, but you should only use it if you want to have a couple of systems.Apart fromRaspbian has 9 more official operating systems available, including Windows base 10, as well as about three dozen unofficial distributions.
The operating system is quite nice, it is stable and supports basic functionality.
After installation, start the system and set the password for root: sudo pass
Choose 5 - change the language. After replacing the interface, it will become very easy to work.
You should also update immediately. In the console enter:
sudo apt-get update then sudo apt-get upgrade and reboot reboot.
Sometimes "raspberry" incorrectly determines the resolution, adding black bars at the edges of the picture.
This is easy to fix:
sudo leafpad in the boot/config.txt file, remove the # sign in the disable_overscan=1 line by uncommenting it.
Work
Let's get to the fun part - checking the performance pocket computer by connecting it to a small monitor and input devices.
At first glance, everything works smoothly: windows move and minimize smoothly, no artifacts.
We open as many as five tabs in the browser, and one of them with video, the rest with pictures and animation - everything is smooth.
We launch the browser version of Minecraft - no lags, the same with Quake III; Team Arena - works great.
Due to the fact that the Internet browser is equipped with a hardware video acceleration function from Youtube, any video in resolution up to 480p plays perfectly, problems begin with 720p. The animation does not play at all, the built-in decoder is not designed for it, but most normal people do not need this.
Presentations in office programs also do not lag and are played smoothly.
conclusions
Acquisition of a low-powered pocket computer for ~40 dollars, capable:
- play video in 480p;
- cope with all office tasks;
- work with five open browser tabs (if no more than two of them have a video or game running);
- cope with "easy" and old games -
Agree, a good idea not only for residents of third world countries.
The PC operates on an operating system tailored for learning programming - it has pre-installed environments for Python and Java. The Raspberry Pi 3 also supports peripherals connected via the GPIO interface.
The Raspberry Pi is an inexpensive microcomputer that fits in the palm of your hand and can do a lot. On the basis of this microcomputer, you can create both serious projects for managing smart home, and use as a media center or even a lightweight home computer with Linux.
In one of the previous articles, we looked in detail at getting started with the Raspberry Pi 3, how to connect the device and what is needed for this, now we will dwell in more detail on such a task as installing the Raspberry Pi 3 operating system. It uses a processor on ARM architecture, which means you can install any ARM-supported distribution, or a Raspbian distribution created specifically for Raspberry.
Installing a Raspberry System with NOOBS
This is the easiest way to get a full and working Linux on your Raspberry Pi. The default operating system set NOOBS (New Out Of Box Software) for Raspberry Pi was released in 2013 and provides a simple interface with which you can install several popular systems with a few clicks.
1. SD card preparation
First of all, we need to prepare your SD card. You need a card with a capacity of at least 4 GB. Run this command:
Now connect the card to the computer using a card reader, and run the command again, so you can determine what name in the system was assigned to your card. For example, it could be mmcblk0. If it is already partitioned, you will see p1 at the end of the name, for example mmcblk0p1. If the map has not yet been partitioned, then we need to do this, for this use fdisk:
sudo fdisk /dev/mmcblk0
Delete everything existing sections by using d, enter the desired partition number if needed, then use n, to create a new partition, and p to confirm creation. We need one partition for the entire flash drive, if you already have it, then you don’t need to do anything.
When finished, click t and set the partition type to W95 FAT32, even though it's Linux, for the installer you need to use file system FAT. Click to save changes. w.

It remains to format the partition in the FAT32 file system:
sudo mkfs.vfat /dev/mmcblk0p1
You can download the NOOBS image from the official website. We need a ZIP archive of the latest version.


You can choose between two versions, the full one with offline installation and the minimal one which requires an internet connection to deploy on the Raspberry Pi. The microcomputer must be connected with an Ethernet cable, the wireless network is only available in the installed operating system.
The NOOBS installer includes the following operating systems:
- Raspbian;
- Pidora;
- RISCOS;
- Arch Linux;
- OSMC.
Perhaps, over time, other systems will be added there.
3. Write to SD card
Here it is still easier to install the Raspberry Pi 3 operating system by simply copying files. To do this, your SD card must be mounted in the system. Check where your connected it file manager:
mount | grep -i mmcblk0p1
If you have not connected it yet, then open it in the file manager and then repeat again. Nautilus has this option context menu, how "Open in terminal", you can use it here. Or use the cd command to navigate to the flash drive folder:
cd /media/path/to/folder/
Then just unzip the contents of the NOOBS archive into it:
unzip /home//Downloads/RaspberryPi/distros/NOOBS_v1_3_11.zip
That's the whole installation, when the extraction is completed, you can unmount the memory card:
sudo umount /dev/mmcblk0p1
On Windows, you can do the same in the GUI, just extract the contents of the noobs zip archive to a flash drive.
4. Starting the system
Next, you can remove the card from the computer and connect it to the Raspberry, you will also need to connect the device via HDMI to the screen, then turn on the power and connect the keyboard. In the installer, you need to select the operating system you want to install:

Installation is quite fast and is a copy desired files to the same memory card. If you install several systems, then a selection menu will be available to you, but if only one, then it will be loaded by default. Installing noobs raspberry pi 3 on video:
Installing a Raspberry system from an image
Another way to install the Raspberry Pi 3 operating system is to use the img image. For example, you can download a Raspbian Jessie image and simply burn it to a memory stick.
The easiest way to do this on Linux is to use the Ether utility. It is already available in most distributions.
Other operating systems are available on the same site as NOOBS. For example, you can download Raspbian, Ubuntu MATE 16.04 or even Windows 10 IoT:

But, in addition, you can install other operating systems downloaded from other resources in this way.
You need to download the operating system image, which will have the .img file extension. Often these files are additionally packed into zip archives to take up less space, so if you get such an archive, unpack it.
2. Writing an image to a card
When will you have img file, launch the Ether utility and select the desired image in the section "Select Image":

Next, make sure you select the correct memory card. If the device needs to be changed, click the button "Change":

If everything is correct, press the button to write the image to the flash drive. Flash. When the process is completed, you operating system Raspberry will be ready to use. Remove the card from your computer, connect it to your Raspberry Pi and boot up.
conclusions
As you can see, installing the raspberry pi 3 OS is very easy if this operating system is officially supported. In addition to the methods described in the article, you can use other recording methods, for example, the dd utility. If you are a beginner, then NOOBS will be an ideal option for you, for advanced users there are images. But anyway, Linux installation much easier on Raspberry Pi 3 Windows installations or Mac to a computer. Do you have a Raspberry? What tasks do you use it for? Write in the comments!
Raspberry Pi computers are becoming more and more popular. If earlier they were bought mainly by engineers and computer specialists, now many amateurs buy them for home experiments and electronic crafts. The operating system controls such a computer. Linux-based(usually Ubuntu or its derivatives). By default, the network in this operating system is configured so that when you turn on the Raspberry Pi in the local network (which is usually controlled by the router), each time it is dynamically assigned a new IP address thanks to the configured DHCP protocol. This is not always convenient. Therefore, it is best to set up a static IP on the Raspberry Pi.
This is done simply. If you know the address of your router through which the locale is organized - excellent, if not, then in the terminal we will type the command:
Netstat -r –n
This will display the routing table on the screen. We look at the column Gateway (Gateway), it should display the current IP address of your router. As a rule, in home networks this is either or. Let in my example it will be the first address. Memorize or write it down.
In order to manually configure the network on the Raspberry Pi through the console and make a static IP, enter the command:
sudo nano /etc/network/interfaces
In the opened config, look for the line "iface eth0 inet dhcp" and erase it. Instead, enter the following:
Iface eth0 inet static address 192.168.1.10 netmask 255.255.255.0 gateway 192.168.1.1
I think that the meaning of the lines is clear, but I will explain a little. In the line "Address (Address)" you need to enter IP from the subnet of the router, the main thing is that it should not already be occupied by some other device. The mask in 99% of home networks is 255.255.255.0, in the line “Gateway (Gateway)” the address of the router itself is indicated to show the system that all traffic should be “driven” through this host.
Next, press the key combination "Ctrl + X" to exit the editor. When asked to save the file, you will first need to press the "Y" button, and then - "Enter". You must restart the network service to apply the changes. This is done with the following command:
sudo /etc/init.d/networking restart
If suddenly the system gives an error, then open the file again and check that the addresses are entered correctly.
Network setup on Raspberry Pi is now complete.
Note:
On the latest releases of the Raspbian JESSIE operating system, the config network card from /etc/network/interfaces is not being read and obtaining an IP address is only in automatic mode. What the developers were guided by is not clear, but now it has become much more difficult to prescribe statics. One solution is to kill the DHCP client daemon. Of course, you can, but there is another option that the author of the homeless.su blog suggested - correct its configuration in the /etc/dhcpcd.conf file.
Open it with the nano editor:
sudo nano /etc/dhcpcd.conf
Scroll to the bottom and add this:
Nodhcp interface eth0 static ip_address=192.168.1.10/24 static routers=192.168.1.1 static domain_name_servers=192.168.1.1
Of course, the addresses must be registered from your network. We reboot our Raspberry Pi and check if the static address works.
Volume >= 16 GB, class >= 10
Variety of distributions
Download the image of the operating system (hereinafter OS) from the official websitehttps://www.raspberrypi.org/downloads/raspbian/
- NOOBS- simplified installation and long because the distribution kit is downloaded by Malinka in the process after selecting the desired OS from the list of suggested ones. Does not require creation bootable flash drive- just copy the contents of the archive to a USB flash drive
- RASPBIAN- a complete distribution of the main official OS for the Raspberry Pi. Size ~2 GB - quick installation
- DESKTOP- a distribution kit with a lot of pre-installed software, including the Raspberry Pi Desktop (RPD), office, frameworks.
- LITE- simplified console version - suitable for older, less powerful versions of the Raspberry Pi and / or advanced users who are able to install and configure the necessary software packages. The desktop can also be installed manually.
 I propose to consider the installation RASPBIAN DESKTOP
Installation
Download the distribution from the download pageFor this you need a program
Specify the path to the OS image and the letter of the memory card
 Click Write, then Yes
Running without a monitor
To immediately connect to Raspberry via Wi-Fi, you need to specify the data for connecting to the network and allow access via SSH
Let's bring the following two files to the specified form:
rootfs/etc/network/interfaces
allow-hotplug wlan0 iface wlan0 inet dhcp wpa-conf /etc/wpa_supplicant/wpa_supplicant.conf iface default inet dhcp
Enter your network name and password:
/etc/wpa_supplicant/wpa_supplicant.conf
network=( ssid="YOUR_NETWORK_NAME" psk="YOUR_NETWORK_PASSWORD" proto=RSN key_mgmt=WPA-PSK pairwise=CCMP auth_alg=OPEN ) To allow access via SSH in the section (!) boot/ Let's create an empty file called SSH.
installing nmap sudo apt install nmap
scan hosts inside the network (one of them is Raspberry) sudo nmap -sn 192.168.1 .0/24
The red number depends on the router model (0,1,2,10...)
SSH connection: ssh [email protected]
pi user password: raspberries
To connect via VNC:
- Enable VNC interface using raspi-config utility (Intefacing Options >>> VNC >>> Yes)
- Install there desired resolution desktop (Advanced Options >>> Resolution >>> [choose one] >>> Ok)
Insert the microSD card with the system into the slot Raspberry, we connect the peripherals (monitor, keyboard, mouse) and at the very last turn we supply power, since this is also a signal to start Raspberries. If everything is done correctly, then after a while we will see the Desktop Raspbian- the system is installed.

Initial setup
First of all, we connect to WiFi networks or Ethernet cable to the router to access the Internet Next, open the terminal with a keyboard shortcut Ctrl+Alt+T, enter the command sudo apt-get update -y && sudo apt-get upgrade -y
 and press Enter
 This will check the availability of new versions of installed packages and, if available, update the software.
 Set up important access settings Raspberry, open the configuration window:

On the first tab, you can change the default user password pi (default is raspberries )
 On the tab Interfaces:
- camera- special camera control interface for Raspberry Pi

- SSH- accessibility of the system to access via SSH protocol
- VNC- availability of the system to remote control desktop via VNC
- The rest of the protocols refer to the Raspberry GPIO pin comb
Setting a Raspberry Static IP Address
If you are not using Raspberry Pi as a desktop PC, in most cases you will need to connect to Raspberries from the outside (SSH or VNC), in order to do this at least you need to know the IP address Raspberry, and it's dynamic by default, which means it might change on the next boot. Find out IP address Raspberries in this moment You can run the command in the terminal ifconfig.In the example below, the Raspberry is connected to the network via Wi-Fi, and the interface is used accordingly. wlan0 and its address is visible on the screen - 192.168.1. 12 . By the way, before the reboot was the address 192.168.1. 17
 Each time a device connects to a network, it receives its address using the protocol DHCP(Dynamic Host Configuration Protocol) is a network protocol, which allows computers to automatically obtain an IP address and other settings required to operate on a TCP/IP network.
 This protocol is initialized both on the router and on the Raspberries. To make the assignment of the address each time to the same value, you need to change the DHCP settings in relation to Raspberry either on the router or on the Raspberries.
- The easiest option is to go to the DHCP settings of the router and assign a static IP for the device with a specific MAC address (it is also displayed by the command ifconfig, the ether parameter is different for different interfaces).
- Let's decide on the interface used, their list is just issued by the ifconfig command: if an Ethernet port is used for connection, then this is the interface eth0 if embedded wifi module- that is wlan0 if external wifi adapter, then wlan1 etc. Consider the case with wlan0
- Next is the IP address of the router. This is the address you enter into address bar browser to get into the router settings, usually 192.168.1.1. You can probably find this out with the route command - it will be the Gateway value in the line with the Flags value equal to “UG” (Up Gateway)
- We select an arbitrary IP address for Raspberry - in fact, this is the value of the last digit in the gateway address from 0 to 255, excluding 1 (this is the gateway address itself) and other addresses already occupied by other devices. If it is not possible or desirable to view the list of connected devices (via the router interface), you can take a number greater than 100, let's say this will be the address 192.168.1.111/24 (24 bit subnet mask)
- All settings in Linux are stored in text files, for DHCP is a file dhcpcd.conf, which is located in the system folder /etc/. Let's open it in the console text editor nano command
- We find a block almost at the end of the file

- Let's uncomment the necessary lines and specify our values:
# Example static IP configuration:
interface wlan0
static ip_address= 192.168.1.111/24
#static ip6_address=fd51:42f8:caae:d92e::ff/64
static routers= 192.168.1.1
static domain_name_servers= 192.168.1.1
8.8.8.8
Last value - list DNS servers- this is our router and Google's public DNS server
- Save changes Ctrl+O, exit nano Ctrl + X
- Reboot Raspberry: sudo reboot now
I am not a very big Linux expert (almost a beginner), so I will be very happy with constructive criticism in the comments.
Everyone who wanted bought a Raspberry Pi 3 a long time ago, and I was waiting for something incomprehensible 🙂 However, recently this computer fell into my hands, so I want to share my impressions and useful (for someone) tips on setting it up.
Hardware

The computer was ordered on AliExpress immediately with a case and a power supply (Model B, 1 GB of RAM). The memory card, microSD SanDisk 16 GB class 10, was already lying around at home. Considering its price, the entire system unit"cost about 3000 rubles.
An ordinary Full HD TV was connected as a screen (the HDMI cable was accidentally lying around in the pantry). From the periphery, I initially connected only a keyboard and a mouse, connecting them to USB ports.
Raspberry heats up noticeably in certain cases (while showing a thermometer icon in the upper right corner of the screen), so additional ventilation holes were drilled into the case almost immediately. The efficiency of the bundled heatsinks is so-so, you need to look for something more serious if you are going to load the computer at 100%.
Operating system
Choosing an OS for Raspberry Pi 3 is a delicate matter. If someone is not in the know, then here is an ARM processor. That is, a regular Linux distribution will not fit on the device; a specially prepared assembly is needed.
Actually, due to the relatively specific hardware, in the future there will be many other difficulties with programs, etc.
There are several official and unofficial Linux builds for this mini computer. Which one to use depends on the task at hand. In my case, the Raspberry Pi 3 will be used as a regular home computer for work and play (sounds a bit ambitious). After trying several OSes, I settled on the main official distribution, Raspbian Stretch 9.1 (the latest at the time). In my opinion, it is faster, more stable and more versatile than the others.
Installing the OS on Raspberry is very simple. Download the image, unpack the .img file and write it to the memory card using special program(for Windows, this is, for example, Win32 Disk Imager).
More detailed description The OS burning process is easy to find on the Internet.
After the recording is completed, the memory card must be inserted into the appropriate slot of the Raspberry Pi. Then we turn on the device in the electrical network and start the initial setup (inserting the power supply into the outlet is a regular way to turn on this computer).
If you thought that the Raspberry Pi 3 could compete on equal terms with a regular home computer for 20,000 rubles, then this is not at all the case. Raspberry will work much slower, and a number of tasks are not available for it at all. However, with certain functions, the mini-computer copes well. For example, with the role of the terminal for not too "heavy" web applications, he will do just fine.
Raspberry Pi 3 Setup (Raspbian OS)

At the first launch, you don’t even need to select and click anything. The system is almost ready to go. After the reboot, the desktop appears.
Although there is nothing special to rejoice here - you just have to configure more things already in the installed system 😉
First, we connect to the Internet. At wired connection The Internet should already work itself. In my case, Wi-Fi is used, so you need to click on the red crosses on the taskbar (icon network connections), choose wireless network and enter a password. Everything is almost the same as in other operating systems.
It will allow you to perform all further actions in the terminal with superuser rights. Otherwise, you will have to add sudo at the beginning of every other line (or more often).
All other commands are given in the article without sudo. That is, it is assumed that the above recommendation has been implemented.
Immediately update the package database and device firmware:
apt update apt upgrade rpi-update
Then go to Raspberry Pi settings: Start (raspberry icon) > Preferences > Raspberry Pi Configuration. Click "Change Password ..." and set New Password(simultaneously for user and superuser). This will avoid some problems in the future.
By default, Raspbian has a pi user with a password of raspberry.
Set up further. Hostname (computer name on the network) can be left unchanged. My image is not displayed on the entire screen (a thick black frame around the perimeter), so I switch the Underscan parameter to the “Disabled” position. On the "Performance" tab, change the value of GPU Memory to 128 (you can leave 64, but some applications may not be enough).
Go to the "Localization" tab. Click "Set Locale ...". Choose Language: ru (this will give at least some translation of the OS into Russian). Set the time through "Set Timezone ...". In my case Europe/Moscow. We select the main keyboard layout through "Set Keyboard ...". I recommend United States/English (US), because everyone is already used to it. Just in case, go to "Set Wi-Fi Country ..." and also select RU.
After all this, click "OK" at the bottom of the window and agree to reboot.
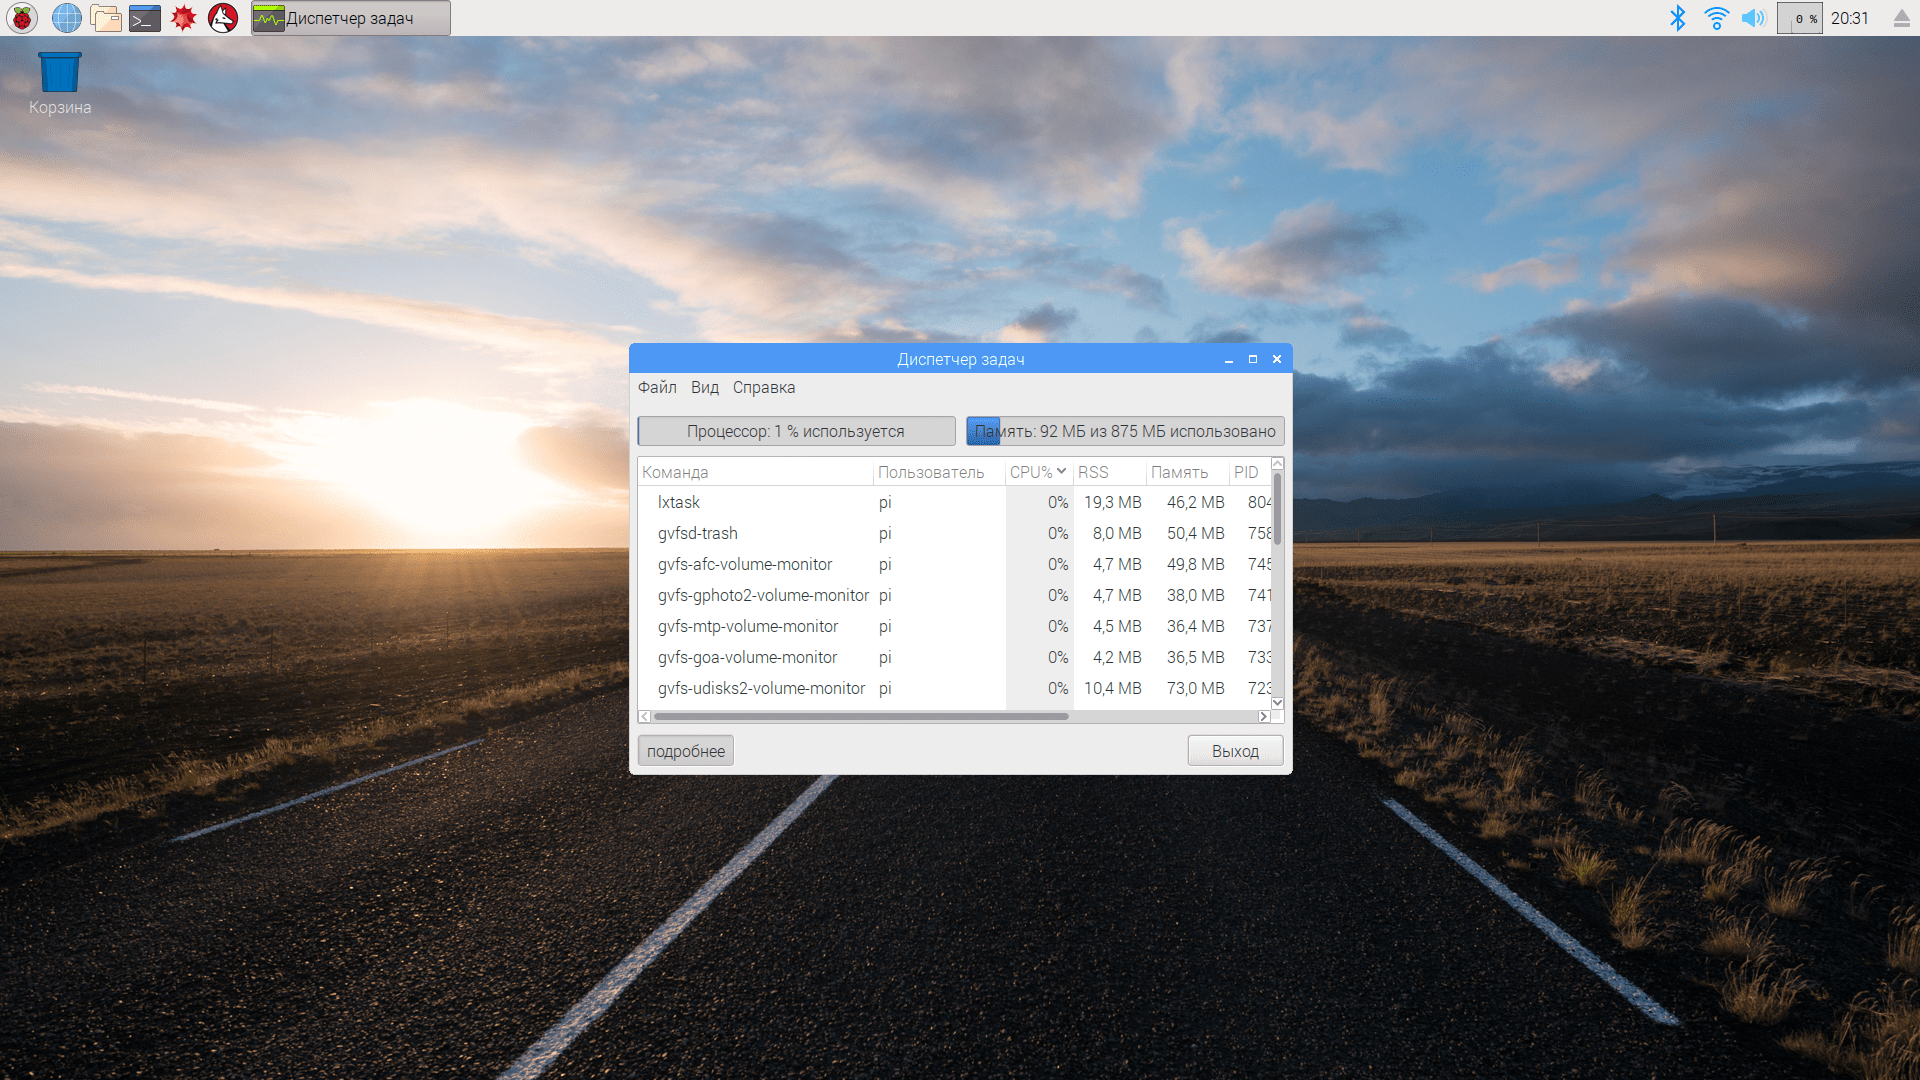
For interest, let's see how much RAM the operating system takes in the new state (task manager is called via Ctrl + Alt + Del or from the application menu). 92 MB! I wish Windows took so much 🙂
Appearance customization
For convenience, we bring the desktop to a more familiar look (in this case, to a look similar to Windows). Right click on the panel, "Panel Settings". Edge is switched to the "Botton" position - the panel moves down. Go to the "Panel Applets" tab, remove the excess, add the desired one. Removed Ejecter and CPU Usage Monitor. Added Minimize All Windows and Keyboard Layout Handler (keyboard layout switcher).
Through the latter we add the Russian layout. Right click on the flag, "Keyboard Layout Handler Setting". Uncheck "Keep system layouts", click "Add", select ru. We change the keyboard shortcut for switching layouts with the button under the Change Layout Options inscription.
The "Close" button in this window does not work, but the cross in the corner works. This is an old bug in many Linux builds (it's strange that it hasn't been removed yet).
There is a Bluetooth icon on the panel. We disable the Bluetooth module through it if we are not going to connect any wireless devices.
Change the set of icons on the left. Right click on one of the icons, "Application Launch Bar Settings". We pull out a couple of shortcuts from the menu to the desktop. Change the wallpaper (I prefer something more solid):

Numlock
By this time, the non-working numeric keypad had already begun to annoy. When the system boots, Numlock is turned off (this also happens in other versions of Linux). I don't want to turn it on every time. It's time to fix the situation. Install the numlockx program:
apt install numlockx
Add it to autoload. For example, open the file manager, go to the folder /home/pi/.config, create a file there autostart(no extension) with a single line: @numlockx -on.
You can use any other way to add to startup.
Problem with USB flash drives and hard drives
At first glance, everything is in order with removable media. They are correctly detected when connected, all files are displayed and open normally. Only now you can’t write anything to flash drives, because they are connected in the “readonly” mode (with rare exceptions).
The problem is solved simply by installing an additional driver:
apt install ntfs-3g
After installation, you need to reboot the system.
All available drives were checked - writing, modifying and deleting began to work (not only in NTFS, but also in FAT32).
On one small USB flash drive that has just been formatted in Windows problems for some reason it wasn't there in the first place.
Programs included
It is time to see what is already installed in the system. Let's just go over the application menu (we don't take console utilities into account).
In the "Programming" section there are more than a dozen applications for programming itself (we will leave them unattended).
The Office category contains only programs from the LibreOffice package (the famous free analogue Microsoft Office). Useful applications for working with documents. Creating and editing not very complex files in them on the Raspberry Pi 3 occurs with minimal slowdowns.
The "Internet" section contains, in my opinion, two useful applications. The first is VNC Viewer. A good option for managing remote devices. The speed of work is acceptable. The second is the Chromium browser. Almost the same Chrome, only without frills. Sites work with different speed. Some are straight forward, some are very tight (depending on the type of site and its optimization). For example, VKontakte scrolls through with slight jerks, and Odnoklassniki is already creaking (although in general you can use both). Even YouTube works tolerably in it (a special extension is installed). In full screen mode, the video, of course, twitches, but in widescreen it looks fine. That is, on this computer, work on the Internet is more or less available (at least, it is more comfortable than on an average smartphone).

When running on a Raspberry Pi 3, a slight frame tear is noticeable in most applications (the bottom of the image updates a little later than the top). This trouble is connected with lack of vertical synchronization (tearing). On the conventional computers the problem is easily solved, but I did not find a solution for Raspbian. Again, much depends on the specific iron.
In "Standard" the minimum set of useful applications: calculator, terminal, viewer PDF files, a notepad, an archiver (which can do almost nothing), a task manager, an image viewer, a file manager and a utility for creating a copy of the system - SD Card Copier.
Everything you need is there, a little extra, we put the rest according to needs.
Skype
With Skype on Linux, there were almost always some troubles. The current version is just a wrapper for the web interface. Instead of trying to run it under Raspbian, let's just use the web version directly.
The Raspberry Pi 3 does not have a mini-jack for a microphone. Option 1 - find a microphone with a USB connector. Option 2 - connect a cheap external USB sound card with the usual connectors. In my case, everything was even simpler (although not quite) - the webcam turned out to have a built-in microphone, that is, two devices occupied only one slot.
Let's open Skype. Through Chromium we go to the address www.skype.com/ru and log in to your account. Then click on the green padlock in the address bar: we allow the camera, microphone and Flash. The microphone still didn't work. It turned out that I had to click on the video camera icon (in the address bar on the right), then instead of "Default" select the correct audio device.

Made a test video call to friends. The sound in both directions passes normally, the video is also transmitted (slows down a bit).
Extension of office applications
The LibreOffice package, of course, is not bad, but now it is in English, does not check spelling and does not display MS Office documents very correctly, because there is not a single font from Windows in the system. Open the terminal, install Russian localization, spelling dictionary and fonts:
apt install libreoffice-l10n-ru hunspell hunspell-ru ttf-mscorefonts-installer
This is much more familiar:

Our regular archiver can only work with typical Linux formats, so we need to help it by adding support for more common types of archives (7z, RAR and a couple more):
Apt install p7zip-full unrar-free
Install more advanced reading software e-books Evince and FBReader to open different types e-books:
apt install evince fbreader
Evince didn't show up in the menu on its own, so I had to go to Options > Main Menu Editor and check the box.

LAN setup
if you have the local network, then the Raspberry Pi 3 is already connected to it (in the case of an open and correctly configured network). To have convenient access to it, in a standard file manager you need to open the Go menu, select Network, open the Bookmarks menu, click Add to Bookmarks, switch the Directory Tree view to Entry Points. Now the link to the network will be at hand every time you open the file manager.
You can also install another file manager such as Thunar.
Everything seems to be fine: network resources available, files are opened, copied and even deleted. Only when entering almost every network folder, the system asks for a password (which we changed at the very beginning of working with the OS). Other computers on my network (both Windows and Linux) access the same resources without passwords. It has not yet been possible to remove this password entry (I enter it every time).
In order for the computers included in the LAN to be displayed at the top level, we edit the Samba settings /etc/samba/smb.conf. Only the file needs to be opened with superuser rights. For example, enter the following command in the terminal (after running sudo -i):
Leafpad /etc/samba/smb.conf
Changing the parameter value work group on the name of our working group, save the changes, do a reboot. Now, when you enter the "Network", you can immediately go to the right computer(without opening two more folders).
The network settings are given as an example. In other cases, this LAN approach may simply not work.
Connecting to a network printer
Since we have office programs, then printing of documents will most likely be required. The network discussed above has a single printer connected to a Windows 10 PC. The printer is already networked, but you need to somehow add it to Raspbian. To do this, install the CUPS and samba-client programs:
Apt install samba-client cups
CUPS will not let us into the settings just like that. Therefore, we need to add our current user to the lpadmin group:
Usermod -aG lpadmin pi
CUPS is managed through a web interface. Enter the address into the browser 127.0.0.1:631 , then go to the "Administration" section, click "Add Printer". Enter username pi and the password that was set when setting up the system (at the beginning of the article). Check "Windows Printer via SAMBA" and click "Continue".

Next is an important point. In the "Connection" field, you need to enter the address of the printer on the network. In this case smb://192.168.1.6/hp1010. What does it consist of: smb://- SAMBA protocol, 192.168.1.6 - local address of the computer to which the printer is connected, hp1010- network name of the printer.
The address of the computer on the LAN must be static, and it is desirable to specify the printer name only in Latin characters (without spaces).
Click "Continue". We enter the name of the printer for our system and, just in case, check the box "Allow sharing this printer", click "Continue". We select the driver for the printer (the list is impressive), click "Add Printer". We save the parameters. We print some document for the test and enjoy life.
Working with graphics
Raspberry Pi 3 can install classic graphic editor GIMP and Inkscape:
apt install gimp inkscape
They generally work correctly, but slowly. Simple manipulations with not very large pictures can be handled by a mini-computer (crop a photo, correct colors, add an inscription, draw a logo). Serious graphics tasks naturally require serious power.

Video viewing
Here everything again rests on non-standard iron. Familiar players simply do not work on it (or work with big problems). It turned out to find only two programs that cope with video playback: OMXPlayer and Kodi. We will use both.
OMXPlayer is already installed in the system, but it is a console one, so it is not very convenient to use it. To open video files by double clicking, do the following. Click on file right click, select "Open with ...". Go to the "Custom Command" tab. AT top line enter omxplayer -b. Check the boxes "Run in a terminal emulator" and "Set the selected application as the default for of this type file". In the application name we write, for example, omxplayer. Click "OK".
These steps must be done for each video file extension.
OMXPlayer does not allow switching between windows. Control keys: "q" - exit, "-" and "+" - volume control, "←" and "→" - rewind.
Kodi is a pretty serious media center. It understands much more codecs than OMXPlayer, has a built-in DLNA client and other goodies. First you need to install it:
The Raspberry's Wi-Fi is rather weak, so you won't be able to watch a decent-sized video over the network through it. Take care of the wired connection.

With Kodi on Raspberry Pi 3, you can watch very heavy movies. I tested it on a 40 GB Full HD file with a bit rate of 40 Mb / s (via DLNA). For more than 2 hours, not a single slowdown or other problems. Some Smart TVs, when playing the same file from the same DLNA server, hung in the middle of the video (I had to turn it off / on).
Listening to music
With sound reproduction, everything is much simpler. Many players are supported. The regular OMXPlayer can also play music, but this is not necessary. Audacious was installed, which is not particularly overloaded, but has a familiar look and normal functionality:
apt install audacious

Torrent client
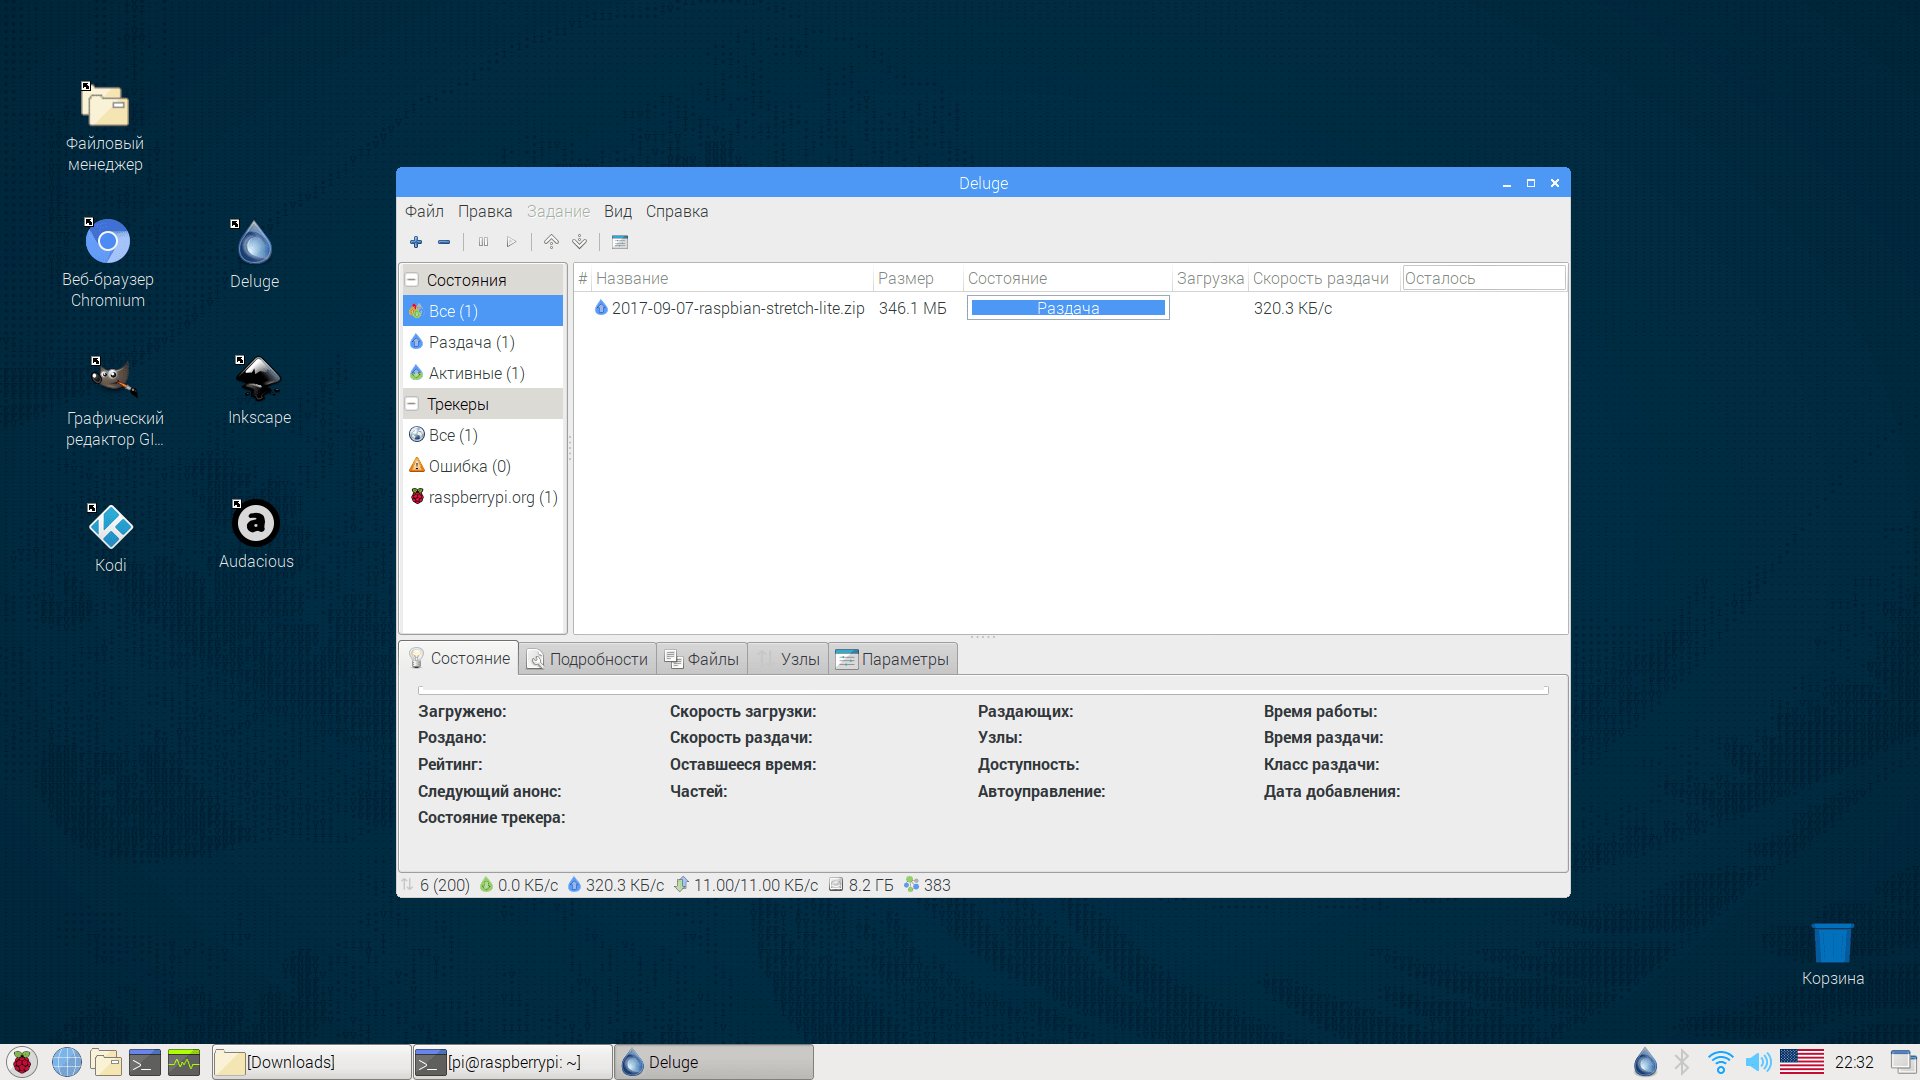
Everything is fine here too. Installed Deluge:
apt install deluge
Why him? Because I'm used to it. Deluge is no better or worse than others. It just does its job the way it's supposed to. For the test, I downloaded Raspbian Stretch Lite through it. Didn't notice any problems.
Games
Of course, it is difficult to call the Raspberry Pi a gaming platform, but it is quite possible to play on it. This is mostly about launching games that came out on old consoles. Long attempts to build something like RetroPie as a standalone application (rather than an entire OS) have been unsuccessful. Search individual applications for each prefix is also a rather tedious business, so the poet settled on Mednafen:
Apt install mednafen
First of all, go to "Global Settings" and select Video Driver sdl instead of opengl (well, Raspberry doesn't have normal OpenGL support). After that, game images (ROMs) will start working normally (not all, of course).
Only the NES and the Sega Mega Drive worked at a normal speed (although most of the platforms were not tested, because there is no interest in them).
You can add games to the Mednaffe interface and launch them from there, or you can even not launch Mednaffe - just open the file with the game image, like any other, by double-clicking (it won't work for all platforms).
It is inconvenient to play console games on the keyboard, and there is an Xbox 360 gamepad at hand. The controller works without additional drivers, all that remains is to configure the buttons. To do this, open the “Systems” section in Mednaffe, go to the desired prefix, open the “Input” subsection, click “Controller Setup”. Select "Port 1" (the first controller), double-click in the Key column and press the button on the gamepad corresponding to the inscription in the Action / Button column (for each row).
If the settings have not been applied, launch the game of the required format from the interface (the new parameters should take effect), after which the settings will already be in effect when you launch it with a double click.

Several "native" games worthy of attention can also be installed. For example, the Battle for Wesnoth (reminiscent of HOMM III) and OpenTTD (reminiscent of SimCity 2000). Both games are translated into Russian.
apt install wesnoth openttd
Finishing touch
After installing many programs, any "garbage" remains. It would be nice to remove it with the following command (it will also free up some space):
Apt autoremove
additional information
- A screenshot is taken with the key Print Screen and is automatically saved to your home folder (/home/pi).
- If you want to speed up your Raspberry Pi 3 a bit, connect it to a low resolution screen (eg 1366x768).
- Applications can be searched in the regular "Add / Remove Software" utility, which is somewhat similar to Synaptic.
- To connect to a monitor without an HDMI connector, you can use a cheap HDMI to DVI-D adapter or the same cable.
- Raspberry can display three special indicator icons on the screen (regardless of the installed OS and desktop environment): lightning - low voltage, half red thermometer - high chip temperature (80-85 degrees), full red thermometer - critical temperature (above 85 degrees ).
Conclusion
In general, I was satisfied with the mini-computer. For its cost, it provides a very wide functionality (only some options for its use are considered in the article). For advanced users Linux setup The Raspberry Pi 3 will seem easy. The rest will be able to use the already configured system without any problems.
You can even teach a cat to click on windows with the mouse.
In addition to enthusiasts, Raspberry may also be of interest to companies with a large fleet of machines. For example, buying 20 classic system blocks for a call center for 12,000 rubles. and the purchase of 20 "raspberry" computers for 3000 rubles. - these are completely different things (180,000 rubles of savings).
Only monitors need to be taken at least with DVI-D - we subtract another 15,000.
For home use, Raspberry Pi 3 will do well as a silent media server, retro set-top box, auxiliary computer for another room, etc., etc.