Including files in PHP using include and require. Including files in PHP using include and require Imaginary section php
Document table of contents1. config_load function
Syntax:(config_load file="filename" )
This function is used to load variables from configuration files into the template. In addition to the name of the downloaded file, this function may have several more additional parameters. For example, the section parameter, which specifies the name of the section to load. More detailed information These and other parameters can be found in the Smarty documentation.
Example:
(config_load file="task.conf")
2. Capture function
Syntax:(capture name="block_name"
assign="variable_name") ...
(/capture)
This function is designed to collect the template output into a variable instead of printing it to the screen.
Everything between (capture name="varname") and (/capture) will be written to a variable called varname. Content captured in this way can be used in the template via the special variable $smarty.capture.varname, where varname is the value passed to the name attribute of the capture function. If a variable name is not specified, the default name will be used.
The second parameter assign specifies the name of the variable to which the captured output value will be assigned. This parameter, like name, is optional.
3. Section function
Syntax:(section name="section_name"
loop="variable_to_calculate_number_of_iterations"
[,start="start_position_index"]
[, step="step"] [,max="maximum_iterations"]
[,show="show_section"] )...
(/section)
The Section is a loop for traversing the elements of an array. The required parameters are name, which sets the name of the section, and loop, which is a variable that determines the number of iterations of the loop.
Typically loop is type variable array, and the number of iterations of the section is equal to the number of elements of this array. To display a variable inside a loop, you need to specify the section name in square brackets after the variable name.
(section name=art loop=$title)
Title: ($title)
(/section)
Example 15.8. Loop to traverse array elements
4. foreach function
Syntax:(foreach from="array_name"
item="current_item_name")
...(/foreach)
In addition, you can use additional attributes key - the name of the key for the current array element and name - the name of the loop, with which you can access its properties. The from and item attributes are required.
foreach loops are an alternative to section loops. The foreach function works very similar to foreach loop in PHP language.
(foreach from=$articles item=art)
Title: ($art)
(/foreach)
Example 15.9. foreach loop
foreach loops have their own properties. They can be accessed like this: ($smarty.foreach.foreachname.varname) where foreachname is the name of the loop given by its name parameter, and varname is the name of the property.
5. If, elseif, else statement
Syntax:(if expression) action_block
(elseif expression1) action_block1
(else) action_block2
(/if)
The operation of the operator is almost similar to the if...elseif...else operator in PHP.
The following comparison operators can be used in expressions: eq, ne, neq, gt, lt, lte, le, gte, ge, is even, is odd, is not even, is not odd, not, mod, div by, even by, odd by, ==, !=, >,<, <=, >=. Each of them must be separated from the surrounding values by spaces. You can use parentheses in expressions and call PHP functions.
(if $name eq “Vasya”)
Welcome, Vasya.
(elseif $name eq “Petya”)
Welcome, Petya.
(else)
Welcome. And who are you?
(/if)
Example 15.10. Operators if, elseif, else
(* this example will not work because there are no spaces around the comparison operators *)
(if $name=="Vasya" || $name=="Petya")
...
(/if)
Example 15.11. Not working example
By creating websites on our own (without using frameworks, CMS, and other fancy things that make life easier for web developers), we are faced with the problem of making changes to the site when there are a lot of pages.
To ensure that we do not have to change identical parts of the site in each of the page files, we can use convenient PHP instructions, which give us the opportunity to include files with the necessary code in all pages using literally one line of code. Then, by changing the contents of the connected file, we change the code on all pages of the site. Convenient no matter how you look at it.
Now let’s look at ways to connect files in more detail:
Using include and require
You will not be able to detect a fundamental difference between these two instructions, even if you try, but there are some nuances:
If an error occurs during the execution of the require command, the parser will receive a fatal error response and the execution of the page code will stop, while include will only issue a warning and file execution will continue (the file will simply not be included).
Let's look at a simple example to better understand the topic.
We have our minisite in which the header and footer are the same on all pages, but the body of the document changes.
We create the files header.php and footer.php in which we place the code that will be the same on all pages, and in the files index.php and newpage.php we will connect the static parts. As a result we get:
Contents of header.php
< header> < nav> < a href= "newpage1.php" title= "menu item" >menu item < a href= "newpage2.php" title= "menu item" >menu item < a href= "newpage3.php" title= "menu item" >menu item
Contents of footer.php
< footer> < p>Made by us
Contents of other pages of the site
Lots and lots of useful information
As a result of loading our page, we get the following picture:

As we can see, everything works great.
Please note that we ran the example on local Denwer server, since for PHP work You must have a server with its support. If you create a website in a simple folder on your PC, nothing will work.
In the example considered, we used require to connect the header and include the footer. What to use on your sites is up to you. As already mentioned, there is not much difference between them. Except that require is considered a slightly more strict instruction.
In fact the line it simply copies the entire contents of the file, the path to which we specify, into the document in which it is located.
Using include _once and require _once
When working on a website, problems may arise due to the fact that the same piece of code is included in one file more than once.
Suppose this happened because several people were working on the site, and when the codes were merged, something like this happened...
To eliminate the possibility of such problems, developers often use include _once and require _once statements. Their operating principle is exactly the same as include with require, but if the file in such an instruction has already been connected to ours, then reconnection will not happen.
To the disadvantages this method This can be attributed to the fact that it is slower and more computationally intensive than its predecessors include with require, since it becomes necessary to remember all included files and compare them to avoid code duplication.
On a note
- To make it more convenient to distinguish between site page files and the files of their fragments that we include in them, usually included files add an inc particle to the name. Considering this approach in our example, we would get the header.inc.php file and so on from the header.php file. This approach can greatly simplify the understanding of the site structure in the future.
- The code from the file that we include inherits the scope of the line in which it is included. So, it’s just that inside the page it will have a global area, and inside the function it will have a local area.
- We can use include with require wherever we want. Even inside scripts.
An article that examines the section HTML element from the sectioning category.
Purpose of the section element
The section element is used to create a section in a document that groups some topical content together. For each section in the document, its name (topic) should be indicated. This is usually done using headings (elements h1 - h6).
Section content...Section title
Section elements are typically used in the following cases:
- to mark sections within a section. For example, to mark up chapters in an article, tabs in a dialog box, sections in a dissertation, etc.
- to group several sections into one thematic group. For example, for grouping latest news on the website, comments on the article, etc.
Thus, the section element should only be used for some content if it has a title and is part of something else.
Using the section element
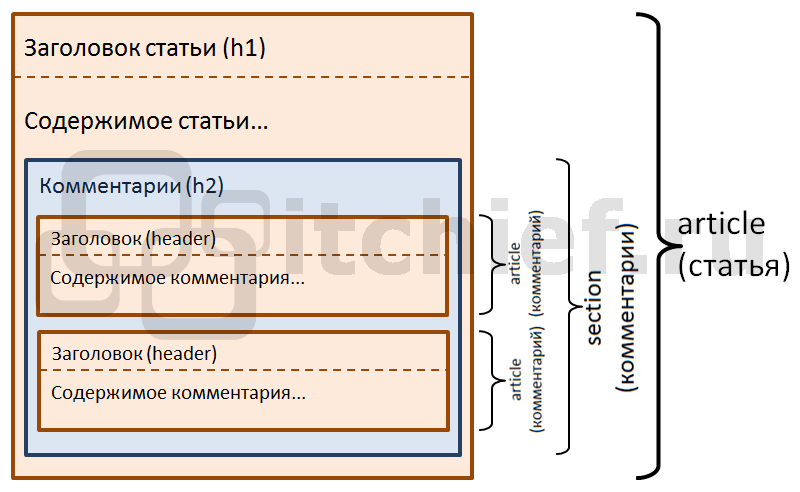
For example, consider a page code fragment containing an article with comments. Each of the comments left by a user on a page contains some complete content and can therefore be considered an article element. But, at the same time, all comments represent a certain thematic group, and therefore they can be placed in the section element, i.e. this element will group all these comments on the page together.
Article title
Comments
Comment title
Comment title
Article title Comments Comment title Comment title
For example, consider using section elements to create sections within an article element:
Book title
First chapter
Chapter two
Chapter Three
Appendix A
Appendix B
The above example will have the following outline:
Book Title First Chapter Second Chapter Third Chapter Appendix A Appendix B

Limitations when using the section element
The section element in HTML 5 is not a universal element for grouping content, i.e. it should not be used to wrap any content you like. Its main purpose is to add semantics to the document and create its structure (outline).
When an author needs to group content just to style it or manipulate it in JavaScript, the div element is their best bet. The div element, unlike the section element, does not add semantics to the document and does not participate in creating its structure (outline).
Difference between section and article elements

The section and article elements, although they seem very similar at first glance, have different semantic meanings. The article element is intended to group content that is complete, self-contained, and can be viewed separately from the rest of the page content. The section element has a different semantic meaning; it is intended to group content that is part of something else.
But how does an author know what some content on a page is? Let's look at this using an example from an article fragment. A fragment is a part of an article and therefore requires a section element to group its content. But this same fragment, already left as a comment, will represent something whole, complete. Therefore, in this context, you can use the article element to group it. But, of course, one can argue the other way around. Therefore, which element to use to group content depends in most cases on your subjective opinion as the author. But the most important thing in this approach is to maintain the chosen position. Therefore, the more consistent the author is in creating the structure, the more meaning he will be able to put into it.
). Each tag(section) must have a pair(/section) . Required parameters are name And loop Each tag. The name of the cycle (section) can be anything consisting of letters, numbers and underscores. Cycles And can be nested and the names of the nested sections must be unique to each other. Variable(usually an array of values) determines the number of iterations of the loop. And When printing variables within a section, the section name must be listed next to the variable name inside square brackets.
| (sectionelse) | is executed if the parameter | does not contain values. | Attribute name | Type |
|---|---|---|---|---|
| . Required parameters are | Required | Default | Description | string |
| And | Yes | Default | Description | n/a |
| Section name | mixed | A value that specifies the number of iterations of the loop. | 0 | The index of the position at which the loop will begin. If the value is negative, then the starting position is calculated from the end of the array. For example, if the loop variable has 7 elements and the value of the start attribute is -2, then the starting index will be 5. Invalid values (values outside the array) are automatically trimmed to the nearest valid value. |
| step | mixed | A value that specifies the number of iterations of the loop. | 1 | The step value used to traverse the array. For example, step=2 indicates the traversal of the array by elements 0,2,4... If the step is negative, then the array will be traversed in the opposite direction. |
| max | mixed | A value that specifies the number of iterations of the loop. | 1 | The maximum number of loop iterations. |
| show | boolean | A value that specifies the number of iterations of the loop. | true | Indicates whether to show this section or not |
Note
As of Smarty version 1.5.0, the session property variable syntax has been changed from (%sectionname.varname%) to ($smarty.section.sectionname.varname).
The old syntax is still supported, but you will only see examples of the new syntax.
index is used to display the current index of the array, starting at zero (or the start attribute if one was specified) and incrementing by one (or the value of the step attribute if one was specified).
Technical Note
If the step and start attributes are not specified, then index is the same as the iteration section attribute, except that it starts at 0 rather than 1.
Note
iteration is used to display the current iteration number of the loop.
This value is independent of the start, step, and max properties, unlike the index property.
Also, iterations start from one, not from zero like indices.
rownum is a synonym for the iteration property, they work the same.
Example 7.38. property (section) iteration
assign("custid",$id); ?> (section name=cu loop=$custid start=5 step=2) iteration=($smarty.section.cu.iteration) index=($smarty.section.cu.index) id=($custid)
(/section)
The result of running this example:
Iteration=1 index=5 id=3005
iteration=2 index=7 id=3007
iteration=3 index=9 id=3009
iteration=4 index=11 id=3011
| iteration=6 index=15 id=3015 | This example uses the iteration property to print the table header every five lines (using (if) with the mod operator). | (section name=co loop=$contacts) (if $smarty.section.co.iteration % 5 == 1) | Name> | |
|---|---|---|---|---|
| Cell | (/if) | view | ($contacts.name) | |