How to check the availability of RAM. Checking the RAM of a computer or laptop for errors. My memory is failing, what should I do?
Modern modifications of Windows make it possible to test such an important PC component as RAM using built-in system tools, but in the case of Windows XP, you will have to use third-party software for this purpose.
However, this is even better, since, according to the vast majority of experts in the field computer equipment Thus, more reliable results are achieved.
It should be noted that the guide described below is suitable for all versions of Windows, not just XP.
Why do you need RAM diagnostics?
Faulty RAM is a common cause of OS errors. For example, if the screen of death appears, it is advisable to test the RAM modules installed in the computer.
Often, the RAM in a Windows PC is not able to withstand the loads placed on it by the system; this can happen even despite the large amount of module memory declared by the manufacturer.
To check RAM, specialists mainly use the Memtest86 utility, which is good at identifying problems with RAM modules.
The main symptoms of RAM problems include the following:
- The PC cannot start and at the same time makes a constant squeaking sound;
- Display of BSOD on the computer monitor;
- Defects in image reproduction on the display;
- Crashes under RAM loads, for example, while working in resource-intensive programs, games, etc.
Of course, the listed consequences can be caused by other problems in the system, but it is advisable to definitely exclude one of the most common reasons failures and first test the RAM modules.
MemTest86
Of the main advantages of the application, it should be especially noted that it performs analysis in a clean environment (without Windows influence XP), which in turn provides the most reliable test results.
The utility can test RAM even if there is no working Windows on the computer, since the program itself is loaded from external bootable media.
Of course, you will need to write it down and work a little, but the instructions below will allow even an inexperienced user to do this quickly and correctly.
The application is distributed freely on the Internet and will not require additional financial costs from the computer owner, even if downloaded from the official resource of the utility developer: “www.memtest.org”. The only drawback of this software is the lack of a Russian-language version.
Program testing procedure
You need to download the archive with the utility from the official source, where two options are available:
- For disk;
- For a flash drive.
 After this, burn the application image to CD or USB. The choice of media depends on the version of the utility downloaded from the website.
The optimal way to burn an image to a CD is to create a disc using the NERO program.
And in order to create a bootable USB flash drive, there is special program. You need to extract the contents of the archive and run the tester installation. Then specify the USB drive.
 Click “Create” and wait until the procedure for creating a flash drive with the program for testing RAM is completed.
Next, install the boot drive in the PC and specify in the BIOS to start the computer from external media. When exiting the BIOS and saving the entered adjustments, the PC will start from the flash drive or CD, and the “memtest” interface will be displayed on the screen.
Testing will then be performed in automatic mode, and the user will only need to wait for it to complete.
 As a result, detected errors will be shown, which are recommended to be copied into a notepad in order to learn about them in more detail from the global network.
 The following steps must be followed:

What to do if the RAM module is damaged and interferes with the normal functioning of the PC?
The best option is to replace it with a new one. But there are times when even wiping the contacts of the strip with an alcohol solution eliminates the problem. It is also recommended to pay attention to the integrity of the connector on the computer’s motherboard.
Are the test results reliable?
The method described above is by far the most accurate of all available memory testing methods, but it cannot guarantee one hundred percent reliability of the results.
A great, creative, successful person has a healthy and strong memory. And vice versa: forgetfulness, absent-mindedness, sclerosis are synonyms of ill health, troubles and problems. It is unlikely that anyone desires such qualities for themselves. It’s the same with a computer: if your memory is in order, working with it is a real pleasure. And if not, expect surprises. Unpleasant.
Today we’ll talk about why problems arise with RAM, what symptoms they make themselves felt, and the dangers of using faulty memory modules. And also - how to check RAM for errors and what to do if you find them.
Why does memory fail?
There are not too many reasons for unstable operation or complete inoperability of RAM. Here they are:
- Malfunction of the RAM modules themselves (they are also RAM modules - R andom A access M emory). The culprit is most often a banal defect, which sometimes manifests itself after months or even years of work.
- Individual incompatibility between simultaneously used RAM or memory sticks and the motherboard. It occurs despite the support stated by the manufacturers. It is usually detected upon first connection.
- Incorrect RAM frequency and timing parameters in BIOS. Occurs after changing default settings in order to overclock or find the optimal mode collaboration several planks.
- Poor contact in the connector. The reason may be the formation of an oxide film on the surface of the contact group of the RAM module.
- Malfunction of the slot, power circuit elements, broken tracks and other defects of the motherboard related to memory.
How RAM problems manifest themselves
The “clinical” picture of memory failures, regardless of the reasons, is very, very diverse - from the complete inoperability of the computer to errors in the operation of applications that occur haphazardly and without connections with any action.Typically, RAM problems manifest themselves with the following symptoms:
- The PC or laptop does not respond at all when pressing the power button.
- When you press the power button, the system speaker beeps when POST fails. Moreover, codes (combinations of short and long beeps) do not always indicate memory problems.
- The computer turns on and turns off immediately or restarts cyclically at any stage of boot.
- After switching on, error messages are displayed on the screen. For example: " CMOS checksum error», « CMOS checksum bad" and so on.
- During startup and operation, the operating system crashes with critical errors (blue screens). Problems with RAM are especially typical PAGE_FAULT_IN_NONPAGED_AREA, UNEXPECTED_KERNEL_MODE_TRAP, DATA_BUS_ERROR, PFN_LIST_CORRUPT, KERNEL_STACK_INPAGE_ERROR, UNEXPECTED_KERNEL_MODE_TRAP, but there may be others. Very often - different.

- The image on the screen disappears or is distorted (video memory defects). In the absence of discrete video with its own memory, the latter is allocated from the RAM.
- The computer slows down or freezes until the user restarts it.
- The functions of transferring and copying files stop working.
- Errors occur when launching and running applications. For example, " Memory cannot be read\written" and others.

- Programs are not installed or uninstalled.
- Files stop being saved. Or after saving they cannot be opened.
- Components are damaged operating system.
As you can see, this list contains almost everything that can happen if a computer malfunctions. And this is just because of the broken RAM!
By the way, memory problems are often disguised as other problems and manifest themselves in the most bizarre ways. There have been cases when they manifested themselves as constant crashes antivirus program(gives reason to “sin” for elusive viruses), unstable Wi-Fi connection, loss of device drivers (after installation, the driver only works until the computer is rebooted), etc.
Sometimes the same failure appears constantly, sometimes they alternate. Often a combination of several errors occurs, for example, blue screens death and failure of system functions.
What consequences can result from using a faulty RAM? To the most deplorable ones. Namely, to the loss of data that you work with on your PC. As files are opened and rewritten, they will accumulate errors that will sooner or later render them unreadable and possibly unrecoverable.
What to do first
Because RAM failure has so many faces, it should be ruled out for any unclear computer problems.
In cases where the computer does not turn on, shuts down, or restarts before loading the operating system, and before testing memory using programs, do the following:
- Turn off the power system unit– unplug the cord from the outlet or press the power button on the power supply/surge protector. Open the case cover and make sure that the RAM sticks are correctly and completely installed in the slots. If even one module is not inserted completely, the computer will not turn on.

- Remove the strips from the slots and clean their contact groups with a school eraser. If the problem is an oxide deposit that disrupts contact, it will be solved.
- by removing the flash memory battery for 15-30 minutes or by closing the contacts of the Clear_CMOS jumper (other names CLCTRL, CLR_CMOS, JBAT1, etc.).

If a failure prevents your computer from starting, try turning on the computer with one RAM module in different slots. If there are several modules, check them one by one.
Identifying RAM errors using programs
Software diagnostics of RAM are carried out under the same conditions under which failures occur. When you are not sure that the problems are caused by the memory, and you want to find out, leave all RAM modules connected in the configuration in which they were installed. If you need to determine which strip has failed, check them one at a time.If you're using memory acceleration technology, select the profile that's causing the problem for the first test. If there are errors, do another check with XMP disabled.
Windows built-in RAM diagnostic tool - Windows Memory Diagnostic Tool, may not be the most popular tool for such tasks, but it is the most accessible. Versions of the utility included in Windows 7, 8.1 and 10 support DDR-DDR4 generations of RAM with a capacity of up to 64 GB (but in fact, perhaps less).Myths that systemic remedy is capable of detecting only obvious problems, but not hidden and subtle ones, according to users who have not bothered to figure out how to work with the utility correctly. Yes, by default it runs a quick scan and a minimal set of tests, but if you change the settings, its sensitivity will increase significantly.
For Windows startup Memory Diagnostic Tool, press the Windows + R key combination and enter in the line “ Open» team mdsched.

Then confirm your consent to restart. To have access to the entire RAM space, the utility will reboot the computer into DOS mode.

The scan will begin immediately after the restart. As I already said, this will be a superficial scan that will only reveal obvious errors. You can either wait for it to finish or stop it by pressing the go to settings key F1.
The program has few settings, and they are intuitive.
- The first option is a test suite. For in-depth diagnostics, select " Wide" To move to the next item, press Tab.
- Next is use or non-use. For the utility to access only RAM, a cache is desirable disable.
- The last option is the number of passes. The more there are, the higher the probability of detecting hidden errors, so if time is pressing, bet no less 8-15 .

To exit the setup menu, press F10.
A full, deep check of RAM by any means always takes a long time. As practice shows, the bulk of defects are detected already in the first hour of testing, but some emerge only after multiple passes - 6-8 hours from the start of the test.
Messages about found errors appear on the same screen in the “ State».

Memtest86
Tilit (not to be confused with Memtest86+, which has ceased development since 2013) is a classic of the genre. Its first algorithms were developed more than 20 years ago. To date, they have been improved and comply with all memory standards and platforms currently produced.Memtest86 seventh version (latest), released in free version - Free Edition and two paid editions. The Free edition does not have the ability to save test reports to disk, create configuration files that can be used to set testing parameters for the program, or exclude the processor cache from testing. In addition, some tests were cut from it, in particular, the use of instructions for reading/writing 64- and 128-bit data and error modeling to test the correction function (ECC) of server memory.
Despite the limitations, the capabilities of Memtest86 Free Edition are sufficient for the vast majority of home users. Searching for hacked paid versions or purchasing them is completely useless.
Unlike the Windows tool, Memtest86 is optimally configured by default, so it's fairly easy to run. But before that, the downloaded file ( iso image) will have to be written to external media - DVD or flash drive, and . The tool for creating bootable USB flash drives along with the utility itself is also available for free download on the official website of the latter.

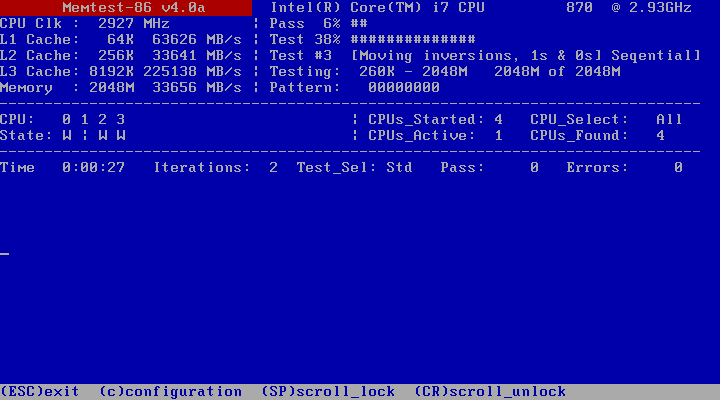
The Memtest86 interface is in English. The green dot in the screenshot above outlines the source data: information about the processor - frequency, size, cache speed, and information about memory - speed and size.
The area on the right - in a yellow frame, displays the current execution of the program: the serial number of the test, the percentage of its completion, as well as the percentage of completion of the entire cycle ( Pass).
The orange frame indicates information about the time that has passed since the start of the scan ( Time), number of passes ( Iterations), addressing mode ( AdrsMode), sequence number of the cycle ( Pass) and found errors ( Errors).
Error details, if any, are listed below. It is impossible not to notice them, since this area is highlighted in red.

At the very bottom of the screen are options for managing the program.
Information about testing methods and procedures, descriptions of tests, rules for creating configuration files and much more is available on.
GoldMemory
Toolit is another powerful RAM testing tool built on alternative algorithms. It often reveals errors that cannot be detected either by Memtest or other means, but, unfortunately, it is a paid solution. You can only use a 30-day demo version for free, which is essentially useless.The full – registered version of GoldMemory allows you to test all types of modern DDR-DDR4 RAM up to 64 GB. It has 4 scanning modes - fast (the only one available in the demo version), normal, advanced and custom. Supports batch batch files. Saves reports and inspection history. Can operate continuously until manually stopped.
Like the previously discussed utilities, GoldMemory works in a DOS environment - it is launched from a bootable DVD or USB flash drive (into the distribution paid version media creation tools are also included). Testing begins immediately after downloading.

The program interface, like Memtest 86, is English. At the top of the screen are the version and license information. The block in the orange frame in the screenshot above displays information about the current execution of tasks and settings.
The settings menu is surrounded by a red frame. Here:
- The "T" key controls the selection of the test mode.
- “C” – enables and disables continuous checking mode.
- “M” – allows you to change the method for determining the RAM size.
- “B” – enables and disables the benchmark test.
- “F” – determines whether to save the report file or not.
- “A” – turns on and off the sound notification about found errors.
- “X” – determines whether to complete testing if errors are detected.
- “E” – controls the transition to an accelerated verification mode, which saves up to 50% of time while maintaining normal efficiency.
By pressing the "T" key in Custom mode, you can select from a list of test groups to identify specific problems.
After the scan starts, a list of errors found will be displayed in the area where the menu is located. It’s also impossible not to notice them.

So what to do with a faulty RAM?
And the authors of diagnostic utilities claim that not all errors that programs detect are associated with a malfunction of the RAM itself. In addition, they react to problems with the cache memory of the processor, motherboard, as well as hardware incompatibility. If you suspect the latter, it is advisable to repeat the memory test on another computer. If there are no errors on it, then this is the same case.Errors that are detected with non-standard timing and frequency settings do not always indicate that the memory is no good. If it passes the tests normally in normal mode, it can be installed in a computer that is used without overclocking. On it, most likely, it will work as expected.
Defective RAM modules must definitely be replaced. I think it won’t be difficult for owners of desktop PCs to do this themselves. Another issue is laptops. If the model is equipped with removable RAM sticks, as in the photo below, this is also easy to do.

Cases of malfunction of non-removable RAM - soldered on the motherboard - are resolved in different ways. Installing a bracket in an additional slot, if there is one, usually does not help, since the BIOS first addresses the non-removable module. If it “died”, the additional one will not work either.

Discrete RAM modules, as you may know, are equipped with an SPD chip that stores information about operating frequencies and timings. The integrated memory does not have its own SPD, and all data about it is contained in the BIOS. In order for the laptop to see the bar in the slot, you need to remove information about the integrated module from the BIOS.
If the board does not have a connector for a discrete module, the only solution is to solder in a new RAM chip to replace the faulty one. When several chips fail, it is sometimes more profitable to replace motherboard entirely, since such repairs are not cheap.
Happy testing!
Also on the site:
No to computer Alzheimer's: how to check the RAM of a PC and laptop updated: May 2, 2017 by: Johnny Mnemonic
In contact with
Classmates
Software for testing computer RAM ( RAM) are programs that perform detailed tests of computer memory.
The memory installed on your computer is very sensitive. It is recommended to check new, newly purchased RAM for errors. And, of course, testing is necessary if you suspect that you may have a problem with your existing RAM.
For example, if your computer won't boot or reboots unexpectedly on its own, then this could indicate certain memory problems. It is also useful to check your memory in these cases:
- programs used on the computer periodically give errors and close;
- When the computer restarts, it emits various beeps;
- displayed .
All memory testing programs mentioned in the article run outside the operating system, so each of them will work regardless of the operating system you use: Windows (10, 8, 7, Vista, Windows XP, etc.), Linux or any other. Also, remember that the term "memory" in this context means random access memory (RAM).
Important: If the test results reveal problems in the memory, it is necessary to replace it, because it cannot be repaired.
is a completely free, installation-free and very easy-to-use program for testing RAM. If you don't have time to try and compare different programs, use Memtest86 - this is the best program to test the RAM on your computer.
Simply download the ISO image from the MemTest86 website and burn it to a disc or . After that, simply boot your computer from the disk or USB drive on which the program is located.
Although this program is distributed free of charge, it also has a Pro version, however, if you are not professionally involved in computer equipment, then free version with basic support will be sufficient.
To run MemTest86, you do not need to load the operating system; it is only required to write to a boot device (disk or flash drive). This can be done using any Windows versions, as well as Mac or Linux.

— free program memory testing from Microsoft. It is very similar to other RAM testing programs, and runs a series of tests to determine problems.
Just download installation file and create an ISO image to burn to a disk or flash drive.
After booting from a disk or flash drive, Windows Memory Diagnostic will automatically begin testing memory and will repeat the test until you stop it.
If the first set of tests doesn't find any errors, your device probably has good random access memory (RAM).
Important: For using Windows Memory Diagnostic is not required Windows installation(or any other operating system), the system is only needed to burn the ISO image to a disk or USB device.

- This modified version the Memtest86 program, which was listed first in this article. Memtest86+, like the original program, is completely free.
We recommend testing your memory with Memtest86+ if you have any problems using Memtest86 or it reports errors and you want to check the test results in another program (double check).
Memtest86+ is available in ISO format for burning to disk or flash drive.
It may seem a little strange that Memtest86+ is only listed in 3rd place on this list, however, since the program is very similar to Memtest86, it would be better to try the original version of Memtest86, and then Windows Memory Diagnostic, which works differently, as a result What you get is a fairly balanced algorithm for checking RAM.
As with Memtest86, to create a bootable disk or flash drive you will need a Windows, Mac or Linux operating system, which may be running on a different computer than the one you need to test.

Another RAM testing program that works very similar to those already listed earlier.
One of the main disadvantages of DocMemory is the need to create a boot floppy disk. Most computers today no longer have disk drives. That's why, best programs memory testing (see above) is used boot disks or USB drives.
We recommend using DocMemory Memory Diagnostic only if the testing programs listed above do not work or you want to once again find confirmation that something is wrong with your memory (after checking with other programs).
On the other hand, if your device can't use disks or USB drives, then DocMemory may be just what you're looking for.
In contact with
Random access memory or RAM is one of the most important components personal computer. Malfunction of modules can lead to critical errors in system operation and cause BSODs (blue screens of death).
In this article, we will look at several programs that can analyze RAM and identify faulty modules.
GoldMemory is a program supplied as a bootable image with the distribution. Works without the participation of the operating system when booting from a disk or other media.

The software includes several memory test modes, can test performance, and saves test data in special file on your hard drive.
MemTest86
Another utility that is distributed already written into an image and works without loading the OS. Allows you to select test options and displays information about the size of the processor cache and memory. The main difference from GoldMemory is that there is no way to save test history for later analysis.

MemTest86+
MemTest86+ is a revised edition of the previous program, created by enthusiasts. Differs more high speed testing and support for the latest hardware.
Windows Memory Diagnostic Utility
Another representative of console utilities that work without the participation of the operating system. Developed by Microsoft, Windows Memory Diagnostic Utility is one of the most effective solutions for identifying RAM errors and is guaranteed to be compatible with Windows 7, as well as newer and older systems from MS.

RightMark Memory Analyzer
This software already has its own GUI and runs under Windows. The main distinguishing feature of RightMark Memory Analyzer is the priority setting, which makes it possible to check RAM without loading the system.

MEMTEST
A very small program. The free version can only check the specified amount of memory. In paid editions, it has advanced functions for displaying information, as well as the ability to create bootable media.

MemTach
MemTach is professional-level memory testing software. Conducts many tests of RAM performance in various operations. Due to some features, it is not suitable for the average user, since the purpose of some tests is known only to specialists or advanced users.

SuperRam
This program is multifunctional. It includes a RAM performance testing module and a resource monitor. The main function of SuperRam is RAM optimization. The software scans memory in real time and frees up space that is not being used. this moment processor. In the settings you can set the limits at which this option will be enabled.

Errors in RAM can and should cause problems with the operating system and the computer as a whole. If you suspect that the cause of the failure is the RAM, then you need to test using one of the programs given above. If errors are detected, sadly, you will have to replace the faulty modules.
If on the computer we can find out that HDD needs defragmentation, then we will not identify significant problems in the RAM of a computer or laptop. RAM-related errors are difficult to fix. A more detailed analysis can be obtained using third party programs, but do not underestimate windows 10, which develops instantly. In this guide, we'll look at ways to diagnose and check RAM for errors, like in a standard way, and check for errors using the popular MemTest86 utility.
Possible computer RAM errors:
Before throwing sins at RAM, we need to know approximate errors and symptoms that will help us move in the right direction. We will analyze the most popular symptoms of computer or laptop RAM errors.
- Your computer beeps several times during startup.
- Crash or under heavy load in 3D games.
- The computer keeps rebooting.
- Problem accessing and working with files.
How to check RAM in Windows 10 and Windows 7
- Enter in search mdsched.exe, in later windows systems press or combination windows buttons+R.
- In the next window, select the mode that is currently suitable. (The tool also offers the option to schedule a test on the next reboot if you are unable to close your applications and restart immediately).

- As soon as the computer restarts, it will start in the Windows Memory Diagnostics environment, and tests will immediately begin running in standard mode. In this mode, the tool will run all the checks available in the main mode, in addition to LRAND, Stride6 (with cache), CHCKR3, WMATS+ and WINVC. You can also select scanning parameters by pressing the key F1.

- After clicking F1, the test selection will appear: basic, regular, wide. Below you can enable the cache and number of passes. In the expanded "Wide" test mode, more tools will be available, which will allow you to thoroughly diagnose RAM for performance. Disabling the “cache” will allow direct access to RAM, which will improve the quality of diagnostics. When you have configured the settings for scanning, click F10 and it will start checking the RAM.

Checking test results
While you can see the status during the scanning process, once the test is completed, your computer will restart automatically and you will need to use event viewer to see test results to see if you have a bad RAM module.
- Press a combination of buttons Win+R and enter eventvwr.exe to open Event Viewer.

- Expand the folder " Windows logs " and press right click mice " System", select from the menu " Find"
- Enter "Find" in the search field MemoryDiagnostics-Results.


- In Event Viewer, double-click the source MemoryDiagnostics-Results and look at the result, if there are no errors, then you can not blame the RAM of your laptop or computer.

What to do if there are errors when diagnosing RAM?
- Your best bet is to replace the RAM stick.
- You can try cleaning the contacts from dust on the bar and in the connector.
- Try inserting one strip into different slots to identify the problem in the module or slot itself.
How to test RAM with MemTest86
If you have done the RAM check using windows and did not identify any errors, but you are sure that there are errors in the RAM, then use the MemTest86 program. Select on the website, download boot image CD or USB flash drive to run the program under BIOS.

After downloading, open the archive" zip" and run the file " imageUSB.exe" to start the program.
- Insert the formatted flash drive into your computer and click " Refresh drives", so that the program sees the drive.
- Select mode " Write to UFD".
- This is the image in the archive folder" MemTest86", which will be written to the flash drive.
- Click " Write to UFD" to write to a USB flash drive. After everything has been done, you can restart the computer and it will start under bios with the MemTest86 program and begin diagnostics.

- When you restart your computer, your computer's RAM will be checked.
- If errors appear, they will appear in red at the bottom, like in the picture.

The guidance was reviewed in Windows system 10, but the RAM tester has been available for years, which means you can also use it in previous versions, including Windows 8.1 and Windows 7.