Installing android on windows 8. How to install Windows on a tablet and does it make sense?
Nowadays it’s difficult to surprise anyone with a tablet based on iOS and Android. But if you remember history, the first tablets on these operating systems appeared relatively recently. In 2010, the first iPad was born, and already next year Google company released its first tablet with Android OS called Motorola XOOM. Nowadays, tablets from Apple and Google have gained immense popularity among millions of users around the world. This order of things prompted the software giant, Microsoft, to join the tablet race.
In 2012, Microsoft released the Windows 8 operating system, which is aimed at both desktop PCs and tablets. The company had to completely change its approach to touch PCs, since it already had unsuccessful experience with tablets on Microsoft database Tablet PC. Microsoft is now using a new operating system for its tablets, which is called Windows 10.
Many users of tablet PCs running Windows 8 now have questions about how to switch to the new ten. In addition to switching to a dozen tablet users, they are also interested in reinstalling and clean installing Windows 10 itself on a mobile PC. To resolve all these issues, we have prepared material in which we will describe in detail the process of installing and updating tens. In addition to Windows tablets, we will also cover mobile OS for smartphones Windows 10 Mobile. In this topic, our readers will find out the answer to the question: how to install Windows 10 mobile on your Microsoft smartphone.
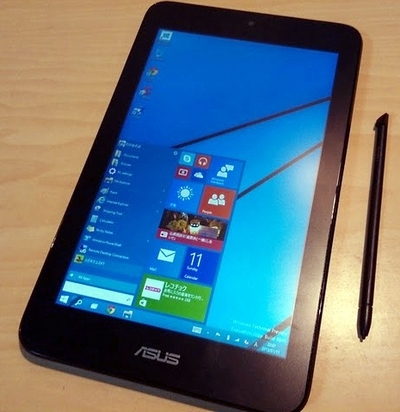
Upgrading eight to ten on the Asus VivoTab Note 8 tablet
Tablet Asus VivoTab Note 8 comes native with the operating system Windows 8.1. For Asus updates VivoTab Note 8 before Windows 10 we need a utility Media Creation Tool, which can be downloaded by following this link https://www.microsoft.com/ru-ru/software-download/windows10. After downloading, launch the utility.
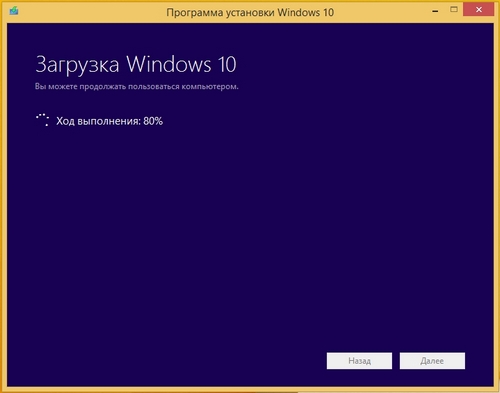
In the window that appears, select the first item, which will allow us to upgrade to ten. At a further stage, the utility will begin downloading and checking the installation files operating system.
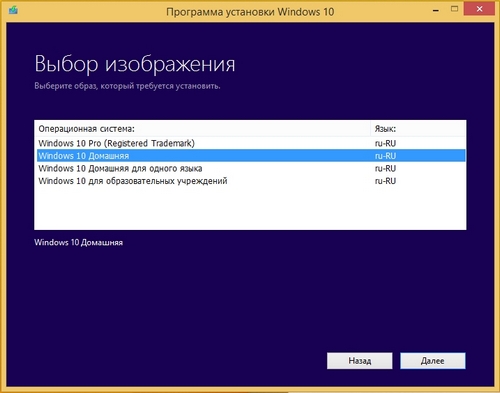
After downloading the installation files, the utility will prompt you to select the OS to install.
After selection, the utility will prepare the OS for the update and open a final window with the Install button.
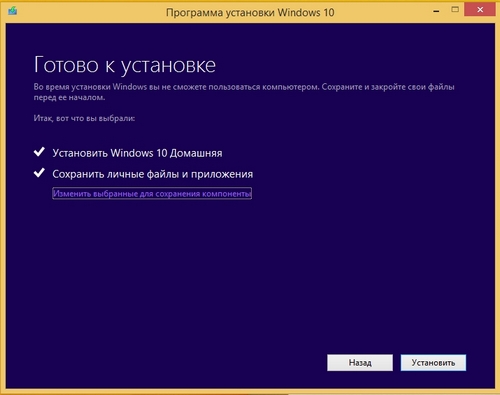
In this window, you must click the Install button, after which the eight to ten update will begin.
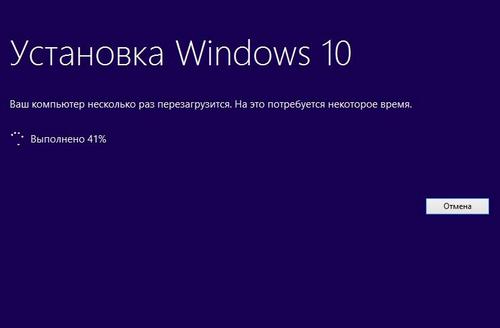
The update process on the Asus VivoTab Note 8 will take a little time, after which the tablet will have the new Windows 10 OS. The new OS will retain all the documents and programs that were in the eight.
In the same way, you can upgrade to ten on other tablets running Windows.
Clean installation on Asus VivoTab Note 8 tablet
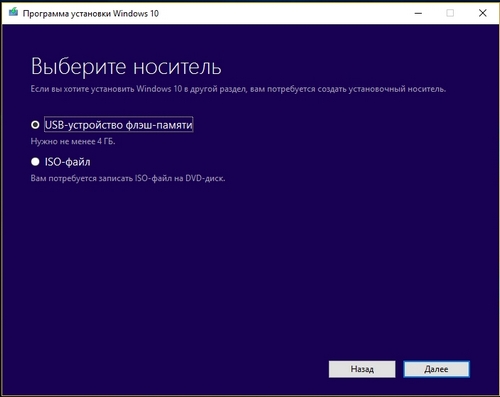
In this example, we'll look at a clean install of Windows 10 on the tablet in question. Clean for many users Windows installation is a priority, as it allows you to configure the system from scratch and save yourself from various glitches that may arise when upgrading from an older OS. For clean install on Asus VivoTab Note 8 we will need the previously reviewed utility Media Creation Tool, flash drive and OTG micro USB hub. A flash drive with a capacity of at least 4 GB is required. The OTG micro USB hub looks like this.
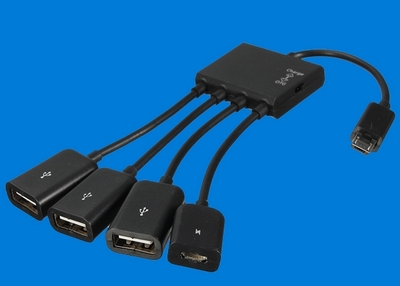
This USB hub is needed to connect a regular USB keyboard to the tablet in question.
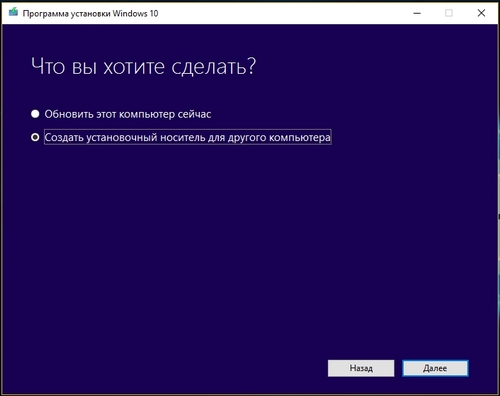
First, let's create a bootable USB drive using the Media Creation Tool. To do this, launch the utility itself and select the second item in it.
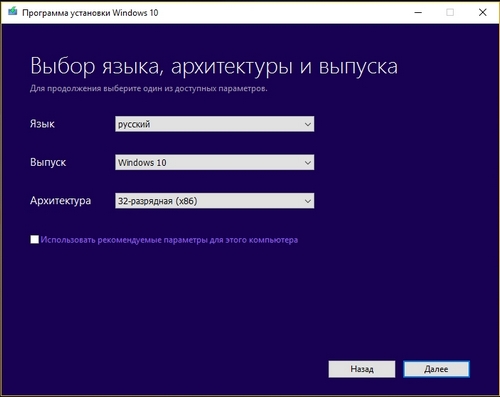
In the next window you need to select the OS version and its bitness. For Asus VivoTab Note 8, you need to select a 32-bit OS, as shown in the figure below.
In the next window, select the type of bootable media to be created. In our case, this is a USB flash drive.
After selecting your flash drive, the utility will download and write installation instructions to the flash drive. Windows files 10.
Having created bootable USB flash drive, you can begin installing the operating system. To do this, insert the USB drive into the hub and reboot the tablet. When the tablet starts, press the F2 button on the keyboard (it also connects to the hub). This action will open the BIOS of the mobile PC. In the BIOS we need to go to the " BOOT"and select our flash drive first when booting the system, as shown in the figure below.
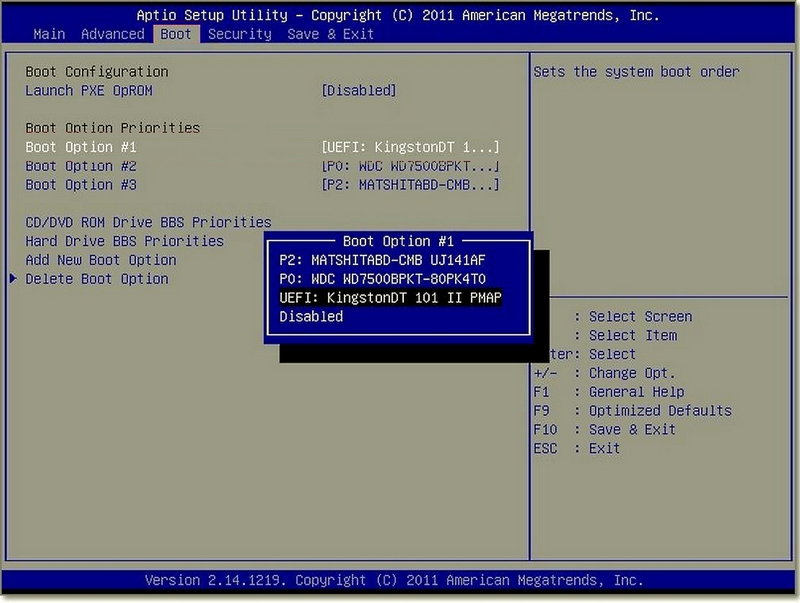
Having completed the steps described above, our drive should be the first to start in the system, thereby loading the Windows 10 installer.
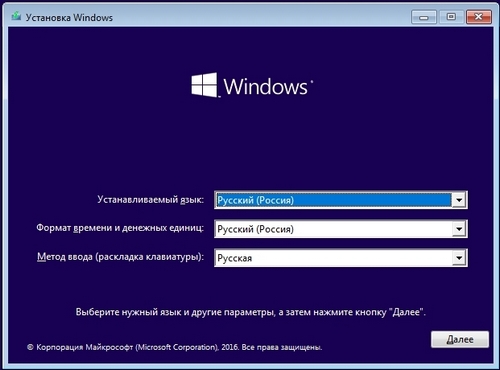
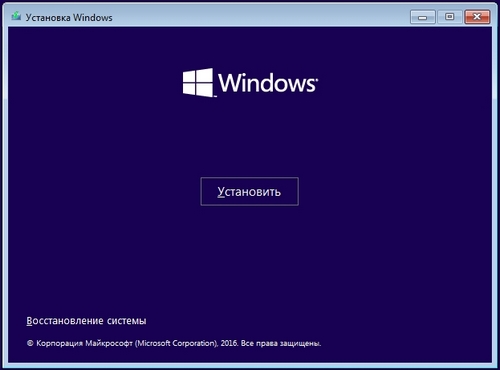
Installing Ten is simple and familiar to many PC users, but we will still describe the installation process. In the next window, click the Install button.
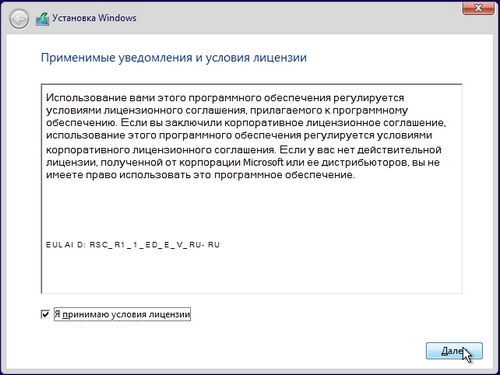
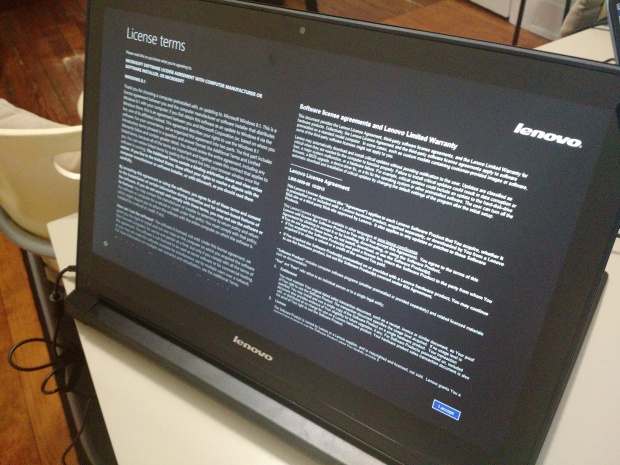
This action will take us to a window in which we must agree to all the conditions license agreement companies.
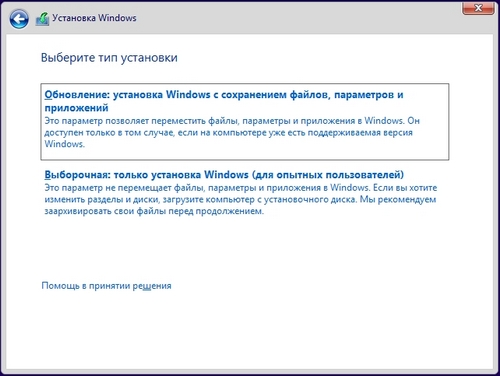
Having accepted the conditions, we will be taken to a window that will prompt us to update the OS located in this moment on your hard drive, or run new installation. Therefore, select the item “ Selective" and continue the installation.
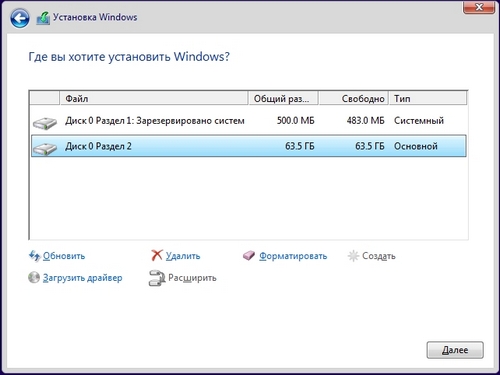
In the next window we will prepare our HDD. In our case, this is one 64 GB partition.
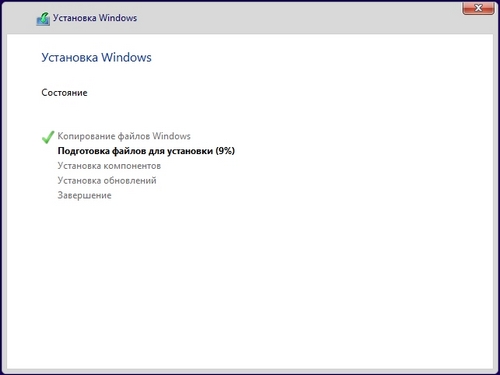
On Asus tablet VivoTab Note 8 installation will not take much time, so in just a few minutes you will be able to enjoy all the benefits of the new operating system.
In order for the tablet to function correctly with the new OS, it needs to update the BIOS. Download and install the latest BIOS version can be found on the official website www.asus.com in the “ Support» on the page of this tablet.
The example shows that installing Windows 10 with x86 architecture is the same as on a regular PC.
Windows 10 mobile instead of Phone 8
For its smartphones, Microsoft also decided to release a new operating system called Windows 10 mobile. This OS name underlines the company's intention to blur the boundaries between PCs and smartphones in the future. For example, implementing a tool Continuum in older versions of smartphones just confirms this desire of the company. A notable feature of the new operating room mobile system is the fact that it can be installed on most older phone models that still worked on Windows Phone 8. For example, Lumia phones 535 and Lumia 630 running Windows Phone 8 can be upgraded to the new OS without any problems. Below is the entire list of Windows Phone 8 phones that can be upgraded to dozens:
- Lumia 430;
- Lumia 435;
- Lumia 532;
- Lumia 535;
- Lumia 540;
- Lumia 630;
- Lumia 640 XL;
- Lumia 735;
- Lumia 830;
- Lumia 930.
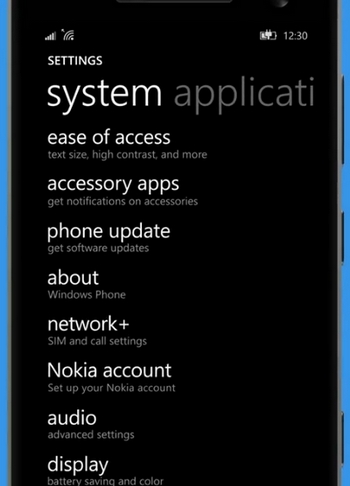
Now let's try to change old Phone 8 for a new ten. To do this, first of all, connect your smartphone to Wi-Fi router and make sure your phone is charged. After this you need to go to the application store Windows Store and find the application in it Update Advisor, as shown below.
![]()
After installing and launching the Update Advisor program, it will ask you for a place to save the backup files that were on the old Phone 8 OS, as shown below.

The next step is to install the update itself on the smartphone instead of Phone 8. To do this, go to the phone settings and start the update by clicking on the items “ phone update» - « download».
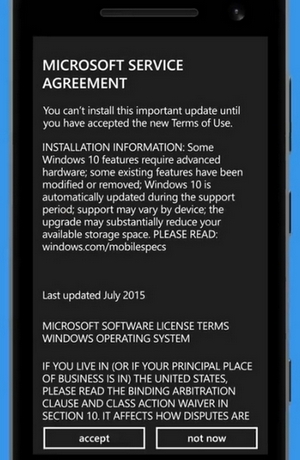
After the download is complete, you must click on the "install" button. The next step will be the adoption of a license agreement, after which the direct replacement of Phone 8 with a ten will begin.
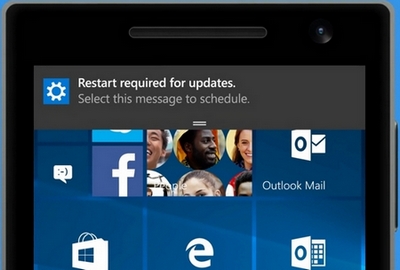
Having made the necessary settings, the phone will ask the user to reboot it.
After rebooting, you can restore all files, as well as go to the application store and update all programs that support the new OS.
The example shows that any Microsoft phone user can handle the update.
Only smartphones such as Lumia 535 and Lumia 630 need to be updated to ten, but new versions without the Lumia prefix do not need to be updated, since the new OS is already installed on them.
I would also like to say a few words about new technology Microsoft Continuum. Essentially, this technology turns your smartphone into a PC. The operating principle is based on connecting a monitor and a smartphone to a special docking station Microsoft Display Dock HD-500.
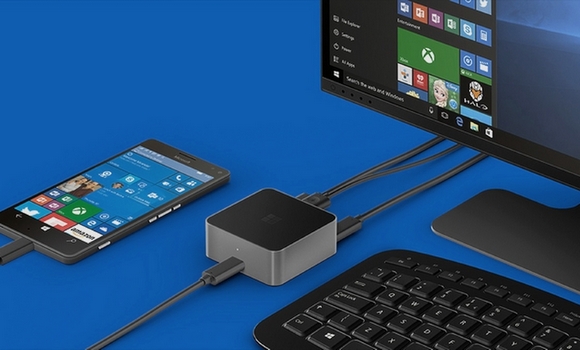
After assembling this circuit, the smartphone functions as touch mouse. The user also has the opportunity to connect regular keyboard and a mouse. The work itself on such a PC, of course, cannot be compared with the work of a regular laptop or desktop computer, but for office use and viewing information in a browser, it is ideal.
The only drawback of this technology is that only users can use Continuum flagship smartphones and new models. Therefore, users of phones like the Lumia 535 and Lumia 630 will be a little disappointed. But still, the fact that Microsoft gave owners of phones such as Lumia 535 and Lumia 630 the opportunity to change the old Phone 8 OS to ten is a very pleasant surprise, which, for example, cannot be said about Android smartphones.
Let's sum it up
In this article, we looked at how easy it is to install Windows 10 on a tablet and phone from Microsoft. For many, upgrading a tablet will not cause difficulties, since the device itself is built on a processor with x86 architecture, which is used on laptops and desktop computers. It follows that installing the OS on a tablet looks similar. Installation Windows mobile and should not cause difficulties at all, since its process is very simple. We hope our article will help you install the latest Windows 10 operating system, both on your tablet and smartphone.
Video on the topic
Let's start with the fact that Android is an operating system. And there is no way to install one operating system (Windows) on another (Android). What is possible: you can put Windows 8 emulators on a tablet with Android, you can demolish Android and install Windows instead, but only if the tablet meets the requirements of the Windows operating system. Requirements for installing Windows 8 can be found on the company's official website.
Let's make a reservation right away - Windows 8 OS is designed for x86 and x64 processors. And Android is designed for ARM processor. There is a special version of Windows RT, it can run on processors designed for using Android, but get the distribution for regular user seems an almost impossible task.
How to install Windows 8 on an Android tablet
So - if these are emulators: QEMU - provides for the installation of the graphical shell of Windows 95 and Windows 98, BOCHS - reproduces Windows XP SP3, aDOSBox - is intended for dos emulation on a tablet.
If the hardware of your tablet allows you to use the Windows 8 operating system, and this is usually the following models: Odeon TPC-10, View Sonic View PAD, Iconia Tab W500, Archos 9, 3Q Qoo – you can remove the old operating system and install new Windows 8 on Android tablet.
To do this you will need: a mouse, a keyboard with USB, and a bootable flash drive with the Windows operating system (you may also need a USB hub if the tablet does not have enough ports, and a USB Ethernet adapter if the new operating system does not see the tablet’s Wi-Fi, and you will have to download firewood for it from the Internet).
It is best to create a bootable USB flash drive using Windows 7 USB or Download Tool 1.0. In order to record the image you will need an 8 GB flash drive. We connect the drive to the computer, launch the program, and click next. We select a device so that the image is recorded on a flash drive and not on a blank.
Now you can go directly to the description of how to install Windows 8 on an Android tablet.
To begin, create backups all information stored on the tablet.
Then in the SETUP of the tablet, select boot from USB (the tablet’s manual should contain a description of how to do this. As a rule, you need to press and hold a combination of buttons located on the case). Next, we install the system by analogy with a computer.
After the OS is installed, download and install device drivers - touch display, adapter. Although it is possible that you will end up with a tablet that will work immediately after installation.
Even today, the operating room Windows system 8, which Microsoft sells to hardware, laptop, desktop and tablet makers, is firmly on its feet. Windows 7 was a high-quality result of Microsoft's painstaking work, which gained many fans. Start Windows 8.1 did not go so well, as a result, some people, upon learning that the tablet comes with , may refuse to purchase the device for this reason alone. And this is a big mistake. Windows 8 is the best and most advanced Windows version existing today, and the 8.1 update made the system even better. Even the Windows installation process has become easier with 8.1 than on previous versions OS. If you are going to install Windows 8.1 on your tablet, laptop or PC, our guide is for you.
If you purchased a tablet, laptop, or computer with Windows 8.1, you may need to install the OS. Here's how to set up your Windows 8 device and everything you need to know about the process.
Installing Windows 8.1 is quite simple. Microsoft makes most things easy for its users. There are a number of settings that appear shortly before installation. First of all, use old computer or tablet PC to find your Microsoft account username and password, if you have one. Almost all Microsoft products use a single account. If you don't have one, that's okay, no problem, you can create an account Microsoft entry at the installation stage.
Next, if you are upgrading from a previous Windows device, you must decide whether you want to transfer programs and settings to new laptop or tablet with Windows 8.1. If you don't have Windows 8.1 devices, you're fine. You should also have the network name and wireless Internet password handy, if you have one. Typically, this information can be found on the router/modem.
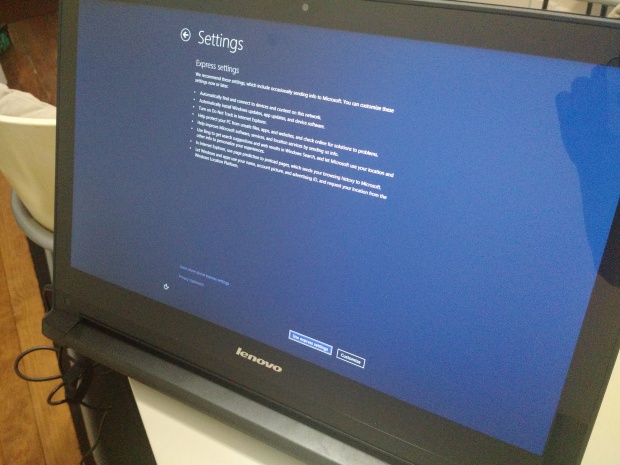
Lenovo tablet on Windows 8.1:
—
Let's start…
First, connect your Windows 8.1 device to the network. You must be sure that the tablet or laptop has enough power so that it does not turn off during the installation process. Power on your Windows device. Make sure you have your Wi-Fi and Microsoft account information handy so you can use it as needed.
The first thing you will see is the choice of region and installation language. It is important that you set these parameters correctly. Select your country, preferred language, and time zone before installing Windows 8.1 on your tablet, laptop, or PC. Then click the "Next" button.
You must now agree to the licensing terms for Windows 8.1. Click "I Accept" if you agree. You will not be able to install the operating system unless you agree to the licensing terms.
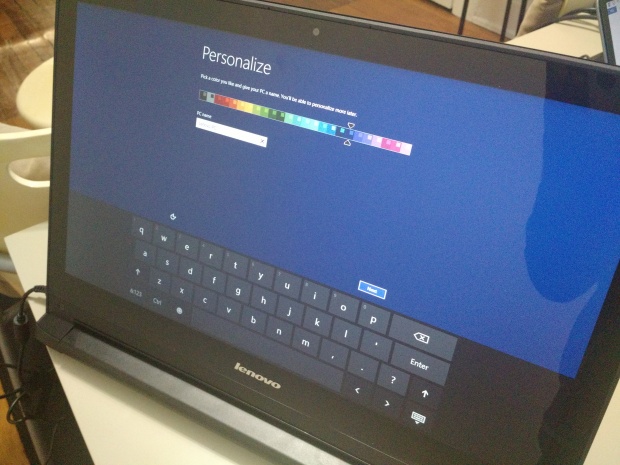
Click on one of the colored squares to choose a color scheme. Then click on the empty field to give your computer a name. You can name your computer whatever you want, and the default suggestions include options like "Family PC" or "My Laptop." You should give your tablet or laptop a unique name so that you can identify it online if you ever need to do so.
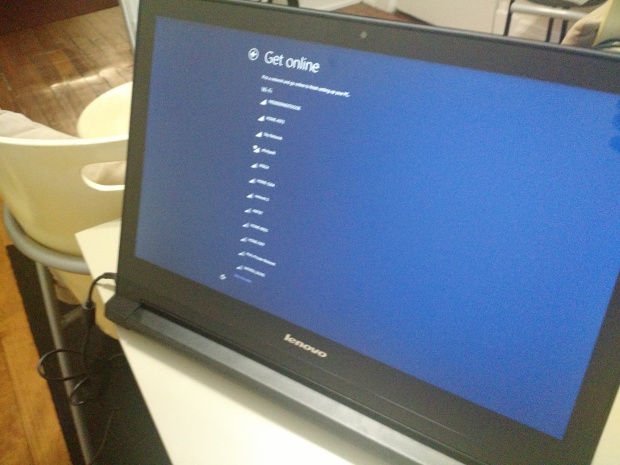
Select your wireless network. Then enter your password wireless network. Again, the password may be located, for example, on the bottom of your wireless router if it is configured by your ISP.
Click "Use" quick setup", To obtain automatic update and enable other privacy settings.
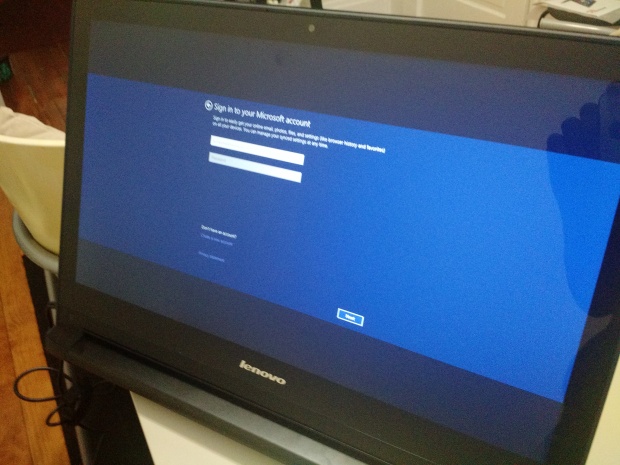
Now use your Microsoft account username and password if you have one. If you don't have a Microsoft account, create a new one by clicking on the appropriate button and entering your details. You can use the account you use to log in to others Microsoft products, including Xbox, Windows Phone or Outlook. It's important to use one account for all devices you own.
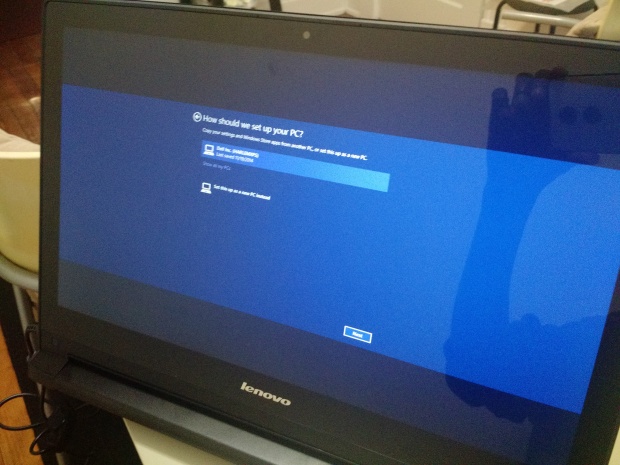
Now choose whether you want to transfer apps and programs from your previous device to Windows 8.1 or create a completely clean OS. If you've never owned a Windows 8 tablet, you'll need to select "Set up this PC as a new PC."
That's all. Windows will begin the installation process and then install all applications and games. If you decide to sync the system with the settings of another computer, the process will end in the next few minutes. New Windows users 8 will find a useful tutorial on how to effectively use their Windows 8.1 devices. The textbook works with a mouse, keyboard or touch screen.
Yours Account Microsoft links everything you do on Windows 8.1 devices. Programs are purchased for the entire account, as well as settings are saved automatically and linked to the account. If you ever have to install Windows 8.1 on your tablet again, you'll want to know that your account will keep all the software distributions you paid for, and the same with the music and videos you buy from the Microsoft Store.
Installing Windows 8 on a netbook or tablet consists of two processes: the process of launching the installer and, in fact, the installation process itself. The latter is no different from installing Windows 8 on regular computer. But the process of launching the installer is individual for each device.
Note
It should be noted that the considered Windows distribution 8 is designed for installation only on devices with x86 processors. It is not possible to install it on ARM devices.
A netbook is a little easier - it has a keyboard, so all you need is a flash drive onto which you write the Windows installer files. To install Windows 8 on your tablet, you will also need a USB keyboard and, possibly, USB adapter Ethernet to connect your tablet to the Internet. The fact is that after installing Windows, you may also need additional drivers: graphics adapter, touch screen, Wi-Fi, etc. You can, of course, download and place everything on the installation flash drive necessary drivers in advance, but this is only realistic if you know what to download and where to download from. And if you connect your tablet to the Internet, Windows 8 will independently download everything it needs.
First of all, burn the ISO image of Windows 8 to a USB flash drive, for which install the program Windows 7 USB/DVD Download Tool 1.0. The program is designed to record an image of Windows 7, but works great with Windows image 8.
Launch the program, select the ISO image and follow the program's instructions by clicking the Next button - everything is extremely simple.
Now all you have to do is boot from the received flash drive. On netbooks, to enter the boot media selection menu immediately after turning on the device, you usually need to press the key
Touch functions are not available when you install Windows, so get used to the keyboard - you use a key to move to the next interface element (switch, button, etc.)<Таb>, to the previous one - key combination +. A button is pressed using a key, provided that the button was previously selected using a key<Таb>. You can turn the switch on/off (for example, for a license agreement) with the key<Пробел>.
To complete the Windows 8 installation procedure, be sure to install all necessary drivers. We will not consider this process here, since the driver installation procedure is different for each tablet and netbook model. The most important thing is that you now know how to create a bootable USB flash drive, and I hope you can handle installing drivers without my help. Perhaps you can find it on the Internet detailed guides on installing Windows 8 specifically on your model of netbook or tablet.
So, you own a tablet running Windows 7. Would you like to try out the recently released Windows 8 on your tablet?
Windows 8 was designed for desktop computers, netbooks, laptops and tablets. All new settings and the Metro home screen have been specially designed for devices with touch screen. However, all Windows 7 devices are capable of running version 8 as well.
The tablet must meet the minimum system requirements required to install Windows 8. It is recommended to install only the 32-bit version if your device has random access memory less than 4 GB. In order for the new operating system to work fully on your device, carefully study its characteristics and check the amount of free memory.
It is common knowledge that 8 per tablet with flash memory is best method available for these purposes.
Once you have USB, connect it to your tablet. Change BIOS settings for (you may need to connect external keyboard To USB port to change these settings) and then follow the on-screen procedure until the tablet is completed.
Go to the website of your tablet manufacturer and install the necessary drivers for Wi-Fi, camera and other necessary functions.
It is also possible to install Windows 8 on your tablet at the same time as Windows 7 (you can use this method if your tablet does not have USB ports).
To implement this method, you must use a VHD (virtual hard disk) to boot Windows 8 correctly. Follow the above instructions using VHD instead of USB boot disk. This guide does not require installing bootable media, which is very important - some users believe that Windows 8 cannot be installed without a disk or flash drive.
Also you can 7 to version 8 on your tablet if your tablet does not have USB port. This is the easiest way to download OS version 8 on PCs and tablets.

In this case you should set ISO file to boot Windows 8 and run the setup.exe file to start the update procedure. When you upgrade from Windows 7 to version 8, you will be able to import all files installed programs and settings.
First of all, turn on the tablet and start the existing system. Complete all necessary documents and other data from your system disk. Make sure your tablet has a minimum of 20 GB of free space. Windows partitions 7 (before moving to the next step).
Download the version 8 ISO file. Download and install Virtual Drive.
Open a new one virtual disk from the My Computer menu, run setup.exe and follow the on-screen instructions to complete installing Windows 8 on your tablet. During installation, the system will ask you to select a partition for Windows boot 8. To update the operating system, simply select the partitions with installed Windows 7 (must have at least 20 GB of free space). The program will complete the installation automatically - just wait until the download finishes and restart your computer.